Ryan is a part-time DJ and full-time producer with over 15 years of experience. His interests span genres and includes everything from Classic Rock to EDM and Bollywood. He primarily works in Ableton, though he is also well-versed in Logic.
The Akai MPD 218 was launched alongside the MPD226 in 2015 as an upgrade from the ageing MPD18. Slimmer, cleaner, with better pads and enhanced compatibility, the MPD218 positions itself as a top-shelf drum machine. Does it meet the brief? Find out in this Akai MPD218 review.
Akai MPD 218 Review
The MPD 218 is a great secondary controller for making beats.
Build Quality: 3.8/5.
Performance: 4.2/5.
Value for Money: 4.5/5.
Overall Score: 4.1/5.
Akai Pro and drum machines are synonymous. The original Akai MPC, launched over 30 years ago, changed music completely. This was the first massively popular drum machine that ushered in the era of hip hop music.
Unlike the drum machines before it (like the E-mu SP1200), the Akai MPC was portable and affordable. It also eschewed the hard, plastic switches in favor of large rubber pads. The pads were way easier to tap and play – even in a live setting.
There’s a reason most hip hop producers are so attached to their MPCs. Countless hit songs have been produced or performed on the MPC. Dr Dre swears by them, as do Mark Ronson and Kanye West.
Akai has changed a lot in the last 30 years – it’s even changed ownership more than once. But the MPC remains one of the greatest pieces of musical gear ever created.
The MPD 218 is a direct descendant of the MPC. It’s a testament to the improvement in production technology that you can get the MPD218 for a fraction of the price of the MPC60 which was nearly $5,000 in 1988.
Just like the MPC60, the MPD 218, too, is a drum machine that doubles up as a MIDI controller. You can use it to bash out drum patterns and beats. Or you can use it to trigger automations and launch clips.
Since it’s powered off USB and weighs barely 1.5lbs, you can take it anywhere.
If you’re looking for a pad controller, the MPD 218 is likely high on your wishlist. In this detailed Akai MPD 218 review, I’ll tell you what’s good about it, what’s not, and whether it’s worth your money.
Quick summary:
Large and sensitive pads are perfect for finger drumming
Solid bundled software for creating MPC workflows
Tiny and lightweight – great for live shows
We use rigorous research, reviews, and real-world performance when recommending products. Our reviewers include producers, performers, and active musicians. You can read more about our review process here. Be advised that MIDINation might earn referral commissions on purchases made through this website. This does not affect your final purchase price.
Note: As an Amazon Associate, MIDINation earns commissions for qualifying purchases made through Amazon links on this page.
About your reviewer Ryan Harrell is the founder of MIDINation and an experienced producer/DJ. His first experience with electronic music production dates back to Cubase 3.0 in the summer of 1997, and he’s been a fan ever since. He prefers Ableton as his primary DAW these days, though he is still partial to Cubase and Pro Tools. He lives in San Diego and freelances as a producer and part-time DJ.
Akai MPD 218: At a Glance
If you’re in a hurry, refer to this graphic for a quick overview of the MPD 218 and its pros and cons. You can also see the results of a quick poll where I asked MIDINation readers to vote whether they would recommend the MPD 218 to their friends.
For the rest of the Akai MPD 218 review, read on.
Build Quality & Design: 3.8/5
Overall design:The MPD 218 is completely different from its predecessor, the MPD 18. And that’s a good thing. Because this unit is slimmer, has thicker rubber pads, is backlit, and is way smaller and lighter. You can lug it around anywhere – it’s barely half the weight of a Macbook Air. And it’s completely USB powered for easy portability.
Aesthetically speaking, the MPD 218 is miles ahead of its predecessor. The sleek all-black body with red tinged pads and backlights looks gorgeous. The soft edges and brushed finish of the rotary knobs looks great as well.
Let’s do a deep dive into the build quality and design.
Portability: The Akai MPD 218 scores big on the portability. It’s small – smaller than a small laptop. It’s also thin – at its thickest, it’s barely 1.5″ thick. At 1.6lbs, it’s marginally heavier than an iPad.
Powering the MPD 218 is easy – you just have to plug it into a USB port.
All of these make it one of the most portable pad controllers you can buy. You can drop it into your backpack and it will feel like you’re carrying an extra iPad around. I seriously recommend this if you plan to carry a pad controller to your gigs or jam sessions.
Build quality: The old Akai MPCs were built like tanks. Some of the old MPC60s are still going strong today after years of abuse in live gigs.
The MPD 218 isn’t anywhere close to that of course (remember that the MPC60 cost $5,000 in 1988 – ~$10,800 today), but it is still well-built. The pads are delightfully large and thick. The rotary knobs have decent heft. Twist them hard and they show sufficient resistance. I’ve been guilty of turning rotary knobs too hard during live gigs, but these feel like they can tae some damage.
The red backlit pads on the all-black chassis looks good but neutral
If I had to point out a con, it would have to be the chassis, which uses hard plastic. I can understand why Akai chose to go with this plastic to cut down on costs and weight, but I would have preferred if the top of the chassis had some metal or tougher plastic.
Design: Aesthetically, I can’t complain much about the Akai MPD 218. The all-black chassis with red highlights looks good in any setting. Switch it on in the dark and the backlit pads look sufficiently futuristic. It’s not nostalgically retro like the Arturia BeatStep, but it’s a design that won’t go out of fashion any time soon. I can’t complain – it’s neither gorgeous nor ugly, but perfectly acceptable.
Conclusion
The Akai MPD 218 won’t withstand a nuclear blast (I’m dead sure the old MPCs would). I also have some reservations about the quality of plastic used in the chassis.
But when you consider its price and the build quality of the competition, the MPD 218 is perfectly above average or even “good”.
Where it wins is in the portability and pad quality. The pads are easily the best in class (more on this below) while the small dimensions and low weight make it as portable as an iPad.
To sum it up:
Small size and low weight make it extremely portable
Great build quality on the knobs and pads; average on the chassis
Pads are best in class and a delight to use
Design is inoffensive and won’t cause anyone any issues
Overview: As I noted earlier in this Akai MPD 218 review, this is a pad controller. A pad controller is essentially a MIDI controller that replaces black/white piano keys with pads. You load up sounds in each blank pad with the included software. To launch a sound, you just have to tap the right pad.
How you use the Akai MPD 218 – or any other pad controller – is up to you. For the majority, the pad controller doubles up as a drum machine. The large, responsive pads are ideal for finger drumming.
But that’s just the tip of the iceberg. Thanks to three separate banks, you can store, well, 48 sounds and clips on the MPD 218. I’ve seen Kanye in show use his pad controller (an old MPC) to launch different clips from ‘Runaway’. He would then use a separate bank on the MPC to ad lib beats on the chorus. Heck, I’ve even seen folks load up piano notes on the pads and use the MPD as a piano (not that I recommend it!).
The good news is that the MPD 218’s pads are responsive enough, and the control options vast enough, that you can use it practically to run an entire show by itself. This is an important consideration if you plan to take this thing live.
On that note, let’s dive into the details in this Akai MPD 218 review.
Pads: Let’s talk about the number one thing you’re buying this unit for – the pads!
I’m pleased to say the pads on the MPD 218 are as good as they come. They’re large and velocity-sensitive. The rubber feels very tactile and responsive. They pop out just enough from the chassis to be playable, but not so much that pressing them down will take effort.
Finger drumming on this thing is a joy. The sensitivity makes it easy to lay down intricate hats, and they’re durable enough that you can hammer them down for kick/snare patterns.
I also have to point out the texture of the rubber. I’ve seen pad controllers where the rubber is too smooth. In a live gig with sweaty hands, that can be a problem. Thankfully, these pads have a sticky texture – great for sweaty, slippery hands.
A cool feature I should mention is the “Full Level” toggle switch. Switch this on and the MPD 218 temporarily switches off the velocity sensitivity on the pads. That is, every hit will have 100% volume. This is great if you’re laying down core elements (like kicks/snares) or if you’re using the MPD to trigger clips/loops.
Tap the “Full Level” button and all the hits will be at 100% velocity – great for triggering clips or laying down core kick/snare patterns
I have to point out a few negatives. For starters, there is no option to change the velocity sensitivity. I understand that Akai has arrived at the “sweet spot” of ideal sensitivity for most users, but there might be some who want to change things around. The default setting works fine for 99% of users, yet, the 1% – especially power users – might feel left out.
A simple software setting would have been nice to have.
Two, because the rubber surface of the pad is sticky, not smooth, this thing will attract a lot of dust. Be prepared to clean it every couple of days if you live in a dusty area. Not a deal breaker, of course, but something you should nonetheless be aware of.
And finally – though this isn’t universal for all users – I have read far too many complaints of pads getting triggered automatically. Usually happens at very low velocity levels so it’s not enough to ruin a performance, but it’s an issue nonetheless. Some users have reported that loosening the screws on the back of the device slightly seems to fix the problem. It’s also an issue that seems to have plagued the pre-2018 models, so it seems that Akai has fixed it.
Knobs: Technically, as Akai calls them, these are “potentiometers”, but I just call them knobs because that’s way easier. The knobs let you control different parameters like volume, panning, reverb mix, etc. You can configure these parameters in the bundled software (more on that below).
The build quality of the knobs is acceptable. They have enough resistance that you won’t accidentally push them all the way up. They also turn enough that you can use them for slow buildups.
If I have one complaint, it’s about the thickness of the knobs. The knobs are slightly too thin in the middle for my fat fingers. You feel like you’re pinching, not grabbing them. Slightly thicker knobs would have felt better while performing.
Expandable banks: A quick feature I should highlight is the expandability. The MPD 218 supports three banks of sounds and parameters for the knobs. This essentially gives you 48 pads (16×3) and 18 knobs (6×3). The banks also make it easy to organize your sounds. For instance, I usually have one bank for my drum sounds, one for triggering clips, and one for playing chords.
Software: The MPD 218 ships with Akai MPC Beats software. This software recreates the legendary MPC workflow and is the heart of the MPD experience. I’m happy to say that this software, despite some compatibility issues on Windows 7, is fantastically powerful. You can load up your sounds or use the nearly 27GB of samples that ship with your MPD. It supports AU/VST plugins right out of the box. And it has time-saving features like ‘Auto Populate’ to quickly fill up parameters.
The pad bank lets you create 3 separate banks of sounds and parameters, effectively giving you 18 parameters and 48 pads
Apart from MPC Beats, the MPD 218 also ships with SoniVox drum suite and Ableton Live Lite. These are nice to have but nearly every MIDI controller these days offers these bundles, so it’s not a groundbreaking deal.
Integration: The MPD 218 has great integration with most modern DAWs, even some free ones. I tested it on Logic and Ableton Live and it was automatically detected by all of them. Integration is slightly more tricky in Cubase and FL Studio, but there are clear instructions on Akai’s website on how to go about it.
Conclusion
To conclude this section of our Akai MPD 218 review, I would say that this device performs well where it’s truly necessary – the pads and playability. These are, to put simply, the most fun pads to use in this price range. The sensitivity is just right and the size is ideal for 99.9% of people.
There is also substantial expandability thanks to three banks of sounds. The included software suite – MPC Beats – is robust and fast.
Minor complaints aside – the accidental triggering of the pads and the thinness of the knobs – I found the performance to be well worth the reputation.
Akai MPD 218 Review: Overall Score: 4.1/5
Akai’s musical gear is rarely ever perfect. Some of the controllers suffer from mediocre build quality. Some others have sticky pads. And some have tightly wound keyboards.
But what Akai has managed to do really well is focus on the core of what makes a good controller. So a pad controller will have great pads, and a DAW controller like the MPK249 will have great DAW integrations.
This is true for the Akai MPD 218 as well.
Sure, the chassis feels too light and flimsy. And sure, there is a pesky accidental triggering issue on some older models.
But on the whole, the MPD 218 does its core job really well. The pads have fantastic, pitch-perfect sensitivity. They are perfectly sized. And included software suite is extremely easy – and fast to use.
For the price, I can’t think of a better pad controller.
For these reasons, I would recommend the Akai MPD 218, especially if this is the only pad controller you’re going to buy.
What’s good:The Akai MPD 218 does what it’s supposed to do – act as a beat-making tool – really well. The pads feel great and the entire MPC workflow is very fun to use.
Good build quality on the pads
The velocity sensitivity is just right
Lots of expandability thanks to 3 sound banks
Neutral aesthetics that won’t turn off any user
The included software is easy to use
Solid integration with most modern DAWs
Perfect size and weight for carrying around to gigs
Smart features such as MPC Note Repeat and Full Level
What’s not good:For all the things the MPD does right, it also gets a few things wrong:
Accidental pad triggering is an ongoing issue
Flimsy and lightweight chassis
Some compatibility issues on Windows 7
The knobs are slightly too thin
My recommendation: If you have the budget, the Ableton Push 2 would be my no. 1 choice for a pad/DAW controller. For most people, however, the MPD 218 would be the cheaper – and better alternative, especially if you’re strictly looking for a beat maker/drum machine. If there is only one pad controller you can buy and you’re working with a limited budget, this should be your #1 choice.
Thanks to the EDM explosion, DJ controllers are now cheaper than ever. Even a small budget can get you access to some surprisingly competent gear. In this guide, we’ll look at some of the most affordable option in the market with our pick of the best DJ controller under $200.
Our Top Picks
Best for everyone: Numark MixTrack Pro 3 “Tight integrations and surprisingly solid hardware in a user-friendly design”
Best performance pick: Pioneer DJ DDJ-400 “Stretch your budget a little and you can get a fantastically competent Pioneer”
When I first started DJing in my basement as a teenager, buying a DJ controller meant hunting through Craigslist for used, barely functional gear.
That has changed drastically today.
Blame it on the EDM explosion, but DJ controllers have never been cheaper or better. While storied brands like Pioneer still rule the market, extremely competent offerings from brands as diverse as Numark and Behringer and Hercules deliver fantastic performance at affordable prices.
In fact, even if you’re working with an absolute beginner’s budget of say, $200, you can get gear that would put 10-15 year old $1,000+ DJ controllers to shame.
The question is: what’s the best DJ controller under $200 you can buy right now?
I’ve got some answers below.
(Note: Some of these controllers might not fall strictly under the $200 budget limit, but with discounts and deals, you can often hit that mark easily.)
We use rigorous research, reviews, and real-world performance when recommending products. Our reviewers include producers, performers, and active musicians. You can read more about our review process here. Be advised that MIDINation might earn referral commissions on purchases made through this website. This does not affect your final purchase price.
Note: As an Amazon Associate, MIDINation earns commissions for qualifying purchases made through Amazon links on this page.
About your reviewer Ryan Harrell is the founder of MIDINation and an experienced producer/DJ. His first experience with electronic music production dates back to Cubase 3.0 in the summer of 1997, and he’s been a fan ever since. He prefers Ableton as his primary DAW these days, though he is still partial to Cubase and Pro Tools. He lives in San Diego and freelances as a producer and part-time DJ.
Cheap DJ controllers often tend to be gimmicky and poorly built. But the Numark MixTrack Pro 3 exceeds all expectations and offers the performance of DJ controllers priced 4-5x higher. Fantastic jog wheels, robust Serato compatibility, exceptional build quality and plug-and-play ease of use make it a top option for any beginner.
Throw in an affordable price tag, a responsive crossfader, and Numark’s trustworthiness and you have the best DJ controller under $200 you can buy right now.
The Numark Mixtrack Pro 3 is a budget controller that sports a wide variety of features and delivers a solid performance. Some of the key features you will enjoy upon getting this controller include Multi-functional touch strips for quickly scrubbing your tracks, two Channel controllers and three Bands EQ for filtering out low/high frequencies in the tracks, Long-throw Pitch controls for keeping beats in perfect sync, to mention but a few.
That being said, it will please you to know that this USB powered-controller is 100% plug and play and it also has a beginner-friendly layout. All the functions on this controller are carefully-arranged and they are very easy to operate, making it a great choice of controller for aspiring and mobile DJ’s.
Another strong point of the Numark Mixtrack Pro 3 is that it is very simple to set up, not forgetting that it also has a very sleek, robust and wide shape for ease of use.
Overall, if you are looking for the best DJ controllers under $200, the Numark Mixtrack Pro 3 is definitely a go-to area because it delivers real value for money.
What we don’t like
Supports only RCA master output
Does not have Dry/wet setting for effects
Recommended for: Beginners and mobile DJs looking to buy their first DJ controller.
Integrated built-in audio interface and Intelligent Music Assistant
Two-deck control with capacitive jog wheels
2x RCA and 3.5mm Headphone Output
Compatible with DJUCED software
Beatmatch guide and onboard video tutorial
Two-channel mixer section with 2-band EQ and filter
The Hercules DJ Control Impulse 200 is again one of the best DJ controllers under $200. It has a two-deck control with capacitive jog wheels and is controlled by DJUCED software. That being said, it will interest you to know that this controller is packed with a wide variety of unique features that will make learning easier for you.
To start with, the controller 5 and built-in tutorials that comes with this deck allows you to learn how to mix in a jiffy while the 8 pads and 8 modes (hot cue, roll, FX, sampler) will help enhance your creativity.
It is worthy to note that this controller is also seasoned with a lot of comprehensive tutorial videos to help you learn the fundamentals of DJing and improve your skills while the light guides on the controller assist you in learning the right moves.
Another important feature in the Hercules DJ Control Impulse 200 is the Intelligent Music Assistant (IMA) which helps you pick the best songs to play. To enjoy this feature, all you need do is to press the assistant button, and it will automatically suggest songs based on what you have playing currently and what songs you have in your DJUCED library.
Having said the above, it is worthy of highlighting that this controller comes in a premium-looking design and the layout is carefully crafted with beginners in mind, making it an ideal deck for those willing to get started with DJing
What we don’t like
iTunes is required to upload to the controller
Recommended for: Beginners and aspiring DJs working on a tight budget who need a full-fledged DJ controller.
Pros
Easy-to-control jog wheels, knobs, and faders
Premium-looking design
Very easy to set up
IMA suggests tracks from your library
Cons
The manual is not that helpful for a beginner
Takes time to be acquainted with all the functions of the controller
Built-in sound card with plug and play connectivity via USB cable
Full 3 band EQ with dedicated high/low pass on each channel
Larger pitch faders and the loop buttons
Generous Rekordbox DJ license key
Extremely lightweight and compact
The Pioneer DDJ-400 might not strictly fit the budget requirement, but it deserves a mention simply because of how good it is, especially given the only slightly higher price tag.
The Pioneer DJ DDJ-400 is an entry-level deck seasoned with contemporary digital DJ controls and performance features found on pricier DDJ controllers. Part of the things that make this deck worthwhile is the fact that it comes with all the key buttons, pads and knobs that will ignite your experience, and this includes full three-band EQs plus dedicated high/low pass on each channel, responsive and touch-capacitive two jog wheels, 8 performance pads per deck, filters volume faders, trim pots, loop buttons, to mention but a few.
Still on the plus side, it will please you to know that the Pioneer DJ DDJ-400 is designed with newbies in mind such that the layout is well arranged and you can easily set up the deck even as a beginner. Also, this DDJ controller Rekordbox DJ license key, which gives you access to the tutorial section where you can quickly learn the basic tutorials you need to develop your skills as a first-time DJ.
More importantly, this deck has an extremely lightweight and portable design, which means you can easily take it along with you almost anywhere you go.
Overall, the Pioneer DJ DDJ-400 is a feature-filled, cheap controller for first-time DJs who wants to learn the basics of DJing, and professional DJs who are in search of a portable deck they can use at their leisure.
What we don’t like
Can only apply one effect to one output at once via the hardware
Below-average tech support from the manufacturer
Recommended for: First-time and DJs graduating from rank beginner to intermediate level; performance-focused or serious beginners.
Portable two-channel DJ controller for Serato DJ Intro
Built-in audio card with headphone cueing for creating a perfect mix
Standard midi mapping for use with other popular DJ software
Dual-stereo audio interface
1/8 inch Headphone output and 1/8 inch main output
Song navigation and channel and master gain control
The Numark DJ2GO2 is an ultra-compact, pocket-sized DJ controller that comes with virtually all the key functions you need to learn the basics of mixing, coupled with some other intriguing features that seasoned professionals may find noteworthy.
The deck comes with a tiny two-channel controller for easy blending and each channel sports a small jog wheel, sync, cue and play/pause buttons, a volume knob, a pitch fader for beatmatching, four auto beat loop buttons(2,4,8,16 beats), and Manual loop(in, out, cancel, reloop).
Additionally, the Numark DJ2GO2 also features four performance pad buttons per deck, all of which have 4 distinctive pad modes, namely Cues [for setting hot cues in Serato DJ], Auto and Manual loop [for setting loop in and loop out points] and Sampler [for triggering sounds from Serato DJ’s sample banks]
Some other interesting controls that come with this ultra-compact controller include crossfader, master and cue volume knobs, dual-stereo audio, headphone output, browse knob, built-in sound card with master gain, all of which makes it one of the Best DJ controller under $200.
Overall, the Numark DJ2GO2 might be your best bet if you are a beginner looking for a decent and affordable controller to start your DJing career. It is also perfect for pro DJs who need a backup for gigs.
What we don’t like
You can’t control Serato effects from the controller
The jog wheels are not touch-sensitive
Recommended for: Casual DJs and beginners; DJs who want a portable controller to use on the go; experienced DJs who want a second controller for mobile use
Pros
Extremely compact
Responsive Browsing knob
Perfect Crossfader with even curve, easy to blend tunes
2-channel mixer with 3-band EQ, each with a dedicated filter control
Touch-sensitive and high-resolution jog wheels
RCA master outputs and 1/8″ headphone output
8 multi-function RGB pads per deck
1/4″ microphone input with Gain control
USB/MIDI software controller with built-in professional 24-bit PC/MAC audio interface
The list of the best DJ controller under $200 would be too shallow without this amazing controller –Gemini Slate-2. Here’s why:
The Gemini Slate-2 Channel Slim Virtual DJ Controller is a compact audio interface fully equipped with RIB backlit pads, a newly designed capacitive jog wheel and an overall familiar layout design that feels comfortable for all DJs from beginners to expert spin stars.
Some of the DJ tools that come handy with this controller include pitch fader, key-lock, and advanced effect controls that make it easier for you to operate. That being said, this controller also sports a wide variety of functions, including the 8 multi-colour pads (per deck) control features such as hot cues, sampler, and on-the-fly auto loops in colour-coded detail. The built-in 2-channel mixer gives you access to the equalizer and dedicated filter controls.
In addition to the above, the stereo master RCA outputs, one 1/8″ headphone output, and one 1/4″ microphone input are located on the left side panel. Also, it includes Serato DJ Intro and is compatible with Serato on PC, and Mac computers. The full 2-channel mixer gives you constant access to the EQ and dedicated filter controls. The fully MIDI mappable and high-resolution controls give the SLATE the ability to easily be adapted for use with any of your favourite DJ applications.
Another thing you will enjoy upon getting the Gemini Slate-2 Channel Slim Virtual DJ Controller is that it comes in a thin but extremely strong enclosure that makes it very durable, as well as quite portable for those long periods on the road.
For Serato users, this is arguably the best DJ controller under $200 you can buy.
What we don’t like
Small jog wheels and sliders
Very short-throw pitch faders
Recommended for: Mobile DJs, Club Installations or those looking for backup gigs; Serato users
Pros
Very easy to use, even for beginners
Compatible with Serato and has Pre-mapped FX controls for Serato DJ Intro
Excellent MIDI mapping functionality
Responsive controls with high-resolution 14-bit Midi
Cons
Small jog wheels and sliders
No gain controls and other related external inputs
Large 6” touch-sensitive high-resolution control platters for precise control
Slim tabletop design for ultimate portability
Compatible with other BEHRINGER CMD controllers for full expandability
The Behringer CMD STUDIO 4a is a 4-deck and 4-channel (audio interface) feature-rich, table-top style DJ controller equipped with all the standard features you’d love to see in a controller. Being full of useful functionality, the controller is considered by most an entry-level option with a very affordable price.
The Behringer CMD STUDIO 4a comes with all the tools you need to learn the basics of DJing. This is no crippled budget controller; Studio 4A has similar features to what you™ll find on bigger, more expensive controllers. It has lots of LED feedback, a decent built-in audio interface, plenty of hot cues, Industry-standard fader sizes, properly proportioned jog wheels, a built-in sound card, which makes it one of the best DJ controller under $200.
What we don’t like
Noticeable jog latency
The occasional hiccup of internal soundcard in ASIO mode
Recommended for: Beginners who use VirtualDJ
Pros
4 deck control and 4 Fx banks
MIDI-reactive controls and Backlit buttons
Long-throw faders for beat matching
Cons
Noticeable jog latency
RCA out only
The occasional hiccup of internal soundcard in ASIO mode
That wraps up our list of the best DJ controller under $200. Regardless of your budget or requirements, you should find an option that fits your needs above.
If you’re learning to play piano, a MIDI keyboard can be an affordable alternative to a full-fledged digital piano. While you will have to make some compromises, the low cost makes it possible for anyone to pick up a MIDI keyboard and start learning. This article looks at the best MIDI keyboard for learning piano you can buy right now.
I’ll be honest: this is a confusing topic to write about.
Nominally, “MIDI keyboard” usually means a controller (such as the Akai MPK Mini) without any built-in sounds that you use to control a DAW. Originally, these keyboards used to have MIDI-only ports (hence the name), but virtually every modern MIDI keyboard has USB as well.
Which basically means that they are not just “MIDI keyboards”, but also “USB keyboards”.
But most digital pianos, workstations, and synthesizers also have USB and MIDI, and they have built-in sounds. You can very well connect your Yamaha digital piano to your computer and use it to control your DAW.
So when I was shortlisting keyboards for this roundup, I had to wonder: should I focus only on MIDI keyboards, or should I include synths, digital pianos, and workstations as well? What really is the difference between them at all since technically they can all be used as MIDI keyboards?
Which is why this review includes every kind of keyboard on the market – MIDI-only keyboards, digital pianos, and even workstations.
The one thing they have in common is that they’re great for learning piano.
So with that disclaimer, let’s look at the best MIDI keyboard for learning piano you can buy right now.
We use rigorous research, reviews, and real-world performance when recommending products. Our reviewers include producers, performers, and active musicians. You can read more about our review process here. Be advised that MIDINation might earn referral commissions on purchases made through this website. This does not affect your final purchase price.
Note: As an Amazon Associate, MIDINation earns commissions for qualifying purchases made through Amazon links on this page.
About your reviewerRyan Harrell is the founder of MIDINation and an experienced producer/DJ. His first experience with electronic music production dates back to Cubase 3.0 in the summer of 1997, and he’s been a fan ever since. He prefers Ableton as his primary DAW these days, though he is still partial to Cubase and Pro Tools. He lives in San Diego and freelances as a producer and part-time DJ.
Roland makes some of the best keyboards in the world, and the GO-61K is no different. This affordably priced keyboard is halfway between a digital piano and a MIDI keyboard. It has Bluetooth connectivity for hooking up with your smartphone or tablet, and it can also be used as a regular MIDI keyboard.
But unlike a MIDI keyboard, it has 500 built-in sounds. It also has speakers so you can learn piano without hooking it up to a computer. The key quality is great, especially considering the price. And it’s a personal preference, but I quite like the red color – helps it stand out against the sea of black/gray keyboards in this space.
This portable keyboard is one of the best MIDI keyboards for learning the Piano. I love the intuitive design that makes it clear right off the bat that beginners will find it easy and pleasurable to use. Coming in at a mere 4 Kg, this keyboard is quite portable and gets around fairly often. You can carry it wherever you go without any problems. It has port and I/O that widens the range of stuff you can do with it.
Aside from that, it comes with Bluetooth options. Create your music on this MIDI keyboard and play it to selected entertainment systems that have Bluetooth capabilities. As a mark of the portability, this keyboard not only runs on electricity but can use AA batteries too.
The features of this keyboard ensure that all and sundry can use it with ease. As it comes with 500 pre-installed sounds, there is virtually no limit to the music you can mix and produce. The sounds are from Juno DS’s experienced synthesizers. While in use, I observed the clarity and realistic nature of these sounds.
A feature that I am quite sure new users and beginners will find appealing is the Loop Mix. With this feature, you can add sounds that will be played on a loop and make it easy for them to make music.
What we don’t like
Well, as a “proper” player, I found the keyboard too simple for my tastes.
Recommended for: This keyboard is recommended for beginners. The simple interface and features make it easy to master.
The Yamaha P45 is a digital piano from Yamaha that sports a great build and that comes with 88 weighted keys.
As it is an entry-level keyboard, I didn’t expect much in terms of design and performance from the P45. Nevertheless, while it doesn’t exactly take the breath away, it is still a remarkable budget option. The Yamaha looks solid. It does not come with any bells and whistles; rather, it sports a simple yet professional look. You have no doubts with the Yamaha P45; it is a piano that simply encourages you to play.
It is encased in plastic. The matte finish makes it look sturdy, and indeed, as I carried it, I could feel the strength of construction. It is a keyboard that with proper care will last for a long time. Unlike other pianos on this list, the Yamaha comes in just 2 color variations: black and white.
The solid build does not imply that it is clunky or has to be lugged around. The Yamaha is meant to be carried around. Hence the design screams portability. Set up is very easy. It comes with a stand that ensures the safety and efficiency of this keyboard.
The keys are not made of wood, which isn’t exactly surprising: it is a budget level keyboard after all. Instead, they are made of plastic. Nevertheless, they are well built and firm. I loved the realistic feeling I got from the keys. This is likely because these keys come with an actual hammer to weigh them down.
If you do not like the touch sensitivity of these keys like I didn’t, the option to adjust them is present. I used this feature and got a level I found very satisfactory.
As for the sound of this Piano, it is quite good. This is even more remarkable when you remember that it is an entry-level piano. It comes with different instrument sounds like Grand pianos, Vibraphone, Strings, and others.
What we don’t like
The Piano’s key action lacks more than 2 sensors. Hence, when I tried playing fast repeated notes and controlling the sound, I found it really hard.
Recommended for: This Piano is for beginners and intermediates. Any player above this level might find it too simple.
Pros
The sound is excellent
The keys are weighted and offer a professional feel
This keyboard from Alesis continues the company’s tradition of producing quality keyboards that have a great design, and that can stand the test of time.
It comes with 88 full sized keys. These fully weighted and sensitive keys are great to touch. I found them great and easy to use. Furthermore, their being fully weighted indicate they have a professional feel. Longtime players and beginners looking to experience the weight of professional keyboards will feel comfortable with this keyboard.
The Piano comes with a feature that correlates the amount of force used on a key with the amount of volume generated. Therefore, the harder you press on the keyboard, the louder and sharper the sound becomes. This makes for interesting sounds for players that have the slightest ounce of creativity.
The keyboard comes with customizable sensitivity levels. On a keyboard with already sensitive and responsive keys, this is great.
It comes in a small, portable size. The portability is further strengthened by the option of using D-cell batteries on the keyboard. It is also AC powered.
The Piano comes with 12 pre-installed voices and 3 effects: modulations, reverb, and chorus. Considering the price of this entry-level Piano, it has many rich features. It comes in 2 modes, the lesson mode, and the split mode. It also has the metronome feature and the transpose feature. Aside from the standard pitch and mod wheels, the keyboard comes with some other buttons like the octave up and octave down buttons that help users to extend the note ranges of the keyboard.
It is compatible with a host of software and MIDI hardware devices. It comes with Ableton Live Lite that gives you even easier ways of producing great music. Altogether, the features and the design make this a very satisfactory keyboard.
What we don’t like
Sound quality from the Alesis Q88 is slightly disappointing.
Recommended for: If you are a beginner looking to get into learning the Piano, but you do not want to spend a lot of money, this feature-rich keyboard will serve your needs.
Fresh from out of the box, it is clear that this new keyboard from Roland means business. Unlike previous keyboards that I used in the Fantom series, there are no bells and whistles attached to this keyboard. The design is minimalistic and straight to business. The keyboard comes with 88 keys, each of which is weighted. While testing, I observed the responsiveness of each key is quite impressive. Considering that this is a weighted keybed, I found the keys fast and great to use. I do not predict player fatigue as a result of the keyboard.
The interface of the keyboard is set on a large LCD panel. The panel houses navigation buttons, a scroll wheel, and other buttons and knobs. All the main settings can be found on the LCD panel.The high-quality of the LCD panel is a testament to the level of detail and attention put into creating this keyboard. The layout is never redundant, and every single layout is meant to make it easier to use.
On the left side of the panel, there is a sound modification area. On this side, 6 knobs exist, with each knob fully customizable and controlling different sound effects. As a controller keyboard, it has a DAW control button. This can also be found on the left-hand module of the keyboard.
Moving on to the right side of the keyboard, you have the arpeggiator which is flanked by the chord control. These are fully customizable to ensure ease of use. You have many tweaks you can make here. There is also a tap tempo button, which I found to be a nifty addition to the keyboard. All these buttons, knobs and controllers are found on this bad boy, along with other controls.
Moving on to the connections, it is clear that Roland has discarded fancy and ultimately pointless parts in favor of more practicality. The keyboard has a host of connections that I found very useful. At the rear of the keyboard, you will find 2 balanced and 1 unbalanced ¼” outputs, a sub out, an SDHC slot, a pair of USB ports, and many other connectors.
The sound that emanates from this keyboard is mighty impressive. Roland is known for churning out keyboards with impressive sounds and does so once again with the Roland FA-08 88. The synthesis engine on this baby is quite good. It has a 128-note polyphonic synthesis engine. There is a slew of instrument sounds that accompany the keyboard. From drums to guitar, the number of represented instruments is quite great.
As for the effects on this keyboard, they are no less impressive. You have a high degree of control over the tones and Studio Sets. One feature I liked is the way the keyboard allows you to have a Studio Set with a multi-effect for each. You can choose from the over 60 effects on the keyboard. The sequencer allows you to sequence up to 16 tracks, which is really remarkable.
Overall, this workstation is very impressive.
What we don’t like
The keys on this keyboard are not velocity-sensitive. The lack of a touchscreen on the LCD is another gripe I had.
Recommended for: It is an ideal keyboard for any music producer with a reasonable budget.
This entry-level keyboard comes with 88 fully sized and weighted keys that give the feel of a more expensive piano.
It comes in a matte black décor. This makes it look compact and more professional than its more flashy contemporaries. It is lightweight and can be carried around with ease. Nevertheless, it won’t fool anyone into believing it is more than a budget option.
On the panel of the keyboard there is a Power Switch, the standard effects buttons, Metronome mode, Reverb mode, the Split mode and a host of other buttons. It lacks a screen which is a bummer but is not surprising at this price. The rear panel of the keyboard features a number of ports for connectivity. There is a MIDI port, sustain jack and other I/O.
On first sight, it seems Williams is out to make the cheapest keyboard on the market and sell as many units as possible.
This is underlined by the tacky looking design and the horrible plastic housing. The buttons, knobs, and design look cheap. The semi-weighted keys of the keyboard feel like the normal keyboards on the market. The plastic keys feel super-cheap.
During testing, despite the bad aesthetics of the keyboard, it surprisingly doesn’t sound as bad as it sounds. It sounds warm and of acceptable quality. As it is still a low-entry device, the speakers cannot compete with the sound obtained from bigger and more expensive keyboards. The speakers sound bad and do not allow you to enjoy the full range of sound.
What we don’t like
Well, as this is a budget device, Williams has decided to eliminate features that would increase the price. For instance, it lacks a screen and recorder. The keys are also not graded and feel more like organ keys than piano keys.
Recommended for: It is solely for beginners and no one else.
Pros
Super cheap
Battery powered and low weight increases portability
There are a lot of MIDI keyboards around that are fantastic for learning piano. Some offer more than just MIDI out and even double up as entire workstations and digital pianos.
We’ve covered some of the best MIDI keyboards for learning piano in this roundup. Pick the right option for your needs from this list and start jamming!
The Yamaha P125 is the most recent update in Yamaha’s legendary P series of mid-range digital pianos. An upgrade to the ever popular P115 (and before that, P105), this keyboard adds new features, better speakers, and a smart app for beginners as well as serious pianists. Find out if this is the perfect digital piano for you in this Yamaha P125 review.
Yamaha P125
Portable mid-range powerhouse
Build Quality: 4.2/5
Performance: 4.4/5
Value for Money: 4/5
Overall: 4.3/5
Yamaha’s P series has to be one of the most successful line of musical equipment ever made. The P95 was a critical and commercial hit, the P105 drastically reduced the weight (we reviewed it here) and the P115 added new smart features.
The P125 is the latest iteration in the P series. Launched in early 2018, it’s Yamaha’s mid-range flagship and remains one of its most sought after digital pianos, especially among serious pianists.
While not much has changed in terms of build quality or the sound engine, Yamaha has added better speakers and paired everything up with a very handy smart app. It’s not a revolutionary upgrade, but an evolutionary one. Truth be told, this is what I expected when the P125 was first announced – the P115 was already touching the limits of what’s possible in a mid-range digital piano and there wasn’t much room to revolutionize the keyboard further.
Is this upgrade worth the money? Are the new speakers truly better? What kind of buyer will the P125 appeal to?
Find out in this Yamaha P125 review.
Quick summary:
GHS action keys and Pure CF sound engine sound as good as ever
Surprisingly low weight for its size
Best-in-class speakers create a rich aural experience
New smart app is a great addition for beginners
We use rigorous research, reviews, and real-world performance when recommending products. Our reviewers include producers, performers, and active musicians. You can read more about our review process here. Be advised that MIDINation might earn referral commissions on purchases made through this website. This does not affect your final purchase price.
Note: As an Amazon Associate, MIDINation earns commissions for qualifying purchases made through Amazon links on this page.
About your reviewer Ryan Harrell is the founder of MIDINation and an experienced producer/DJ. His first experience with electronic music production dates back to Cubase 3.0 in the summer of 1997, and he’s been a fan ever since. He prefers Ableton as his primary DAW these days, though he is still partial to Cubase and Pro Tools. He lives in San Diego and freelances as a producer and part-time DJ.
Yamaha P125 Review: At a Glance
Here’s everything that I think about the Yamaha P125 review in one glance. Use this if you’re in a hurry or want something for reference later.
For a more detailed Yamaha P125 review, read on.
Build Quality & Design: 4.2/5
Why change what’s not broken?
That’s the philosophy Yamaha seems to have approached with the P125. Nothing much has changed as far as the build quality, weight, and design are concerned. Visually, you won’t even be able to tell the P125 and its predecessor, P115, apart.
While you might blame Yamaha for being lazy with the upgrade, I personally don’t think there was much room to change things. The P series reached its pinnacle of build quality with the P105, and there isn’t much you can do to improve things further.
Nonetheless, let’s take a closer look at the overall design, build quality, and other physical features in our Yamaha P125 review.
Portability
The biggest change since the P105 has been portability. Yamaha smartly recognized that the people buying their mid-priced keyboards weren’t just serious beginners, but also amateur artists dragging their keyboards around to live gigs. The weight dropped substantially in the P105 iteration, going from nearly 40+ lbs to barely 26lbs.
This feature hasn’t changed much in the P125. The weight is still the same, though the dimensions are the tiniest bit smaller. However, when placed next to its predecessor, you can’t really tell them apart.
The P125 remains one of the lightest digital pianos in this price range. It is substantially lighter than Yamaha’s own arranger keyboards like the DGX-660 (46 lbs). The only comparable keyboards that weigh less than it are the Casio PX-160 (24.5lbs). The difference, however, is minute enough to be immaterial; any adult should be easily able to carry the P125 around to live gigs.
Note: There is a smaller version of the Yamaha P125, the P121. This one has the exact same features, but has 73 keys only,
Build Quality
The build quality is unmistakably Yamaha. The chassis is made from high-grade hard plastic with a glossy finish. The buttons, though small, are tactile and have a satisfying click. The keys are high quality plastic. The black keys have a matte finish for better while playing.
I do think that Yamaha sacrificed long-term durability for portability. As good as the plastics are, I would have preferred something even tougher. A digital piano isn’t something you buy every couple of years; if you’re buying this one, you’ll likely use it for a decade. Given that gigging musicians might also buy it, tougher construction would have better handled the rigors of the road.
Another miss is the lack of textured keys. A lot of high-end digital pianos nowadays have textured keys to simulate the ebony/ivory keys on actual grand pianos (a feature called Ivory Touch). This feature has started seeping into mid-priced digital pianos as well. I would have liked to see Yamaha step things up a notch and include textured keys in the P125.
Design
There’s nothing much I say about the design except that it’s “striking” and “minimalist” – words I’ve repeated for every P series keyboard since my original P105 review.
Yamaha’s design philosophy for it’s keyboards is rather simple:
Low-end keyboards (such as the PSR series) have a friendlier, more expressive design. PSR-series digital keyboards look like digital keyboards with large buttons, dials, and screens.
Mid-range keyboards, such as the P-series, look like halfway between a real upright acoustic piano and a digital instrument. The buttons are visible, but they are smaller and there is no screen.
High-end keyboards, such as the YDP series, are meant to simulate acoustic pianos. The controls are hidden away and they’re usually sold with upright furniture stands to mimic real pianos.
You have to see the P125’s design choices within this context. Yamaha wants to acknowledge that this is a digital piano, while also giving the impression that it could be an acoustic instrument.
The small buttons (which I had criticized earlier for being too small) and minimalist aesthetic, thus, are intentional.
Overall, the P125 looks decidedly Japanese. The layout is extremely clean and the buttons are neatly organized. The only striking feature is the red line that runs across the length of the keyboard.
If you like your digital pianos to look like the real thing, you won’t be disappointed.
The red line running across the top of the keys is visually striking and helps create a visually separate zone for the keys
I have to point out that the layout has a slight right hand bias. The controls are placed near the left side of the device which makes them easier to use for right-handed players (since your left hand would be free). Perhaps if the buttons were placed more in the center of the keyboard, it would be better.
Oh and before I forget, you can also get the P125 in white color which, despite being a dust magnet, looks absolutely stunning.
Conclusion
To round up this section of our Yamaha P125 review, I’d say that this is one of the better built mid-priced digital pianos. It uses some of the best plastics and has a gorgeous, minimalist design. Although not as “real” as the YDP series keyboards, the P125 does a great job of looking and feeling like an actual acoustic piano.
To sum it up:
Beautifully built; everything looks and feels premium
Minimalist design looks stunning
Small buttons and lack of textured keys are a miss
The Yamaha P125 looks good, but does it sound as good as well?
Let’s find out in this section of our Yamaha P125 review.
Keyboard
Let’s talk about the single most important part of any digital piano: the keyboard.
Like all of Yamaha’s mid-range keyboards, the P125, like its predecessor, has 88 full-sized keys with Graded Hammer Standard (GHS) action.
Since the keyboard is arguably the most important part of any digital piano, I feel this part deserves a more detailed explanation.
Yamaha’s keyboards have three types of graded hammer action:
GH/GHE (Graded Hammer Effect): This is Yamaha’s premium weighted action and is only found in its top of the line YDP-series and up. The components are higher quality and offer a smoother and quieter performance.
GH3: This is similar to GHE but the action is faster. Press a key and it springs back into place faster than the GHE. It’s similar in performance to the GHE, but is meant for faster playback.
GHS (Graded Hammer Standard): This is Yamaha’s mid-range weighted action and is meant for beginners and intermediate players. The keys have variable weight which helps mimic the action of a real-world piano.
Essentially, every GHS keyboard has weights built into the keys. The weights are heavier on the lower bass keys, and become lighter as you go up the octaves. This weight is meant to simulate the action of a real piano where bass notes tend to be more tightly wound, and thus, heavier.
Weighted keys vs weightless (Synth action) keys
Good weight distribution in any keyboard is paramount for accurate performance. Higher notes tend to be played faster. Bass notes, on the other hand, are often held longer. You’re not going to play a lot of staccato bass notes, but you might do that on higher octaves. If the weighted action isn’t variable, it would be very difficult to play fast, staccato notes on higher keys (this is why it’s next to impossible to play proper piano pieces on a synth action keyboard).
In GHS keyboards, the weight of the keys decreases as you go up the octaves
Yamaha’s GHS has been the industry standard ever since it was launched. Over the years, Yamaha has made small changes to the action, but by and large, it has remained largely the same.
Yamaha claims that they’ve made the GHS action on the P125 smoother than P115, but the difference was not noticeable to this reviewer. Perhaps the difference is in the durability of components, but that’s something you’ll only find out over extended use.
I would argue that Kawai’s RHC (Responsive Hammer Compact) action is better than Yamaha GHS in terms of sheer responsiveness. But in terms of sheer durability and versatility, you can’t beat the GHS. It’s perfect for beginners and intermediate pianists. It also works perfectly for a wider range of music styles. You can really hammer on the keys if you’re playing, say, rock ballads. And you can go really soft too – like the opening notes of Fur Elise.
Needless to say, like the P115, the P125 also has variable touch sensitivity. You have four settings to choose from:
Hard – Ideal for pianists with a heavier playing style. Also works great for genres or songs that require a great deal of piano bashing (say, the last solo in November Rain)
Soft – The soft setting makes the piano particularly sensitive. It’s great for pianists with a light touch or songs that require delicate control. For most songs, however, the soft setting will be too sensitive.
Medium – The default setting on the P125. This will work for 95% of users.
Fixed – This setting removes touch sensitivity altogether. You’ll want to use it in some synth-based tracks/sounds or if you’re using the P125 as a MIDI keyboard.
As I mentioned above, I’m slightly disappointed that Yamaha didn’t include textured keys on the P125. It’s time one of the big manufacturers bring this feature down to mid-range keyboards. You shouldn’t have to spend $1,000+ to know what ivory/ebony keys feel like.
Sound Quality
To understand the P125’s sound quality, you have to first understand how digital pianos produce sound.
Unlike synthesizers (which, as the name implies, synthesize sound from raw digital or analog signals), digital pianos are essentially samplers. That is, they include a bank of sound samples that are triggered when you press specific keys.
As with any sampler, the quality of the output sound depends a great deal on the quality of the original samples. If the original sound itself is poor, there is no amount of algorithm magic that can improve it.
Yamaha’s mid-range keyboards have a big advantage on this count. All these keyboards use the Pure CF sound engine. This sound engine uses samples recorded from Yamaha’s legendary CFIIIS 9′ concert grand piano that cost well over six-figures.
The Yamaha CF Sound Engine is based on the CFIIIS Concert Grand Piano
Since the source itself has such a rich and vibrant sound, the Pure CF sound engine, and by proxy, the P125, also sounds positively stunning. When you’re using the default concert grand piano sound, you’re practically playing the $100k CFIIIS 9′ piano.
But a few things have changed from the P115.
One of the biggest change is the use of 4-layer sampling. The P115 Pure CF sound engine included 3 layers of samples. Yamaha has bumped this to include an additional layer. This fourth layer adds a touch of richness to the sound that was previously missing. You’ll heart it particularly when you’re using the headphones, thanks to the stereophonic optimizer.
Speaking of the stereophonic optimizer, this is a new feature on the P125 that widens the sound when you’re using headphones. As someone who likes to play his music late at night, I’m a heavy headphone users. Most digital pianos, including the P105 and P115, sound scrunched up on headphones.
The stereophonic optimizer feature kicks in when you’re using headphones and widens the sound stage. This creates a sense of roominess that was previously missing.
A third and perhaps biggest new improvement to sound quality is a new set of speakers. Like the P115, the P125 also has two regular 12cm speakers and a pair of 4cm tweeters.
However, the speakers are placed in such a manner that they project sound in both upward and downward direction. This creates a richer sound profile and better mimics the free-ranging sound projection of an acoustic piano – as this visual from Yamaha shows.
The Yamaha P125 has downward pointing speakers for richer sound projection
You can now feel the sound envelop you. In rooms with good acoustics, the feeling is absolutely magical.
A big negative is the pedal included with the P125. This pedal feels light and chintzy, and doesn’t nearly do justice to the excellent build quality of the P125. I feel that Yamaha just packaged its cheapest pedal in order to bump up the perceived value of the device. You’ll want to throw it out asap and get a better quality pedal instead.
Another cool improvement is that the polyphony has been bumped up to 192 from 128 in the last iteration. You likely won’t even notice it but it’s good to know that you have additional room for extra notes – should you ever manage the keyboard that far.
Connectivity
Ever since the P105, Yamaha has included two connections as standard in the P-series digital pianos:
USB to Host to connect the piano to a computer or MIDI sampler
L/R line out ports to connect to a mixer
The P125 is no different and includes both these connections, along with ports for sustain and pedal units. A gigging musician will particularly appreciate the L/R 1/4″ line out ports. They make it much easier to hook up the P125 to a mixer.
There are also two headphone ports located on the front of the device. These come in handy when you’re learning alongside a teacher.
I have to make a special mention of the USB to Host port. This is the port you’ll use to connect the keyboard to an iPad for using the Smart Pianist app. You’ll also use it to connect the piano to a computer for transferring files or using the keyboard as a MIDI controller.
USB-to-Host and L/R Line Out ports come in handy on the Yamaha P125
While transferring MIDI files is standard enough, it was a pleasant surprise to learn that you can record audio directly via the P125. Just plug in the keyboard to your computer and play your piece. Instead of MIDI, you have the option to record it as audio – without relying on external converters or mics.
However, a big negative is that the P125 does not ship with A-B USB cable necessary for connecting it to a computer. You will also have to buy a Lighting to USB cable in case you want to connect it to an iPad or iPhone.
Given how much Yamaha touts the Smart Pianist app as a key feature (more on this below), I would have liked if they had thrown in a free A to B USB cable in the box.
Conclusion
To round up this Yamaha P125 review, I would say that this digital piano is a marked improvement over its predecessor. The new sound engine is richer, the sound quality on headphones is substantially better, and the new speakers do better job of projecting the sound.
However, lack of textured keys and a missing cable are definite misses and keep this keyboard from being “exceptional” instead of just being “great”.
Yamaha P125 Review: Features: 4.1/5
This is the part where Yamaha has made the biggest improvements. There are more sounds, a brand new app, and new modes to play around with. For a certain kind of buyer, these new features alone might be worth the upgrade.
However – and I think I can speak for most serious pianists – these features are hardly going to swing your decision. If you’re looking for a keyboard in this range, your top concerns are likely sound and build quality.
Having said that, I also understand that Yamaha doesn’t really have a lot of room to improve as far as the quality of the keyboard or sound are concerned. The only way to make this new offering stand out is through evolutionary changes such as newer sounds and smart apps.
Keep this in mind as you read through this section. These new features are nothing to ignore, but they’re also unlikely to be the only reason why you’d choose the P125.
1. There are 10 new sounds taking the complete range of built-in sounds to 24. There are the original 14 sounds found in the P115, but there are also new grand piano, electric piano, organ and string sounds.
My favorite new sounds are Organ Tutti and Vibraphone.
That said, outside of the grand piano and e-piano sounds, the P series’ onboard sounds have always been something of a miss. The guitar sounds are too artificial and organ sounds too tinny.
If you’re buying this for versatility, you’ll do better by picking an arranger keyboard.
You can switch sounds quickly through the onboard buttons
Stick to the P125 for its core grand piano sounds.
2. The built-in effects is the same. You get one reverb effect with four room settings (hall, concern hall, club, and chamber) and that’s it.
This should suffice for most users though I do wonder if Yamaha missed a trick by not including some additional effects. A chorus or delay would have added some interesting sound design choices. Since there are new e-piano sounds, a flanger or phaser might have been nice as well.
Certainly adding more on-board sound effects is something Yamaha needs to consider for the next version of the P125.
3. Table EQ improves sound performance on flat surfaces. Remember when I told you how the P125 now projects sound in both upwards and downwards direction?
That sounds great when you’re using a stand, but if you’re keeping the piano on a flat, solid surface, you’ll get nasty reflections from the downwards facing speakers.
Yamaha smartly recognized this and built a Table EQ feature. This feature cuts out frequencies from the downwards facing speakers such that you get minimal reflections on flat surfaces.
Table EQ feature cuts down dissonant frequencies and reflections when the piano is placed on a flat surface
A very handy tool if you plan to keep the P125 on a desk.
4. You get both Sound Boost and IAC. We saw these features in Yamaha P115 and they mark a presence here as well.
Sound Boost is an EQ + volume feature that boosts treble frequencies. The purpose is to make the high end stand out more when the piano is played with other instruments. The effect is marginal and likely won’t be noticeable in 99% of situations.
Intelligence Acoustic Control (IAC) solves the problem so many pianists have faced: low frequencies are just not audible enough at low volumes.
IAC boosts the volume of both top and low end frequencies at low volumes such that they cut through the mix more. The effect is particularly more pronounced with low frequencies.
I like it – it makes practice sessions particularly better. But it’s not nearly remarkable enough for Yamaha to dub it “revolutionary” as it has in its marketing.
5. There are more playing modes now. You already have the standard Duet Mode which has been around since P95. If you’re unaware, in Duet Mode, the keyboard is divided into two halves. It’s great for practicing alongside a teacher, or, as the name implies, perform a duet.
Refer to this graphic to understand all the different modes:
Additionally, there is now a Split Mode. This mode allows you to split the keyboard into two instruments. Both sections play separate instruments (usually a bass instrument on the low frequencies on the left and a treble instrument on the right).
You can change the split point as well.
There is also a Dual Mode where instead of separate zones, you can play two instruments at the same time. It’s great for creating more complex arrangement – like playing strings alongside a piano.
In practice, outside of Duet Mode – which is helpful while learning alongside a teacher – you’ll rarely ever use Dual or Split mode. They’re nice novelties to play around with but hardly something you’ll ever pull out in a live gig or even use on a semi-regular basis.
6. The P125 skimps on the accompaniment features. The P105 introduced the “Pianist Styles” feature that created backing tracks in different piano styles (Jazz, Blues, etc.). The P125 removes this feature altogether.
Instead, you get a wider range of Rhythm Accompaniments (also introduced in P105). This feature creates drums in different styles to play along to. From the 10 rhythms originally introduced in P105, you now get 20 rhythm styles, including some very effective Fast Jazz and Shuffle rhythms.
All the rhythm styles available on the P125
I can’t say I’ll miss the Pianist Styles feature – I don’t know anyone who used it regularly. But I do appreciate the expanded rhythm accompaniment feature – this is something you’ll use far more often.
7. There is a new app. This is Yamaha’s “big” feature for the P125 – a brand new app called Smart Pianist.
This app gives you complete control over the P125. You can choose from a range of onboard sounds, change the pitch, choose different reverb effects, pedal performance, etc.
Yamaha also touts its Smart Chord feature that allows you to extract chords from songs on your smartphone/tablet.
In practice, this feature only works if the track is simple enough and the chords audible enough. Don’t expect it to work with your Tool albums, though it should be able to extract chords from simple ballads.
The Smart Pianist app was only available on iOS when the P125 was launched. Thankfully, Yamaha has since expanded support to Android as well.
On the whole, the Smart Pianist makes controlling the P125 easier, but it’s not a revolutionary leap in technology. Given that you have to plug in your keyboard into your smart device, you likely won’t even use it much.
8. The onboard recorder is as dismal as ever. While I understand this isn’t an arranger keyboard, and that everyone can easily plug the P125 into a computer/smartphone, I’m yet again disappointed by the onboard recorder.
Like its predecessors, the Yamaha P125 only supports recording of two tracks. That’s abysmally low for modern day standards. I’m not looking to create complex arrangements on this keyboard, but Yamaha could have at least bumped this up to 8 tracks.
The limited tracks feel particularly egregious when you consider how Yamaha has expanded the number of sounds to 24. If you’re going to give me 24 instruments to play with, at least give me the option to record more than two of them.
Yamaha P125 Review: Overall: 4.3/5
The Yamaha P125 is an evolutionary change that improves on many of the shortcomings of its predecessor. The sound quality is the best it has ever been thanks to a new speaker arrangement, and the keybed has been fine-tuned even further.
There are also a bunch of new features to improve sound quality a little bit more. Table EQ, Sound Boost, IAC – these are all welcome additions, as are the new rhythm styles.
On the whole, if you’re looking for your first mid-range digital piano, the P125 would be perfect for you.
However, if you already have one of the older models from the P series (or its equivalent from Casio/Roland/Kawai), the P series doesn’t offer enough to warrant an upgrade.
To sum up this Yamaha P125 review, here’s a quick overview of all its pros and cons:
What’s good:
Classy minimalist design
Great keybed with authentic GHS action
Best-ever speakers with a richer, fuller sound
Expanded rhythm styles to create more enjoyable accompaniments
Multiple settings to improve EQ and volume in different situations
Expanded polyphony – 192 instead of 128
Smart Pianist is a handy new app
Stereophonic optimizer for headphones is a great new feature for practicing
What’s not good:
Dismal onboard recorder
Small buttons and LEDs can be difficult to use for new users
Apart from grand piano sounds, most built-in sounds are lackluster
Ships with an awful plasticky pedal
New playing modes are best as gimmicks and not as something you’ll use regularly
My recommendation: Get the Yamaha P125 in two situations:
You’re upgrading from a beginner keyboard (such as the Yamaha PSR E363)
You’ve never bought a serious digital piano before
It makes little sense to upgrade to the P125 from an older model in the P series (or equivalent from other brands). You’re better off saving up for a high-end keyboard instead.
For everyone else, the P125 will be an excellent first “serious” digital piano.
Before I leave, let’s answer a few quick questions to round up this Yamaha P125 review:
Q. What extras will I need to purchase?
The P125 ships with an AC adapter and a pedal. However, as I mentioned above, the pedal is cheap and not satisfying to use at all. You’ll want to buy a better pedal at least.
In addition to this, you’ll also want to buy:
A pair of headphones – preferably studio headphones for an accurate sound profile
A USB A-to-B adapter for connecting the P125 to a computer
A stand
A Lightning to USB adapter if you’re using an iPhone or Mac, or a USB A to C converter if you’re connecting to an Android
Can you record with the Yamaha P125?
Yes, there are three ways to record with the Yamaha P125:
Use the built-in recorder to record up to two tracks
Connect the P125 to a computer and use a MIDI sequencer/DAW to record MIDI notes
Connect the P125 to a computer and record audio directly via USB
And of course, you can always just place a mic next to the speakers, though I can’t see any reason why you’d want to do that.
Does it come with a stand?
Sadly no – the Yamaha P125 doesn’t ship with a stand. It does, however, have a nifty Table EQ feature to negate unwanted frequencies when using it on a table or other flat surface.
That said, you’ll want to buy a stand asap since that makes the playing experience significantly better.
Does the Smart Pianist app work on Android smartphones?
When it was launched, the Smart Pianist app was iOS only. This was a major negative and Yamaha quickly rectified this problem by launching the app on Android in early 2019.
So you can now use the Smart Pianist app on any device you choose – Android or iOS.
The Yamaha P105 is the replacement to the legendary and ever-popular Yamaha P95. Effortlessly easy to pick up, yet packed with features, this keyboard promises to hold its own in practice rooms as well as recording studios. In this Yamaha P105 review, we put this keyboard through the grinder and tell you if it’s worth your money.
Yamaha P105
Perfect mid-range gigging keyboard
Build Quality: 4.3/5
Performance: 4.2/5
Value for Money: 4/5
Overall Score: 4.3/5
As far as music gear companies go, Yamaha doesn’t really need any introduction. What Gibson is to electric guitars, Yamaha is to digital pianos. Yamaha absolutely dominates the low, mid, and even high-end of the digital piano market, leaving others to eke out niches here and there.
To this reviewer, this dominance is highly deserved. Yamaha is a legit pioneer in the digital piano space, leveraging its century-old history in acoustic gear to create the most realistic sounding digital pianos.
The Yamaha P105 is the company’s mid-range offering. It’s powerful yet portable and aims to be at home in the practice room as well as live gigs.
Does it meet this brief? Is it a worthy successor to the legendary Yamaha P95?
Find out in this Yamaha P105 Review.
Quick summary:
Great keys and rich grand piano sounds
Low weight and relatively smaller dimensions make it great for gigging
Minimalist design helps you focus on the keys
Limited features might frustrate beginners
We use rigorous research, reviews, and real-world performance when recommending products. Our reviewers include producers, performers, and active musicians. You can read more about our review process here. Be advised that MIDINation might earn referral commissions on purchases made through this website. This does not affect your final purchase price.
Note: As an Amazon Associate, MIDINation earns commissions for qualifying purchases made through Amazon links on this page.
About your reviewer Ryan Harrell is the founder of MIDINation and an experienced producer/DJ. His first experience with electronic music production dates back to Cubase 3.0 in the summer of 1997, and he’s been a fan ever since. He prefers Ableton as his primary DAW these days, though he is still partial to Cubase and Pro Tools. He lives in San Diego and freelances as a producer and part-time DJ.
Yamaha P105 Review: At a Glance
Here’s everything that I think about the Yamaha P105 in one glance. Use this if you’re in a hurry or want something for reference later.
For a more detailed Yamaha P105 review, read on.
Build Quality & Design: 4.3/5
Overview: The Yamaha 105 is built specifically for practicing musicians. Consequently, Yamaha has prioritized portability in this model. Yamaha knows that most gig venues don’t have their own acoustic pianos and musicians have to bring their own gear. As such, every single design decision on the P105 is meant to make live gigging easier.
Let’s take a closer look at the overall design, build-quality and other physical features.
Portability: Let’s talk about the biggest reason why you’d want to buy this unit in the first place – portability.
Unlike older models in the P-series, the P105 has lost a considerable amount of weight. It’s barely over 25 lbs – a far cry from the 40+ lbs of the P95. I had no problems dragging the P105 into my Uber to take to a gig.
Yamaha has also squeezed the dimensions by reducing the size of the speakers. Instead of full-fledged speakers, you get two small tweeters and woofers. The sound quality is arguably better while the dimensions are reduced further by a few inches – a big deal when you’re gigging.
Build Quality: The build quality is typically mid-range Yamaha – all smooth and robust. The keys have a wonderful smooth finish and the piano black really glistens. All the buttons are made of hard plastic and have a soft bevelled top that’s pleasant to touch. The main chassis is hard plastic + bits of metal. It’s lightweight without feeling flimsy. I can confidently say that this is one of the best built mid-range digital pianos you can find.
Design: Yamaha’s aesthetics in the P range is drastically different from its beginner-focused PSR range. There is a stronger focus on minimalism and getting out of the way of the player. This means minimal (or absent) screens and smaller buttons that allow you to focus on the keys, not the features.
This philosophy is amply on display in the Yamaha P105. It has no screen (nor should you need one in this category). All the buttons are small, tiny even, and are cleanly laid out along a single horizontal line.
A striking feature is a red line running along the top of the keys. I understand this is a personal preference, but I loved this aesthetic touch. It adds a pop of color to what can otherwise be a very minimalist and monotone design. Plsu, it helps create a visually distinct “space” for the keys.
The red line running across the top of the keys is visually striking and helps create a visually separate zone for the keys
I personally also love the angularness of the Yamaha P105. Everything is laid out in straight lines. From the speakers to the buttons, there is hardly any roundness in any element. It feels distinctly like a Made-in-Japan product.
Usability: Usability refers to the placement of different features/buttons and how they affect real-world usage. On this front, the Yamaha P105 can be a mixed bag. The focus on minimalism means that a lot of the buttons are smaller than they would be on a beginner-focused keyboard. There are also missing features like a screen. Plus, Yamaha has used very tiny LEDs to indicate status of different features (such as Record or Play). This makes for a gorgeously minimalist device, but it also makes it hard to gauge what state a button is in – especially if you have bad eyesight like I do.
Case in point: the master volume dial. On a beginner-focused keyboard, you bet this dial would be massive and within easy reach. But since Yamaha is targeting intermediate and even advanced musicians with the P105, the volume dial is narrow and doesn’t feel particularly tactile.
The P105’s buttons are a little too small for this reviewer’s preferences
Sure, Yamaha’s pro audience wouldn’t mind this, but to a beginner switching to a better digital piano, the lack of user-friendliness can be off-putting.
Conclusion
To sum up this section of our Yamaha P105 review, I’d say that this is arguably one of the best looking AND best built digital pianos in this price range. The minimalist, distinctly Japanese aesthetic looks stunning. The portability is off the charts. The buttons are small such that you can focus on what truly matters – the keys – and not a parade of features.
To sum it up:
Beautifully built; everything looks and feels premium
Minimalist design looks stunning
Small buttons draw attention to the keys, not the features
Overview: I’ve seen a number of Yamaha P105 reviews that talk about the lack of features in the 105 such as different learning modes or composition capabilities found on Yamaha’s arranger keyboards.
To these reviewers, I’d say that you’re getting the P105 completely wrong.
The Yamaha P105 is meant for serious musicians. If you’re buying this, you’re not a first-time beginner tinkering around in her basement. A large screen, hundreds of sounds, learning modes – all the features a beginner wants – are intentionally missing here.
Why?
Because Yamaha’s serious customers want good keyboards, not just good features. This is meant to be an acoustic piano replacement in a live setting. Anyone playing it wants fast, responsive, and authentic piano sounds – everything else is secondary.
So when you read this review, keep this in context. Don’t compare the P105 to, say, the Yamaha PSR e363 – it’s not meant for the same customers.
With that out of the way, let’s continue this Yamaha P105 review with a closer look at the performance:
Sound Quality: You buy a keyboard for the sound quality and on this front, the Yamaha P105 delivers in spades. The grand piano sound, called the “Pure CF sound engine”, is based on the Yamaha CFIIIS concert grand piano – a $100k+ grand piano. The sound is full, rich, and strongly resonant – as you’d expect a grand piano to sound like.
There are two small speakers and two tweeters built into the P105. The tweeters are a new addition and add some much needed high-end to the sound. The frequency response is otherwise mostly flat save a dip in the lower bass registers. You’ll get better results if you plug it into external speakers, but for practice sessions and small gigs, the built-in speakers are totally worth it.
The Yamaha CFIIIS concert piano is the source of the Pure CF sound engine
Other Sounds: While the grand piano sound is the heart of the Yamaha P105, you also get two acoustic piano sounds. These two acoustic pianos occupy the softer and brighter spectrums of the piano sound respectively and can add some variety to your playing. Though if you’re like me, you’ll keep coming back to the grand piano sound.
Apart from these acoustic pianos, you also get a bunch of classic electric pianos and organs, including a genuine Rhodes sound. These are all decent enough though none will blow your socks away quite like hearing the grand piano sound for the first time.
Key Quality: The keys on the Yamaha P105 are, in a word, fantastic. You get a full 88-key keyboard that uses Yamaha’s legendary Graded Hammer Standard (GHS) action. This system replicates the resistance you find on an acoustic piano. Lower octave keys are heavier and become lighter as you go up the octaves. You can also change the velocity response as per your preferences, moving from soft to hard, or even removing it altogether (which helps if you’re using it as a MIDI instrument).
Apart from the handy USB-to-MIDI, connectivity is a definite plus point on the P105. You get a dedicated 1/4″ line out which makes it dead easy to hook it up to an external mixer console. You can bypass the headphone out port altogether which makes monitoring much easier. As a gigging musician, this, along with the low weight, will be a massive timesaver.
USB and two L/R aux ports make it easy to hook up the P105 to mixers or a computer
Features: Most of Yamaha’s entry-level digital pianos are loaded with features. But as you go up the product hierarchy, you’ll find that Yamaha keeps stripping away features, focusing more and more on the essence of a great piano: authentic sounds, fantastic keybeds.
The Yamaha P105 is somewhere in the middle. It’s not as stripped away as the YDP series, nor is it filled with bells and whistles like the PSR series. There is no screen or complex arrangement capabilities. Instead, you get some basic features such as:
Piano accompaniment: With this feature, you can play a chord (or heck, even a single note) and the P105 will create an entire accompaniment in ten different styles (such as Blues, Jazz, Boogie, etc.). Nothing groundbreaking but fun to use when you’re bored playing alone.
Rhythm function: Switch this feature on to get basic drum patterns for practicing. These patterns are in different styles including Samba, Waltz, Swing, etc. I found myself using this feature a lot more than the piano accompaniment. It’s particularly good for practicing, though I wouldn’t be caught dead ever using them in a live gig.
Other features include a mini two-track MIDI recorder built in to record chord/melody parts. You also get duet mode which splits the keybed into two – great for practicing with a teacher.
And that’s it – the P105 does the bare minimum as far as features go. And honestly, if you’re looking for a piano in this category, you can’t really complain.
Conclusion
To round up this Yamaha P105 review, I would say that this digital piano ticks all the boxes that really matter. It has a fantastic sound engine, wonderful built-in speakers, and gorgeous keys. If you’re a serious musician, the lack of hundreds of sounds and different learning modes is likely not a priority either way.
Yamaha P105 Review: Overall Score: 4.3/5
The Yamaha P105 is great at what it does: offer its users an authentic acoustic piano experience at an affordable price. It’s gorgeously designed, has wonderfully responsive keys, and a full, resonant sound that sounds eerily like a real piano.
This is NOT a keyboad for beginners. You’ll find the lack of features frustrating and the keyboard does not even try to hold your hand through the features.
I would recommend the Yamaha P105 to any serious musician who wants a well-rounded, no-nonsense, portable keyboard at a reasonable rate.
What’s good:
Classy minimalist design
Great keybed with authentic GHS action
Resonant and rich sound engine
Decent accompaniment features
Great connectivity – line-out port is particularly welcome
Low weight and relatively smaller size make it very portable
What’s not good:
The lack of features can frustrate beginners
Small buttons and LEDs can be difficult to use for new users
Apart from grand piano sounds, most built-in sounds are lackluster
Drum accompaniment patterns are robotic and unenthusiastic
Large 88-key size means you’ll have to buy specialty stands for it
My recommendation:Get the Yamaha P105 if you are a serious musician looking for a portable keyboard for live gigs. It’s as close a replacement to a full-fledged acoustic piano as you can get in this price range.
If you’re a beginner, however, avoid the Yamaha P105. Instead, something from the PSR series which will be cheaper and have better learning features.
Before I leave, let’s answer a few quick questions about the Yamaha P105:
Q. What extras will I need to purchase?
Nothing really – the P105 comes with everything you’ll need to start playing right away.
However, you’ll want to invest in a stand as well as a foot pdeal. I would especially recommend the latter since a lot of piano pieces explicitly call for the foot pedal use.
Can you record with the Yamaha P105?
Yup – the P105 includes a two-track MIDI recorder built right in. It also has a USB-to-MIDI connection which allows you to plug it right into your computer. Once connected, you can record anything you want in your DAW or sequencer.
Does it come with a stand?
Sadly no – you will have to buy a stand separately. I found this to be a pretty big inconvenience since 88 key keyboards are, by default, very unwieldy. They also don’t fit standard 61 or 76-key keyboard stands. You will have to buy something designed specifically for 88-key keyboards, though I must admit that Yamaha’s own stands look really good.
What is polyphony in a digital piano?
Polyphony refers to the number of sounds an instrument can produce simultaneously. If you have 16 note polyphony, it means that the instrument can make 16 different sounds at the same time.
Most modern keyboards have at least 128 note polyphony, i.e. you can play 128 notes simultaneously. Of course, there are few situations where you’ll ever need that many, but 128-note polyphony should be considered the target figure (which the Yamaha P105 supports).
After more than a century of existence, Yamaha retains its position as a world-class manufacturer of digital and acoustic pianos. The best Yamaha keyboards remain highly coveted among amateurs and professionals alike. This guide looks at the best Yamaha keyboard, and what to look for when buying one.
In 1887, a 36-year-old man, Torakusu Yamaha, set up a corporation – Nippon Gakki Co. Ltd. – in Hamamatsu, Japan to manufacture piano and reed organs. Just a few years ago, Yamaha had become the first Japanese person to ever craft a reed organ. His goal was simple: to bring Japanese craftsmanship to musical instruments and build world-class products.
You, of course, know this company as the present-day Yamaha Corporation, named after its famous founder. Today, Yamaha is the world’s largest musical instruments manufacturer, well-known across the world for its pianos, guitars, and even drums. Another part of the company is equally famous for its motorcycles.
Despite competition from old rivals such as Casio and new players such as Kurzweil, Yamaha remains at the top of the totem pole when it comes to digital pianos and keyboards. Their product range is unparalleled, offering everything from beginner-level keyboards to pianos you’d play at Carnegie Hall.
If you’re in the market for a keyboard, you really can’t go wrong with Yamaha.
The question is: what kind of Yamaha keyboard should you get? What should you look for in this keyboard?
We looked at 14 different keyboards across categories to help you answer these questions. Read on to see our pick for the best Yamaha keyboard in each category, and how to buy them.
If you want quick answers, these are the best Yamaha keyboards at a glance:
We use rigorous research, reviews, and real-world performance when recommending products. Our reviewers include producers, performers, and active musicians. You can read more about our review process here. Be advised that MIDINation might earn referral commissions on purchases made through this website. This does not affect your final purchase price.
Note: As an Amazon Associate, MIDINation earns commissions for qualifying purchases made through Amazon links on this page.
About your reviewerRyan Harrell is the founder of MIDINation and an experienced producer/DJ. His first experience with electronic music production dates back to Cubase 3.0 in the summer of 1997, and he’s been a fan ever since. He prefers Ableton as his primary DAW these days, though he is still partial to Cubase and Pro Tools. He lives in San Diego and freelances as a producer and part-time DJ.
The Best Yamaha Keyboard: Our Top 7 Picks
We’ve considered the features you should look at before deciding which keyboard to buy.
Now, let’s look at the best Yamaha keyboard in each category:
The Yamaha DGX-660 has the best combination of price and performance, with a weighted GHS (Graded Hammer Standard) keyboard and state-of-the-art internal software which lets it emulate the sound and feel of a traditional acoustic piano.
Modern features are also included, such as USB support, WiFi connectivity, microphone compatibility, and a wide range of built-in digital effects. These all offer you the opportunity to produce great music, heard through the keyboard’s high-quality built-in speakers.
While the DGX-660 does have a host of features that can be used to teach newbies, it is expensive to purchase for that purpose and the menus can be counterintuitive to use.
Many stores also sell this model in bundles, which often contain cheap headphones, microphones, and other accessories. This can be troublesome, especially since the keyboard itself is made by Yamaha which has a proven track record of excellent build quality.
By emulating the sound of an authentic grand piano using the Pure CF Sound Engine, you can enjoy the sound and feel of playing on a piano while still taking advantage of the keyboard’s portability and advanced features which allow it to genre blend, layer chords, and even split the keyboard into two so that two instruments—or two players—can play at the same time.
Recommended for: The Yamaha DGX-660 is an ideal keyboard for any intermediate to advanced player that wants an altogether well-rounded product. It is not the best at any one task, but does well in every category.
Pros
Best combination of price and features
Weighted GHS keyboard helps narrow gap between digital and acoustic
Built with education in mind, the Yamaha PSR-EW300 is equipped with the Y.E.S. (Yamaha Education Suite) to get newbies started with comprehensive skill training and timing practice. Its light-weight touch-sensitive dynamic keys are perfect for beginners who are just beginning to learn the feel of a keyboard and might need help with proper pressure and intensity.
The PSR-EW300 has 76 keys, giving you maximum dynamic expression and the ability to receive direct tutoring from an instructor. Coupled with the keyboard’s varied selection of instrument voices and over a hundred different songs to practice with, I consider this keyboard excellent for serious beginners who are interested in learning how to play piano.
Questionable speaker quality and the need to buy an adapter separately are disadvantages that any newbie will experience. While not a big deal by itself, sound quality can play a part in determining your future interest in the hobby.
Once more familiar with the basics of keyboarding, you may feel the need to upgrade to a different model because of the dynamic keys. They are useful for learning, but GHS (Graded Hammer Standard) keys will replace them as the gold standard in further education and for serious playing due to their emulation of authentic piano keys.
Recommended for: Players who are just starting to learn how to play the keyboard can’t go wrong with purchasing this model. The affordable price and education features make it highly accessible.
Pros
Affordable pricing for beginners
Dedicated learning suite to allow for self-teaching
Dynamic keys help teach pacing and intensity
Cons
Speaker quality isn’t the best
Dynamic keys are weaker compared to GHS keys
The model is specifically targeted at newbies, making future upgrades a necessity
If you are looking for a keyboard that lets you create a high-quality piece from start to finish with just the keyboard and no extra software or hardware, the Yamaha MX49 is for you. This synthesizer can emulate vintage models from the 70s and comes with its own suite of over 1000 effects and sounds.
I had a look at the connections, and it has complete USB support for playback and recording. You can even connect to the AUX input using a stereo cable to add extra functionality to the keyboard.
Here is the kicker: the MX49 is meant to be a complete music production synthesizer. That means you use it for every step of the production process, from basic chords to layering to digital effects. This is highly useful for the on-the-go player, but it can be challenging if you have dedicated software for certain steps of the process.
For example, the keyboard only has limited integration with modern DAWs like Ableton and FL Studio. You can use the MX49 as a one-stop shop without a problem. You start encountering issues when you try to integrate the keyboard with powerful software synthesizers and DAWs.
Another drawback with this model is that the keys don’t feel very good. They aren’t bad, but they don’t leave you satisfied. In other words, they get the job done. This may not be very important, depending on what you want to use the keyboard for.
Recommended for: Without dedicated hardware and a more professional studio suite, this model is an ideal synthesizer for any player that makes heavy use of layering, splitting, DAWs, and VSTs.
Pros
One-stop shop production capabilities
Excellent capacity for layering sounds and producing dynamic pieces
Combines both synthesizer and MIDI functions
Cons
Keys aren’t the best
Limited utility when compared to professional software synthesizers
Serious players will not be satisfied with the Yamaha PSRF51. It sounds harsh, but it is true. I found this model to meet some basic standards but nothing beyond that. It is great for people who don’t know if they want to invest in a better keyboard.
Basically: The PSRF51 is for casual players or those who are only just getting introduced to the hobby. The keys aren’t good, the build quality doesn’t live up to the Yamaha brand, and the speakers leave a lot to be desired.
Now that we’ve got that out of the way, what does it do right?
Well, it’s incredibly cheap. That’s the main benefit of this model. It’s an affordable starting point that lets you get a taste of what playing a keyboard is like without needing to make a major investment.
With its no-nonsense build, you’re also guaranteed ease of use. It really is as simple as turning the thing on and starting to play. Its control panel makes voice and rhythm a breeze.
You can also play it off of battery power if you don’t have access to an outlet.
Recommended for: The Yamaha PSRF51 is ideal for those who are uncertain about becoming involved with keyboarding. Quality and features are nothing to write home about, but the price point makes it perfect for introductory playing.
Authentic organ sounds and controls (with five organ waves)
Large switches with retro design
Highly responsive and fast keys
This is a niche model, so you should know what you’re looking for before purchasing the Yamaha REFACE YC organ. It is a portable keyboard with only 37 keys, less than half of what you could expect from a “grand piano” keyboard model.
I gave it a go, however, and it does pretty well at what it’s trying to do. If you’re on the lookout for a keyboard that can accurately emulate the sound and tone of an organ, the REFACE YC does just that.
The keyboard—likely due to its size—is noisy to use. The speakers themselves aren’t high quality, giving your audio a tinny echo. You sacrifice quality in the pursuit of miniaturizing, unfortunately.
One of its best features is its vintage organ sounds. You can easily switch from a modern sound to one of more retro appeal, and it fits the bill pretty well on each of its five organ characters.
Lastly, the keyboard has your standard-fare USB support as well as an AUX input, so you can play the organ alongside real tracks if you want to.
Recommended for: Anyone who is seeking a more organ-like playing sound and experience from their keyboard. Its authentic organ sounds give it a niche in the keyboard industry.
Pros
Authentic organ characters from the vintage to the modern
Miniature size makes it easy to move
Large switches and responsive keys
Cons
While keys are responsive, they make a lot of noise
Its smaller size reduces capability and function
Tinny speakers don’t output a great-sounding piece
Includes 6 different voices with 64-note polyphony
This was an impressive keyboard to try out. So many keyboards out there come with a boatload of features that may feel gimmicky to players who don’t use them. The Yamaha P-45 nips this sentiment in the bud by offering players a simple, no-frills experience. It’s a keyboard, plain and simple.
Now, that could be bad, depending on how you want to use a keyboard. If you really like digital effects, basic layering, and a whole plethora of voices, the P-45 might disappoint you.
But if all you’re looking for is a keyboard that accurately emulates the sound of an authentic piano, well, you can’t go wrong with this one.
In particular, its keys are excellent quality. You’re offered a full-size experience which gives you four different touch sensitivities, and the GHS keys themselves are very good. They feel like they’re worth a lot of money. It can be intimidating to those who are just starting out.
The sound produced is also impressive. It comes pretty close to being just like the real thing. Unfortunately, the speakers can’t keep up with the quality, which is really disappointing.
Recommended for: The no-frills, no-nonsense keyboard player. This is pure quality without any extra features or instruments. Turn on and play the piano without any fuss.
Pros
Fantastic key quality
Full-size keyboard allows for full range of play
Sound quality is premium
Cons
Intimidating to inexperienced players
Speakers are lower quality than what the keyboard can output
Pure CF Sound Engine with state-of-the-art sampling technology
Damper Resonance and full pedal support
The lack of portability and the high cost of the Yamaha YDP-181 makes it ideal for players who are already talented, know the ins and outs of digital keyboards, and don’t need to move around a lot.
You are paying for quality, and quality is exactly what you receive. When I tried out the YDP-181, I was surprised by how great the weighted GHS keys felt and with the sound the keyboard produced. It was very close to an authentic piano in both touch and sound.
The build of the keyboard helps provide the illusion by emulating that stereotypical upright piano-like look. When you’re sitting on the bench in front of this keyboard, you kind of feel like you’re playing on the real thing.
So what’s bad about this keyboard?
Well, if you’re the kind to buy bundled keyboards, you should know that most stores will sell you cheap accessories. For such a premium product, it’s better to buy it all separately. Cheap accessories will just make the keyboard less than what it can be.
The speakers also aren’t as good as they could be. They’re still great and they have decent fidelity, but it can’t stand up to the quality a dedicated sound system can output.
And lastly, the price. The nature of its cost does mean it’s not an accessible product for beginners or intermediate players. You get what you pay for, though, so definitely keep an eye out for this model series if you consider yourself an advanced keyboard player.
Recommended for: Advanced players who are familiar with the full range of keyboard models. High quality and with authentic audio, the YDP-181 is great for those who know exactly what they’re looking for.
Pros
Closely resembles an authentic piano experience
Full-size keyboard is built with high-quality keys
Sound quality is as good as it can be without dedicated hardware
Cons
High cost limits accessibility
Often sold with products that diminish the keyboard’s potential
Despite its high-quality sound, speakers still can’t keep up
The word “keyboard” is often misleading. Depending on what circles you hang out in, it can mean a MIDI keyboard, an acoustic piano, a digital piano, or even a synth. Your EDM producer friends likely refer to their Akai when they say “keyboard”, while your pianists friends use it for their Yamahas.
If you go by the formal definition, any instrument that has keys is, well, a keyboard.
This is a broad category and includes several sub-categories. Let’s understand these better below.
Pianos, Arrangers, Controllers, and Synthesizers
If you’re a beginner, one of your biggest sources of confusion is likely to be the difference between the following instruments – piano, digital piano, arranger, MIDI controller, synthesizer, and workstation.
You’re not the only one. A surprising number of even experienced musicians can’t readily tell you how a synthesizer differs from an arranger.
Broadly speaking, you can describe these instruments as follows:
Acoustic piano is the traditional, physical piano you’re all familiar with. An acoustic piano produces sound when a hammer strikes a string, physically. These are expensive and require high-maintenance. Yamaha makes some of the world’s finest acoustic pianos, and, in fact, got its start in the late 19th century making them.
Digital piano is the digital replication of an acoustic piano. This instrument has an onboard computer loaded with piano samples. When you press a key, the equivalent sample is played. The volume and tone of the sample changes depending on how hard or soft you hit the key.
MIDI controller: Often also called a “MIDI keyboard”, a controller is essentially a set of keys and buttons. It doesn’t make any sound of its own. Rather, you have to connect it to a synthesizer (or computer) via a MIDI or USB cable. Whatever sound you load on the synthesizer can be played back by the keyboard (provided you hook up the synth to a speaker). Thus, a MIDI controller is just a way to “control” a physical or software snythesizer.
Synthesizer, as the name implies, is an instrument that can create or synthesize sound. You can play around with different settings, oscillators, filters, etc. to create nearly an infinite number of sounds. While most synthesizers have built-in keyboards, it isn’t a necessity. More and more people have now switched entirely to software synthesizers (such as Massive and Serum) that are controlled with a MIDI keyboard.
Arranger or workstation is a type of keyboard with a mini audio workstation. Such keyboards have built-in memory to record several tracks. You can then arrange these tracks to produce complete songs. Think of them as a physical version of a digital audio workstation (DAW).
Acoustic pianos are outside the brief of this guide. Further, as electronic producers, we aren’t really equipped to review acoustic instruments.
Arrangers have little use for modern musicians. DAWs are so cheap, easy to use, and powerful that expensive arranger/workstation keyboards make little sense today. You won’t want to buy one unless you absolutely can’t access a DAW (rare since everyone already has a laptop).
We would include MIDI controllers in this roundup, except Yamaha doesn’t make any MIDI keyboards. Of course, nothing is stopping you from using a digital piano as a MIDI controller as well.
As for synthesizers, apart from the intuitiveness a physical instrument, software synths promise way more power and flexibility than even the best Yamaha synthesizers.
Which essentially limits this roundup to Yamaha digital pianos.
So let’s look at the features you should care about when you’re buying a Yamaha digital piano.
What Features to Look for in Yamaha Keyboards?
While Yamaha is generally known for its quality and you can virtually pick anything from its extensive lineup, there are a few things you need to consider when buying a Yamaha keyboard:
Key Action and Weight
A keyboard is all about, well, the keys.
Whenever you hear a musician say that a keyboard “plays nice”, they probably mean that the keys feel good to touch and offer substantial responsiveness.
While the construction material of the keys is certainly important (old school acoustic pianos used to have keys made from ivory), a more important factor is the key action.
The key action describes how each key responds to the touch. Subtle things such as the speed at which the key “bounces” back after being pressed affect your playing. The closer a keyboard can mimic the feel of a traditional grand piano, the better it is.
Yamaha’s keyboards offer three types of key action:
Graded Hammer Standard (GHS): This is Yamaha’s cheapest action meant for beginner to intermediate level players. GHS offers “graded” weight, i.e. lower keys are heavier while higher octave keys are lighter – just like an acoustic piano. GHS offers a good simulation of acoustic piano performance and is recommended for relative beginners.
Graded Hammer effect or GH/GHE: This is Yamaha’s premium action commonly found in intermediate to performance keyboards. The action is smoother and quieter. Keys spring back faster, making staccato playing possible. Recommended for experienced players.
GH3: An alternate version of GH/GHE, this key action offers the same responsiveness but faster key swingback. After you press the key, you will feel its weight a second time, even before you release it completely – just like an acoustic piano. GH3 is usually found in the best Yamaha keyboards.
Cheaper keyboards might offer simple synth-action – the same found on mid-range MIDI keyboards. Synth action, as the name implies, does not offer any resistance or weight. The keys bounce back as you press them. This makes entering notes easier (which is why it’s used on MIDI keyboards) but doesn’t offer the responsiveness of a traditional acoustic piano.
Complementing the idea of key action is key weight.
Essentially, keys can be fully-weighted, semi-weighted or unweighted (aka synth-action).
Fully-weighted keys have built-in weights to mimic the tightness of an acoustic piano. Just as you will have to press down harder on lower octave keys, fully-weighted keyboards are heavier in the lower ranges.
Semi-weighted keys are similar to fully-weighted keys, except they aren’t as heavy. This allows for a nice compromise between playability and authentic performance.
Unweighted keys are basically synth-action keys. There is no heft when you press down; the keys spring back up immediately. There is no difference between higher and lower octave notes either.
Buying advice:
Try and match up your experience with the key action. Don’t buy GHE, fully-weighted keys if you’ve never touched a piano before – the responsiveness will be too authentic and difficult to play.
If your budget permits it, spring for GHS keys at the very least. Try to get at least semi-weighted keys as well. Avoid synth action/unweighted keys if you can, though a lot of budget Yamaha keyboards offer just that.
Sound
You obviously want to buy a Yamaha keyboard that sounds good.
For the most part, you won’t be disappointed with any product from Yamaha. Even when they use cheap synth-action keys in their entry-level instruments, Yamaha’s keyboards always sound good enough.
As you progress higher up the price ladder, you get keyboards that sound as good as a $20,000 grand piano.
There are a few sound-related things you should keep in mind:
Polyphony
Polyphony is a measure of the number of notes an instrument is capable of producing simultaneously. A monophonic instrument, for instance, can only produce one sound at a time (remember those old Nokia phone ring tones?)
Polyphony is a bare minimal requirement for any keyboard. Otherwise you won’t be able to play chords or multiple notes at the same time.
Almost all modern instruments are polyphonic, except for cheap analog synths. The Minimoog is a famous example of a monophonic instrument.
Polyphony is usually measured in multiples of 4 (an instrument that can play two notes at the same time is called “duophonic”). Most modern Yamaha keyboards, even the entry-level offerings, will have a minimum of 32 note polyphony.
While adequate, 32 notes does constrain your playing style. At the very least, look for keyboards with 64 note polyphony.
The best Yamaha keyboards will usually have 128 note polyphony. This is the industry standard and is good enough for nearly everyone.
Some high-end Yamaha keyboards will offer as much as 256 note polyphony, but at that level, you’re just chasing numbers. There is almost no difference in the playing experience between a 128 note polyphonic instrument, and a 256 note polyphonic instrument.
Buying advice:
32 note polyphony should be the absolute bare minimum you should settle for. 128 is ideal. 64 note polyphony is fine, though if you can, spring for 128 notes.
Sound source/engine
All digital keyboards produce sound from a library of digital samples. Think of how you use a MIDI keyboard to play notes from a sampler.
The sampler in Ableton lets you drop a sound and play it with your keyboard
Obviously, the quality of the samples affects the quality of the output. Better samples, sampled better make the sound more natural and authentic.
Yamaha’s key sampling engine is AWM (Advanced Wave Memory). The first iteration of this engine was developed in 1987 and used PCM (Pulse Code Modulation). This engine changed the “color” of a sound depending on the force (velocity) with which the note was struck.
The AWM engine has been modified constantly. It is the basis for the sound in most entry-level and mid-range Yamaha keyboards today.
The AWM was also the foundation for Yamaha’s premium sound engine, the Pure CF. This engine uses sounds recorded from Yamaha’s top-of-the-line CFIII grand concert piano. As a result, Pure CF gives you probably the best replication of a an acoustic piano you can get.
Cheaper Yamaha keyboards tend to use samples recorded from the smaller (and cheaper) Yamaha S6 piano. An untrained ear might not make out the difference between a Pure CF sound and an S6 sound, but an experienced player will.
I should mention that sampling technology has improved a lot in the last two decades. The best Yamaha keyboard from 1990 can’t hold a candle to an entry-level Yamaha keyboard today.
Bottomline, Pure CF is Yamaha’s premium sound engine found in most mid-range to performance keyboards. Below that, most keyboards use a standard AWM engine with built-in sounds recorded from a range of instruments, including the S6 piano.
Buying advice:
If you have the budget for it, buy a keyboard with a Pure CF sound engine. If not, any Yamaha keyboard will, at the very least, sound good.
Built-in sounds
If you’ve walked down the musical instruments aisle at Walmart, you’ve likely seen tons of cheap keyboards advertising their “XXXX Built-in Sounds!”
What does this exactly mean?
“Built-in sounds” refers to the instruments pre-loaded on the keyboard.
The way digital keyboards produce sound is through digital sampling. There is a small computer onboard on every keyboard that’s loaded with a range of sounds. Memory permitting, you can essentially load this computer with any sound in the world – piano, organ, xylophone, guitar, etc.
Think of the way you can load your DAW with any sound and play it with your MIDI keyboard.
In fact, plenty of keyboards even give you the option of downloading your own sounds to the instrument.
So when a manufacturer says that a keyboard is loaded with XXX number of sounds, it basically means that the onboard computer has XXX pre-loaded samples.
While a few of these sounds are good and useful, a large number of built-in sounds is mostly used as a marketing gimmick. You don’t really need your keyboard to play sitar or the harp – the sample quality is likely going to be low and the keyboard isn’t a suitable instrument for these sounds anyway.
At most, you’ll want traditional key-based instrument sounds (organ, harmonium, piano) and a few classic electronic piano sounds (such as Rhodes piano).
Ignore everything beyond that as a marketing gimmick.
Number of keys
MIDI keyboards might come in a range of keyboard configurations – 25, 37, 49, 61, 76, and 88 – your options among Yamaha keyboards are more limited. Most keyboards tend to be between 61 and 88 keys.
This is partly due to the nature of the keyboards and their target users. Yamaha keyboards are digital pianos. You don’t use them to control a digital synth or enter notes in a DAW (though you can). Rather, you use them to compose songs, create melodies, and play piano pieces.
In real-world terms, 61 keys gives you 5 octaves of range. 88 keys is called a “full-size” piano and gives you the same range as a concert piano.
Some of Yamaha’s best-selling models, such as the PSR series, usually have 61 or 76 keys, i.e. 5-6 octaves of range.
The number of keys impacts four things:
Ease of use: The math is simple – the more keys a keyboard has, the harder it is to play. If you’re a beginner, it can be difficult to figure out where the C note starts if you have 7 octaves to deal with. Fewer keys are more accessible and easier to play.
Portability: The more keys you add to a keyboard, the longer it becomes. The longer the keyboard, the heavier and less portable it is. Yamaha PSRF51, a 61-key keyboard, for instance, is approximately 38″ long. But Yamaha P71, an 88-key keyboard, is 58″ long. That’s almost 5 feet – wider than most tables.
Playability: A full-sized, 88-key keyboard will give you access to all 7 octaves of range at once. With a 61 key keyboard, you might have to use the octave increase/lower feature to access lower or higher notes – not the most intuitive way to play music. In other words, you can play any piece of music if you have a full 7 octaves of range.
Price: Although it’s not always true, more keys tends to equal more $$$. The bigger the keyboard, the more it will cost.
Having said that, keep in mind that 88 keys wasn’t always standard in the music world. Mozart made much of his music on a 5-octave keyboard. Beethoven used a maximum of 6 octaves. Apart from his very late work, you won’t hear Beethoven use the very high or low notes on a piano.
So if you’re concerned about portability and price, I would recommend choosing a 61 or 76 key keyboard. This will give you enough range to play virtually any piece of music while saving desk space.
Buying Advice:
Evaluate what matters more to you – price, playability, ease of use or portability. If you want something that can play anything and price isn’t a concern, go for an 88-key keyboard. If you want something more compact, pick a 61-key keyboard. Go for a 76-key keyboard to get the best of both worlds.
Other Features
Besides keys and sound, there are a few additional things you should look for in the best Yamaha keyboard:
Portability
Portability is a measure of three things:
Size: The bigger the keyboard is, the harder it is to carry around. Full-size keyboards tend to be nearly 5′ wide, which makes them rather unwieldy. 61 key keyboards, on the other hand, often come in under 40″ – perfect for portability. Besides width, also consider the depth and height of the instrument.
Weight: Weight is a function of size – larger keyboards are heavier. But other factors such as build quality, construction material, etc. also affect overall weight.
Power source: While most keyboards are powered by AC power, a few entry-level options also use battery power. If portability is a key concern, look for a keyboard that runs on AA batteries.
There is no one size fits all measure of portability – everything will depend on your requirements. Unless portability is a prime concern for you, I don’t recommend compromising on features or keyboard size for it.
Speakers
The easiest way to ruin a good keyboard is to pair it up with low quality speakers. The best of Yamaha’s Pure CF sound engine keyboards will sound horrible if you play them through weak, tinny speakers.
Fortunately, Yamaha does a good job of matching its keyboards with the right speakers (after all, it makes some of the best studio monitors in the industry). But some keyboards don’t have built-in speakers and require external amplification (just like an electric guitar).
In this case, you’ll want to pair up the keyboard with a set of high-end speakers or amplifiers. Choosing these amplifiers is beyond the scope of this article, however – we’ll cover it in a future guide.
For now, you should just buy a keyboard with built-in speakers to avoid any issues.
Recording capabilities and microphones
A lot of keyboards – Yamaha’s included – offer the option to record your music and play it back. This is a very useful feature if you want to know what you sound like when you play.
Some keyboards also have built-in microphones. Granted, these mics aren’t going to blow you away, but they do a good enough job of helping you record your singing.
These are nice features to have – prioritize keyboards that offer them.
Learning modes
Most budget Yamaha keyboards have built-in learning modes. This can range from interactive lessons to simplified sounds for learners.
If you’re a beginner, I highly recommend buying a keyboard with these modes. They might sound gimmicky (and honestly, a lot of learning features are), but they can really help a beginner struggling to learn.
Experienced players should avoid these features of course – they just get in the way of your playing.
Ports
What ports the keyboard has defines what you can connect to it (or it to). Look for keyboards that offer at least one of the following:
USB for connecting to computers
MIDI for connecting to an audio interface or other MIDI devices, effectively turning it into a MIDI controller (note that USB can also fulfil this function)
Aux in for connecting external devices to your Yamaha keyboard’s speakers, such as playing a piano track through a phone, recording it, then playing it back on the keyboard.
Headphonejack for connecting headphones – crucial for those late night practice sessions
Sustain pedal port for connecting an external sustain foot pedal to your Yamaha keyboard.
Other bells and whistles
Apart from the above, you’ll frequently see keyboards advertised with a range of features – LED lights, a gazillion sounds, drum kits, etc.
Almost none of these are “must haves”. Some of them are “good to have”, while some are useless. But you should never base your purchase on these bells and whistles.
A simple keyboard with great keys and sound engine will give you far more joy than a feature-rich keyboard with cheap keys and poor quality sounds.
How much should you spend?
Now for that all-important b-word: budget.
Yamaha keyboards stretch across a huge range of prices. Entry level keyboards start as low as $99. Top-end keyboards can go beyond $2,000. In between, you have a range of keyboards covering virtually every possible budget or need.
In general, a few trends hold common across the best Yamaha keyboards:
Premium keyboards (over $1,000) tend to be close replicas of Yamaha’s top-end acoustic pianos. Many even come with consoles and benches. The YDP-181, for instance, looks and feels just like a console piano. Other keyboards in this range tend to be arranger or synthesizer keyboards.
Low-end keyboards (under $300) are usually aimed at beginners and have a ton of learning-focused features. The low-end PSR series, for instance, has interactive learning modes, chord patterns, etc. These keyboards also tend to have additional instruments and “song” modes built-in. This allows you to play backing instruments (drums, bass) over a chord progression to turn an idea into a song.
Mid-range keyboards ($300-$1,000) is the broadest range. At the top of this range, you get extremely competent keyboards that offer nearly the same performance as acoustic pianos. At the bottom-end, you get competent keyboards with slightly below-par keys and sound engines.
You’ll want to first figure out what level you’re currently playing at. If you’ve never touched a keyboard in your life, don’t plop $800 on a mid-range keyboard; go for a cheap Yamaha PSR keyboard instead.
Match your experience, expertise, and needs with the budget. The closer you get to the $1,000 mark, the more “authentic” playing experience (Pure CF sound engine, GH keys) you’ll have.
At the low-end of the scale, you’ll get easy to play (but inauthentic) synth-action keys and tons of learning modes – perfect for a beginner.
Before we close, let’s answer a few quick questions to help you zero-in on the best Yamaha keyboard and digital piano for your needs.
Who should buy a digital piano?
Honestly? Everyone and anyone interested in music.
Digital pianos get a bad rep because of two reasons:
Unfavorable comparisons to acoustic pianos
Poor experience from earlier generation of digital pianos
Yes, digital pianos can’t always replicate the *feel* of acoustic pianos. And yes, earlier digital pianos, especially from the 90s to early 2000s, were awful in terms of key weight and fell.
But that has changed drastically in the last fifteen years. Digital pianos have improved radically in both sound sampling and key feel. A modern Yamaha keyboard (pick from our list above) can feel as close as possible to a wildly expensive acoustic piano.
Given the upfront cost and regular maintenance of an acoustic piano (these things can cost tens of thousands of dollars), a digital piano is a no-brainer.
The fact that it doesn’t weigh 2000lbs is an added plus!
What is polyphony?
Polyphony, as I mentioned above, is how many sounds an instrument can produce at the same time.
A monophonic instrument is something that can produce just one sound at a time. Think of a guitar pitch pipe. If you blow into the pipe marked, say, ‘G-3’, it will produce only the G-3 sound pitch. That is, it’s a monophonic instrument.
On the other hand, if you strum the open strings of a guitar, you are hitting 6 notes at the same time – EADGBE. Thus the sound is polyphonic.
Since in digital instruments, all sound is produced, well, *digitally*, polyphony is highly important.
Earlier digital pianos used to have limited polyphony. A good mark was 32 note polyphony, which meant that you could have 32 different pitches playing at the same time.
You might think that 32 is more than enough – after all, you don’t have 32 fingers to play 32 notes simultaneously!
But the nature of piano means that after you hit a note, it will keep reverbating for a time. Hit a few dozen notes quickly in succession and you might have dozens of notes reverbating at the same time. This is what gives an acoustic instrument its characteristic ‘warmth’ and richness.
Thus, 32 note polyphony isn’t enough – you need more.
Thankfully, most of the best Yammaha keyboards and digital pianos we covered above boast 64+ note polyphony. 128-note polyphony is, in fact, the standard. A few very high-end instruments might have even 256-note polyphony, but at that point, it’s just bragging rights.
For practical reasons, most of you will be happy with 64- note polyphony. With 128-note polyphony, you will never run out of room for additional notes.
But never go below 64 notes, no matter how tantalizing the price and features.
Can a digital piano produce sound?
As I specified earlier, a digital piano can only reproduce sounds already loaded onto it. It cannot be used to create new sounds (that is, sound synthesis). For that, you will need to invest in a synthesizer, as we’ve shared above.
Is Yamaha a good keyboard brand?
Absolutely.
While I would never quantify something as subjective as “sound”, Yamaha easily ranks right at the very top of the digital piano totem pole. The only brands that can compete with its top of the line offerings are Roland and perhaps Korg. At the mid and lower end, Casio is a tough competitor, which is why we frequently rank Casio keyboards along side Yamaha in our best digital piano guides.
Which is the best Yamaha keyboard for beginners?
As a beginner buying a digital piano, you want a combination of affordability, competence, and features. Thankfully, the Yamaha PSR series is designed specifically to accommodate these requirements.
Our recommended Yamaha keyboard for beginners is the Yamaha PSR-EW300. However, if you’re on a smaller budget, you can also check out the Yamaha PSR E263. If you can bump up the budget slightly, the Yamaha PSR E363 is an even better option.
Should I get a 61 or 88 key keyboard?
Get an 88 key keyboard if a) you have room to spare, and b) you want to play classical music.
If neither of these are true, a 61-key or 76 key keyboard should do fine.
An 88-key keyboard does open a lot of options that can be difficult to access with 61-keys. If you intend to play some JLo acoustic tunes, 61-keys would be fine. But if you want to play Chopin and Moonlight Sonata, better grab an 88-key keyboard.
Which keyboard is better – Yamaha or Roland?
This is debatable, but for this reviewer, Yamaha is the better brand simply because it covers a much wider range of quality and price levels. The top-of-the-line Roland keyboard compares very favorable against Yamaha. But Roland has almost nothing to offer in the entry-level to mid-range, while Yamaha has enough options for everyone from the 11 year old starting music classes to the 70 year old hobbyist.
Where should I buy Yamaha keyboards?
You can either shop for Yamaha keyboards from dedicated music outlets such as Sweetwater and Thomann. Or you can just buy from Amazon.
We recommend Amazon because their prices are usually lower than competitors and their service remains unmatched.
For this week’s query, we’re jumping off one of our earlier articles and sharing our pick of the best digital piano for a beginner. Unlike the other list, this focuses exclusively on beginners and their specific needs (low budget, ease of use, learning capabilities).
It used to be that serious pianists would regard digital pianos (and the people who learned to play on them) with disdain.
An acoustic piano is areal piano. You can’t get the same experience pushing buttons on a computer.
While I’ll be the first one to admit that the sheer richness of a gorgeous Steinway grand piano is nearly impossible to replicate, digital pianos are increasingly closing the gap. The best digital pianos today do a wonderful approximation of acoustic pianos that cost several times more.
So much so that if you tell a seasoned pianist that you’re learning your chops on a Yamaha or a Kawai, you’ll get a nod of approval, not a shake of disdain.
However, vast differences remain between offerings in the “digital piano” category. The products at the very top of the table cost nearly the same as a used acoustic grand piano (and perform nearly the same).
Meanwhile, the bottom end of the market is dominated by cheap, plasticky keyboards that will make you hate piano before you even learn how to play it.
So as a beginner, you have to be careful about what you pick. You can’t afford to splurge, of course, but if you’re not careful, you can end up with a crappy keyboard that’s a pain to play. Nothing will kill your enthusiasm faster than trying to play Chopin on a keyboard that feels like a child’s play toy.
Which is why I put this article together. Below, I’ll share my pick of the best digital piano for a beginner. I’ll discuss specific tips to keep in mind when evaluating your options. I’ll then share some of my favorite instruments in this category.
We use rigorous research, reviews, and real-world performance when recommending products. Our reviewers include producers, performers, and active musicians. You can read more about our review process here. Be advised that MIDINation might earn referral commissions on purchases made through this website. This does not affect your final purchase price.
Note: As an Amazon Associate, MIDINation earns commissions for qualifying purchases made through Amazon links on this page.
About your reviewer Ryan Harrell is the founder of MIDINation and an experienced producer/DJ. His first experience with electronic music production dates back to Cubase 3.0 in the summer of 1997, and he’s been a fan ever since. He prefers Ableton as his primary DAW these days, though he is still partial to Cubase and Pro Tools. He lives in San Diego and freelances as a producer and part-time DJ.
I. Quick Tips for Buying the Best Digital Piano
As a beginner, it goes without saying that your needs are very different from a pro user’s. You want reasonable quality, not concert-ready performance. And you need it at a price point that won’t leave a knot in your heart.
Based on these factors, here are a few essential tips for buying the best digital piano for a beginner:
1. Don’t confuse digital pianos with other keyboard-like instruments
The number one question I get from beginners buying their first digital piano is this:
What’s the difference between a digital piano, a MIDI keyboard, and a synthesizer?
This misconception stems from the fact that outwardly, all these instrument-types look the same. They all have that familiar set of black-white keys. They all purportedly let you make music. And they all are sold by the same few manufacturers – Yamaha, Akai, Roland, etc.
The differences between them, however, couldn’t be more vast:
MIDI keyboards don’t have any onboard sound. Instead, they are just an interface to control a software instrument (on a computer). If you want to make music with a MIDI keyboard, you’ll need to connect it to a computer via a USB or MIDI cable (hence the name), start a software instrument, and connect the computer to speakers.
Synthesizers combine a MIDI keyboard with an onboard computer. This onboard computer is capable of synthesizing (i.e. creating) sound – just like a software instrument on your laptop. A synthesizer can be technically programmed to play any sound – a guitar, an organ, and even a digital piano. Synthesizers usually have built-in speakers.
Digital pianos are keyboards with built-in speakers that play piano sounds. You don’t need to connect it to a computer or synthesize sounds to play this instrument. While technically you can use it to control a software instrument (a la MIDI keyboards), that’s not the original purpose. Nor do digital pianos have sound synthesis capabilities (though some will offer a few selection of onboard sounds apart from piano – such as organs and xylophones).
A digital piano is meant for people who want to play the piano.
If you want to control a computer, use a MIDI keyboard. And if you want to create your own sound without a computer, consider a synthesizer.
But if you want to play Chopin and practice your 5th symphonies, you need a digital piano.
2. Buy the best keys you can afford
Once you get past the piano vs synth vs keyboard issue, you’ll find another question:
What kind of keys should you buy?
This is a mighty important question. After all, the keys are the raison d’etre of buying a digital piano in the first place. Cheap keys will kill your enjoyment of the instrument altogether.
Most digital pianos have semi-weighted or fully-weighted keys. This means that the keys have built-in weights to mimic the heft and resistance of acoustic piano keys.
For most beginners, I recommendsemi-weighted keys. Yes, fully-weighted keys feel better, but they also have far too much resistance for inexperienced players. You don’t really have the finger strength to play them effectively.
Beyond this, every manufacturer has its own nomenclature for keyboard action technology (i.e. how the piano keys “strike” the sound surface). Yamaha, for instance, has three classifications for its key action:
Graded Hammer Standard (GHS): The first key action to mimic acoustic piano keys. This is the technology most modern digital piano keys are based off. It’s still popular, especially in Yamaha’s entry-level and mid-range pianos.
Graded Hammer or Graded Hammer Effect (GHE): An improvement over the GHS with better sensors. The most notable difference is in speed of note repetition (faster = better).
Graded Hammer Effect 3 (GH3): The top tier of Yamaha’s keys. This action-type is found mostly on high-end keyboards. It features even better sensors, faster note repetition, and a lighter playing style.
In general, GH3 > GHE > GHS.
Other manufacturers will have their own classification and nomenclature.
Your goal, in general, should be to get the best quality keys you can afford to buy. If you have a budget of $500 and you find two keyboards, one with great keys and another with great features, always pick the one with better keys.
Trust me, you will regret buying poor quality keys far, far more than skipping on a few features.
3. Understand the sound source
An acoustic piano produces sound when a wooden hammer strikes a piano string.
Of course, you can’t have hammers and strings in a digital piano (it is digital, after all), so how do you produce sound?
Easy: an onboard computer with a sample of recorded sounds.
Digital pianos have recorded samples of all the sounds made by acoustic piano keys at varying velocity levels. When you press the C3 key on a digital piano, the computer finds the C3 key sample in its memory and plays it immediately. The onboard computer figures out how hard/fast you struck the key and modifies the sound accordingly.
(This is an oversimplification but you get the idea.)
Since you’re essentially playing recorded samples, the quality of the recording and the source of the samples has a huge impact on sound quality.
Simply put, if the recorded samples are from a cheap, beaten down piano, recorded in a basement with a broken microphone, you’re going to get crappy sound.
Which is why the best digital pianos on the market – the Casio Celvianos and Yamaha Arius’ of the world – use samples recorded from the world’s top acoustic pianos in tightly controlled studio settings.
Yamaha’s mid-range and up pianos, for instance, use samples from the famous Yamaha CFIII concert piano (which costs over $100,000).
Whenever you’re evaluating digital pianos, look at their sound engine. What instrument is the source of their samples? Are they recorded from the best possible keyboard in the company’s lineup?
Once again, strive to get the best sound engine/sample source you can afford. Along with the keyboard, this will have a big impact on your playing experience.
4. Get 88 keys (unless you have a space crunch)
How many keys should you get in your digital piano?
Simple: the same as any acoustic piano.
You’ll use your digital piano to play pieces that were originally written for acoustic pianos. This means that sometimes you’ll need to access bass notes in the lowest octave. And sometimes you’ll need to hit those high notes at the top of the range.
If you have 49 or even 61 keys, you can’t do that. At least not without some complicated fiddling with the octave up/down button.
So unless you have a space crunch, replicate the acoustic piano experience: get 88 keys. Skip all the 61-key and 76-key variants. They’re great for smaller spaces but not for an authentic experience.
5. Skip all fancy features
In the “must have” feature list for digital pianos, you get quality keys.
In the “good to have” list, you have sound engine, 88 keys, and learning tools (at least for beginner pianos).
Finally, in the “nice to have – but not necessary” list you have all the features marketers like to trumpet on sales pages: 256-note polyphony, hundreds of built-in sounds, etc.
The first of these oft-marketed fancy features is 256-note polyphony. On paper, it sounds great (which is why it is marketed so heavily) – you can play 256-notes at the same time!
But unless you’re a centipede, you’re not going to ever have a situation where you need to have 256-sounds playing simultaneously.
The most you truly need is 128-note polyphony. And even entry-level digital pianos offer that.
The next: built-in sounds.
This is another “good on paper” feature. Who wouldn’t want a digital piano that can play organ, xylophone, clavichord and harpsichord sounds?
Except that most of these built-in sounds are usually cheap (a general rule: the higher the number of built-in sounds, the worse they sound). Moreover, outside of novelty situations, you’ll almost never want to play a harpsichord.
If you’re getting these features without paying extra, go ahead and get them.
But if you’re being charged a premium because of these features, choose something else.
6. Make learning aids a priority
This article is on the best digital piano for a beginner. It stands to reason that this audience also needs good learning aids.
While I always recommend that you find a good piano teacher, you can also learn a great deal from the built-in learning features in many low-end pianos. Casio ‘s entry level keyword are particularly good from this perspective, offering both interactive and passive lessons.
These aren’t necessary, but they can accelerate your learning. They can also make it easier to practice and help you pick up better playing habits.
Between two equal digital pianos at the same price tag, always pick the one with better learning features, especially if you’re a beginner.
On that note, let’s answer the original question: what’s the best digital piano for a beginner?
II.The Best Digital Piano for a Beginner
Here’s my pick of the best digital pianos for beginners, sorted into different categories:
Yamaha is a brand name I and countless musicians implicitly trust when it comes to digital pianos. You can even say that Yamaha created this product category, being the first company to pioneer digital pianos.
Because of their pedigree, it’s hard to go wrong with a Yamaha keyboard as your first piano. As this affordable but powerful P71 shows, most of Yamaha’s entry-level offerings do a great job of marrying price and performance.
For beginners looking to seriously start making music, the P71 is a fantastic choice.
Design
This keyboard is quite portable despite its small size. The form factor is slim with a depth of just 12 inches. You can carry it around easily, which makes it great for home use. You can also easily keep it out of reach when not in use since it weighs so little – just 25lbs.
A side effect of the low weight is that the quality of materials in use isn’t particularly high. The keyboard is made of plastic which makes it light but also fragile.
However, the keys are fully-weighted which offers a professional-like playing experience.
Performance
The P71 has great sound performance. The tones are great and give the piano a great overall sound. It has a reverb effect, which is great, but we’d have wanted more options.
The dual mode allows you to play up to 2 instrument sounds at the same time.
It is easy to play, unlike some other complicated pianos on this list. Just switch it on and start jamming – no instructions necessary.
What We Don’t Like
Although it has many features we find appealing, we have to say we were disappointed by the lack of an LCD screen. This feature is too useful to not to be included, especially since some modern digital pianos offer it at a lower price point.
Recommended For
The P71 piano is recommended for beginners and intermediate players
How cheap can you really get when it comes to digital pianos?
As the Alesis Melody 61 shows, plenty!
This is one of the cheapest digital pianos on the market. And while it has tons of flaws, none of them are so bad that I won’t recommend it to absolute beginners. Especially given this throwaway price tag.
Bottomline: if you’re on a very tight budget, the Melody 61 MK3 is for you.
Design
This digital keyboard comes with a very modern, yet stylish look (your children will love it). It has a professional feel to it despite being for beginners. With the 61 keys that come with it, beginners can easily master the keyboard.
During testing, we also observed that it is very easy to detach from the stand. It can be carried around as it is quite portable – another plus if you’re buying it for your children.
Performance
It comes with 300 instrument voices and 300 auto-accompaniment rhythms. This makes it great for kids since they can hear their favorite tunes with just the press of a button.
It comes with dual keyboards and a split keyboard. Each of these features makes it easy to play the instrument.
With the dual keyboard, you can play 2 instruments sounds at the same time.
Of course, the 61 keys is a letdown. I would have preferred it much more with 88 keys. But given its focus on children, the lack of two octaves is acceptable.
What we don’t like
The lack of 88 keys and the plasticky quality of the keys.
Recommended for
This keyboard is recommended for parents that want to introduce their kids to the piano. It is easy to play and comes with fun features that will attract the kids to the instrument.
Including the DGX660 in this list of the best digital piano for a beginner is cheating a bit. This is a beast of a machine that’s often more at home in mid-range and even professional roundups.
But I understand that there are some beginners out there with the budget for a truly serious experience. And if that’s you, you would fall in love with the DGX660. It’s not just the best beginner digital piano; it’s the best mid-range, intermediate piano as well.
Design
The size and the weight of this digital piano do not make it very portable. Aside from the size, it comes with accessories like a matching stand, and it is quite easy to install. It comes in black and white hues.
It comes with an LCD screen that we observed made it easier to use the keyboard. The screen display lessons and other things that make it great for beginners.
Performance
The weighted keys make it easy to use this piano. Weighted keys are great for beginners as it helps them when they graduate to using similar keys on professional pianos.
The sound from the keyboard is quite clear and sound convincing. It comes with 10 different piano sounds and a plethora of other instruments sounds.
It gives a realistic piano experience and has many useful features. One particular feature that we like is the ability to use a microphone to amplify your voice.
What We Don’t Like
For beginners, the amount of features that this piano comes with can be intimidating. It is also relatively heavy.
Recommended For
This instrument is overall impressive and is undoubtedly one of the best digital pianos at this price. We recommend it for anyone who can afford it.
Need a digital piano that doesn’t hog the entire desk? Or need something that isn’t sold in those dreary black colors?
Then the GO-61K is for you.
Although it has 61 keys, this keyboard finds its place on my list because of its compact form factor, great design, loud speakers, and robust Roland performance. The keys feel great and the weight, at under 12lbs, is a revelation.
Throw in features like Bluetooth connectivity and you have a digital piano that’s perfect for those who prize portability.
Design
This digital keyboard is designed in an intuitive way that makes it easy for beginners to handle it with ease.
It weighs a mere 4 Kg. Therefore, it is quite portable and can be carried on the go without any hassles.
It can be operated via AC, or you can plug in AA batteries to make music whenever you want to.
The piano comes with Bluetooth options. You can easily stream music from the piano to selected entertainment systems.
Performance
It comes with many features that improve the overall ease of use and performance. It comes with more than 500 sounds pre-installed in the keyboard. They are drawn from Juno’s very own Juno DS from experienced synthesizers.
The sounds are very realistic and enjoyable to hear.
To ease new players into playing the keyboard, there is the Loop mix which creates a loop of sounds you can add sounds to for your entertainment and education.
With this feature, it is very easy to start making music.
The speakers are loud and sound impressive.
We also enjoy the fact that it comes with a 3-month free subscription to the piano learning app Skoove.
Recommended For
This digital piano is recommended for everyone who wants to have fun with an uncomplicated piano, but the friendly features make it especially great for beginners. We especially like the Bluetooth connectivity.
As its name implies, the Alesis Recital is meant primarily for beginners starting their digital piano education.
Consequently, it prioritizes education over everything else. You get a fantastic learning mode built-in, plus even more lessons and modes online. Throw in robust all-around performance and decent key quality and you have a digital piano that’s perfect for learners of all shape and form.
Design
This digital piano comes with 88 full sized keys. The keys are sensitive and are fully weighted. This means they are heavy and leave a satisfying tingle in the fingers when pressed down. They feel quite nice, and beginners will love them.
A design we found intriguing is that when you increase the force on the keys, the piano ejects a louder volume. The harder you press, the louder it sounds.
The keys are sensitive to touch, and the sensitivity can be adjusted using the different sensitivity levels.
The keyboard can be powered by the AC adapter or 6 D-cell batteries.
Performance
You have 12 pre-installed voices in this piano. Furthermore, there are 3 effects: modulation, reverb, and chorus.
With the 128-note polyphony, it is a very feature rich digital piano.
Some of the extra features that come with this piano are :
Lesson mode
Split mode
Metronome
Transpose
What We Don’t Like
Although it ticks many boxes, sound quality from this keyboard is a tad disappointing.
Recommended For
Beginners who do not want to spend a lot of money but still want to enjoy great features.
Need a digital piano but struggling with a space crunch? Want to play anywhere without lugging around heavy power adapters? Want a “just play” experience without struggling with intimidating 88 keys?
Then the Casio CTK-240 is for you.
Normally, I would never recommend 49 keys to anyone. But I understand there are some of you who have a space crunch (hello, dorm room) or need something that’s absolutely portable. Which is why the CTK-240 finds a spot on my list.
Design
This digital piano is a strong contender for the best designed keyboard for beginners. The 49 full size keys are of great quality and are easy to use. They feel great and are quite responsive. They are smooth to touch and do not feel cheap.
Performance
As a beginner digital piano, it comes with loads of features to make learning easier.
It comes with a lesson system that beginners will find super helpful. It teaches beginners how to play the keyboard. The lights installed at the bottom of the keys light up whenever you use them in this mode.
The dance music mode of the keyboard is another performance feature that we like about this piano.
It can be connected to your IOS device via the audio import. It comes with 48 note polyphony, which although isn’t a lot, is adequate for beginners.
What We Don’t Like
It is light on features that will interest anyone other than a beginner.
Choosing the best digital piano for a beginner isn’t easy. For starters, as a beginner you often know too little about these instruments to make a meaningful decision. Second, while the mid-range and high-end of the market has a few brands and models, the lower-end, beginner-focused market is crowded with competitors.
Hopefully, this article made it easier for you to find a digital piano that fits your needs.
Choosing the best cheap MIDI keyboard can be harder than you think. It used to be that your options were limited to a handful of products. But thanks to industry consolidation, higher competition, and the entry of dozens of cheap but competent Chinese brands, you have more options than ever. Picking the best MIDI keyboard under $100 from these can be a challenge.
Which is precisely why we created this buying guide: to help you pick the best cheap MIDI keyboard for your needs.
This segment of the market has exploded in the last few years. It used to be that you would default to the Akai MPK Mini or the mini version of Novation Launchkey, but the number of options available to you today is truly astounding. There are ultra-cheap options that start at less than the price of a movie night for two. Then there are slightly more expensive options that pack in large 49 key keyboards for under $100.
It’s not just the number of options; working within a small budget also means that you have to make compromises. Do you get a larger but inferior keyboard? Or do you stick to better but fewer keys? Should you skip the pads and sliders and knobs? Or should you get a hybrid that balances keys + controllers? What about integrations?
All of these questions can impact your decision. It’s not enough to buy the best cheap MIDI keyboard; you have to buy the best keyboard for you.
In this guide, I’ll cover all these issues. We’ll start with a list of our top recommended MIDI keyboards. Then I’ll share a detailed buying guide to help you make a more informed decision.
We use rigorous research, reviews, and real-world performance when recommending products. Our reviewers include producers, performers, and active musicians. You can read more about our review process here. Be advised that MIDINation might earn referral commissions on purchases made through this website. This does not affect your final purchase price.
Note: As an Amazon Associate, MIDINation earns commissions for qualifying purchases made through Amazon links on this page.
About your reviewer Ryan Harrell is the founder of MIDINation and an experienced producer/DJ. His first experience with electronic music production dates back to Cubase 3.0 in the summer of 1997, and he’s been a fan ever since. He prefers Ableton as his primary DAW these days, though he is still partial to Cubase and Pro Tools. He lives in San Diego and freelances as a producer and part-time DJ.
Overview: What You Need to Know
Normally, I jump right into sharing a short review of each of the keyboards I mentioned in the above list. But because we’re talking specifically about “cheap” keyboards, there are a few things I felt we should clarify.
“Cheap” MIDI keyboards speak to a particular segment of the market. If you’re looking at this category, you likely fall into one of these buckets:
You’re a beginner looking to buy his/her first keyboard
You’re an experienced musician looking to buy a throwaway “use and abuse” secondary keyboard
You’re looking for something cheap and portable to take with you on the go
There is a certain expectation that if you buy a “cheap” MIDI keyboard, you’ll have to sacrifice quality. And while this is certainly true, you can still get a lot of quality for remarkably low prices in this category.
Case in point: the Akai MPK Mini MK2, which made our “best MIDI keyboard” list finds a spot here as well. Sure, it doesn’t have the best of keys, but it is affordably priced enough to be considered “cheap”.
We reviewed 16 keyboards in compiling this list, which included models from nearly every manufacturer big and small – Akai, Novation, Worlde, amoon, etc. In coming up with our final list, we looked at a few things, such as:
Budget: “Cheap” can mean different things to different people. An experienced producer might find a $300 keyboard cheap, while a beginner might scoff at a $50 price tag. For the purpose of this article, we defined cheap as “priced under $100“.
Number of keys: There are plenty of keyboards that offer 49 or more keys under $100, but very few of these are halfway decent. For the most part, we focused on keyboards with 25-37 keys, i.e. 2-3 octaves of range.
Pads: Since this is a list of the best cheap MIDI keyboards, we omitted pad-only controllers such as the Ableton Push. Of course, we did include plenty of keyboards that combined pads with keys. But pads, for the most part, were not a priority.
DAW integrations: While we love a keyboard that integrates with every DAW under the sun, we were partial to those that prioritized the popular DAWs such as Logic Pro, Ableton, FL Studio, and Avid Pro. We would love a keyboard that works as well with LMMS as it does with Ableton, but if we had to choose, we would pick the one that focuses on Ableton over others.
Control options: We would love a cheap MIDI keyboard that can pack in 16 encoders, 8+1 sliders, and a full-range of pads, but we know that’s not possible in this price range. Thus, we focused more on keyboards that prioritized good keys and offered control options as a value-add. The sideshow, rather than the star, so to speak.
Brand: Brand shouldn’t really matter, but we’ve found that better brand usually means better service. And musicians, while they’re not a biased bunch, do care about the brand value of the gear they use. Thus, we focused mostly on brands you know and recognize – Akai, Novation, etc. There are some fantastic keyboards on the market from no-name Chinese manufacturers, but we can’t recommend them outright because of the dubious quality of their brand.
With that out of the way, let’s look at the top MIDI keyboards from our initial shortlist.
The Best Cheap MIDI Keyboard: In-Depth Overview
In previous articles, we wrote about the best 25-key, 49-key, 61-key, and 88-key MIDI controllers. While these lists covered pretty much the entire gamut of MIDI keyboards, they did not focus specifically on cheap controllers.
Thus, in this guide, we’ll focus only on keyboards you can buy for less than $100. Most of these are limited to 25 keys, but there are a few options with 37, 49, and even 61 keys.
Read on to see a detailed overview of some of our top picks for the best cheap MIDI keyboard:
When it comes to cheap 25-key MIDI controllers, my top option is usually the same: the Akai MPK Mini MK2 (full review here).
However, the Akai MPK Mini has a few clear flaws:
It is priced near the $100 mark, making it slightly (and only slightly) more expensive for beginners
It doesn’t have traditional pitch/mod wheels
The square edge and short key length makes playing the keyboard a little difficult
This is precisely why I picked the Acorn Masterkey 25 as my choice for the best cheap MIDI keyboard.
Acorn isn’t a big brand in the MIDI controller space, and I was honestly surprised by the quality of this keyboard. It fixes so many of the niggles I have with other keyboards in this category.
For starters, you get two traditional pitch/mod wheels. If you’re like me and like to bend your notes, you’ll love the tactile wheel of the large, rubber wheels.
Next, the keys, though narrow, are long and taper off before the edge of the controller. This is easier on your wrists and easier to play as well, especially if you have long, slender fingers as I do.
There isn’t much to offer in terms of control options, but a master slider and four separate knobs offer just enough to keep you happy. A tiny LCD screen (missing from so many competitors) shows track information.
But the best feature by far is the free copy of PreSonus Studio One Artist edition. This DAW normally retails for close to $100, but the Acorn Masterkey gives it away for free. A terrific value, especially if you’re a beginner who has been stuck with free DAWs so far.
Portability isn’t the Masterkey’s strong suit. At 3.6 lbs, it is heavier than my Alienbook. That weight isn’t wasted, however; the chassis is fittingly heavy and durable.
If I have any complaints, it’s about the lack of pads. Even 8 basic pads would have been enough to take this keyboard from “great” to “must buy”.
Overall, this is the perfect keyboard for someone just starting to build his studio. It’s small yet full-featured with great quality keys. The free software is a massive bonus as well.
Buy this if you:
Are on a budget
Need to prioritize the keyboard over pads and other control options
Pros
Spectacularly affordable
Easy to play full-sized keys
Includes PreSonus Studio One Artist edition DAW
Traditional pitch/mod wheels
Cons
Narrow keys can result in errors for inexperienced players
No pads
Slider has trouble staying put in mid-level positions
It’s impossible to create a list of the best cheap MIDI keyboards and not include the 800 lbs gorilla in the fray. The Akai MPK Mini MK2 is, by far, the best-selling MIDI keyboard on the market, and for good reason.
Why?
Because while the MPK Mini barely gets anything wrong. The entire package is tiny, lightweight and portable. The keys, while not full-size, are wide enough for comfortable playing. The pads, while not like its elder siblings’ MPC-style, have enough responsiveness and push to hammer out a few beats. Then you get 8 knobs, a dedicated arpeggiator, nice, rubbery octave up/down buttons, and the proven Akai brand.
All of this at a price tag that, after all the usual promotions, is deliciously low and you can see why it tops most charts for the best cheap MIDI keyboard.
Of course, nothing is completely perfect. The small size and sharp-edged keys can be uncomfortable over long periods. The 4-way joystick is a poor replacement for traditional pitch/mod wheels (and it’s awkwardly placed as well). The knobs don’t have nearly the same resistance as the MPK49’s encoders.
But all of these are moot problems; for its price, the Akai MPK Mini MK2 is one of the best MIDI keyboards you can buy.
The Novation Launchkey 25 is the smallest version of Novation’s prestigious Launchkey series of MIDI keyboards. Its larger variants, especially the Launchkey 61, regularly show up on “best of” lists. And the Launchkey 25 is no different.
Cut from the same cloth as the Akai Mini MK2, this keyboard packs in a set of 25 keys along with pads and controls. Unlike the Akai, however, the Launchkey 25 has a few crucial differences:
You get 16 pads, not 8
The pads are backlit
You get dedicated navigation control buttons
These features transform the Launchkey 25 into a fully-realized hybrid controller, and not just a keyboard. Plug it into your computer and it integrates seamlessly with most DAWs. Load a clip into the pad and it lights up.
There are issues, of course. The keys are plasticky and a tad too springy (though newbies tend to prefer the springiness). The pads aren’t as responsive as you’d want them to be. And the controller is seriously missing dedicated pitch/mod wheels.
However, for keyboards in this price range, you can’t really ask for more. If you’re a beginner who can spend a bit more, I recommend getting the Novation Launchkey 25 over cheaper $50 keyboards. From the keys to the large number of pads, you’ll appreciate the drastically better performance.
The APC Key 25, which is the keyboard variant of the APC Mini, offers an astonishing 40 tricolor pads packed into a tiny, 1.7 lbs chassis. This is fewer than the APC Mini’s 64 pads, but considering that you also get a full-sized 25-key keyboard, it’s a great compromise.
40 pads really open up possibilities in terms of music production. Instead of using your controller as a small drum machine, you can transform the APC Key 25 into a full-fledged controller. Use it to launch clips, effects, and of course, hammer out drum patterns.
The 25-key keyboard complements the pads perfectly. With a traditional pad-only controller (like the APC Mini), you have to keep a separate keyboard to create melodies. The APC Key 25 combines the pads and keys to make it easy to create melodies and chords from a single unit.
I should also mention that the APC Key 25 is designed to be used with Ableton Live. While it integrates well with other DAWs, you will find the most value if you use it with Ableton Live.
Sure, there are problems aplenty. The small pads are easy to mishit and don’t have nearly the same responsiveness as Akai’s MPC line of pad controllers. And the keys are plasticky and feel nowhere as good as Akai’s MPK series.
But as with most things, it’s about the complete experience. The APC Key 25 is a fantastic machine if you don’t want to compromise. You get the best of both worlds – full-sized keys and 40 pads – at a great price tag.
Buy this if you:
Use Ableton Live
Need pads as well as keys and don’t want to buy separate instruments
Pros
Low weight – just 1.7 lbs
Huge number of pads – 40
Pad + keys combo makes it an all-around controller for Ableton Live
Cons
Integration isn’t as seamless with other DAWs as it is with Ableton Live
Both pads and keys are less responsive than they should be
The keys are clicky and become loose over time. There are no pads, knobs or sliders. And three awkward clicky buttons have replaced the pitch/mod wheels you’re familiar with.
There’s a lot of things wrong with the midiplus 32 AKM320.
The price, however, isn’t one of them.
The midiplus 32 n is precisely what you’d want if you were in the market for the best cheap MIDI keyboard. It has almost no features to speak of and makes compromises left, right, and center.
But it is extraordinarily cheap and packs more than 2 octaves of keys – 32.
The keys are low profile and slim with a sharp square edge that ends just short of the chassis. These aren’t waterfall keys, but because of the little indent before the end of the chassis, they’re not hard on your wrists.
Unlike most other keyboards on this list, it also has 32 keys, i.e. 2.5 octaves.
The slim keys and portability-focused design makes this extremely easy to carry around. The entire unit weights just 1.6 lbs – less than a Macbook.
You don’t get any pads, knobs or sliders, of course. But you do get a volume control knob (a strange and unnecessary addition) and large octave up/down buttons. In place of traditional pitch/mod wheels, you get three buttons that do a relatively poor job.
But given the price, I can’t really complain. If a keyboard is your priority, this is the best budget MIDI controller you can buy right now from a respected manufacturer.
Buy this if you:
Are on a budget
Don’t need any pads, knobs or sliders
Pros
One of the cheapest keyboards from a respected manufacturer
Narrow footprint and low weight
Easy to use plug-and-play operation with most DAWs
If you’re prioritizing portability, you can’t go wrong with the bestseller in the category (and a keyboard I personally use on the go) – the Akai LPK25.
Weighing in at a measly 635 grams, this is one of the lightest keyboards on the market. Coupled with a tiny footprint that’s barely wider than a 13″ laptop and as tall as a brick, this keyboard is extraordinarily easy to carry around.
You get 25 mini keys, keeping in line with the portability-focused nature of this device. There are no other control options save a dedicated rubber octave up/down button and two dedicated buttons for sustain and arpeggio.
Using the LPK25 is easy given the lack of control options. Plug it in and nearly every DAW will recognize it instantly. This is great for beginners who don’t want to get bogged down by too many options or integration niggles.
No wonder it ranked as the “best for beginners” pick in my roundup of the best 25-key MIDI controllers.
Of course, there are some issues. The keyboard is inconsistent in detecting the force of each touch. Some touches register as gentle nudges. Others as punchy noises. This can be a problem if you plan to take this thing to a live situation.
The lack of control options is also obviously a problem. But given the focus on portability, I wouldn’t consider it a serious flaw. Akai could have easily tacked on a few pads here, but that would have made this keyboard far less portable.
On the whole, for its purpose – portability – this is a great keyboard, priced affordably, from a top brand.
Buy this if you:
Are a beginner and need something easy to use, or
Want something that is ultra portable
Pros
Easy to use plug-and-play performance with most DAWs
Affordable and highly portable
Very low weight – under 650 grams
Cons
Inconsistent key performance
No features; slightly overpriced for what it offers
Most keyboards on this list have either 25 or 32 keys. This is mostly because of the difficulty of squeezing in more than 3 octaves of keys into a package priced under $100.
Which is what makes the midiplus i61 so remarkable. Not only did midiplus exceed the 3-ocatve range, it’s managed to offer a whopping 5-ocatves of range, i.e. 61 keys, in a budget-friendly package. This is barely 2 octaves away from a full-sized keyboard.
Creating this affordably priced 61-key keyboard requires some compromises, of course. You don’t get any pads, knobs, sliders or other control options. As far as features go, this keyboard is as barebones as they come.
What you do get is a set of 61 full-size keys. These are synth-action keys with a certain springiness that beginners will like. They’re not anywhere close to being as responsive or piano-like as some of the higher priced variants on our best 61-key MIDI controller list.
They do, however, get the job done – giving you access to 5-octaves of range without having to hunt around for the octave up/down buttons.
Apart from the 61 keys, you also get dedicated pitch/mod wheels. I would have preferred if they were located to the left of the keyboard – that would have made access to lower notes easier while using the wheels.
You also get a tiny LCD screen that shows track information. Additionally, you get connectivity via USB or MIDI ports.
That’s not a lot to write home about, but given the price constraints, this is one of the rare 61-key MIDI controllers that can fit into the “best cheap MIDI keyboard” category.
Buy this if you:
Want a full 5-octaves of range
Don’t care about features and control options
Pros
61 full-sized keys are great for experienced piano players
Affordable price tag
Cons
No features to write about
No control options
Clunky, unresponsive keys will frustrate experienced players
Music equipment is expensive. Excluding the software and the computer, the cost of setting up the simplest of beginner studios is several hundred dollars.
But among $2,000 Fenders and $1,000 Yamaha digital pianos , MIDI keyboards stand unique as among the cheapest gear you can buy.
Sure, you can easily splurge $500 on a professional-grade Akai, but for most users, $200 is enough to get a competent MIDI controller. Which is a roundabout way of saying that MIDI keyboards are inherently cheap.
Of course, some keyboards are cheaper than others, like the ones you saw above. What you’ll want to look for in these keyboards is very different from what you’d want in a $300 keyboard. Essentially, you’ll have to compromise – do you want a great keyboard or should you settle for a mediocre one with more features? Do you get 16 pads or make do without them?
Given these price constraints, there are a number of things you should consider when buying the best cheap MIDI keyboards.
Figure out your requirements
MIDI controllers typically fall into three categories:
Key-only controllers: These keyboards – such as the midiplus i61 – only offer a keyboard. There are no other control options – knobs, pads, sliders, etc. You’ll want one of these if you only intend to use the controller to play melodies and chords.
Pad-only controllers: These controllers only have pads, like the Ableton Push. They might have some additional sliders, knobs, and buttons, but the primary focus is on the pads. You’ll want one of these if you want to launch clips, play drums, etc. You can’t use pad controllers to play melodies or play chords.
Keyboard-pad hybrid controllers: Most MIDI controllers fall into this category, i.e. they combine some control options with a keyboard. The number of keys can vary between 25 to 88. The control options can range from 8 pads (as in the Akai MPK Mini) to as many as 40+ pads (like the Akai APC 25).
Most serious producers have separate pad and keyboard controllers. I personally use an Ableton Push with an Akai MPK249. I wouldn’t recommend this for most people, however. Not only is the cost extremely high, you’ll also want a large enough desk to accommodate multiple devices.
Which is why most ‘regular’ producers – the amateurs, hobbyists, and beginners – will want a hybrid controller. By combining a few control options with a keyboard, you get the best of both worlds.
What you prioritize – keys or controls – will depend on how you play music. Do you use Ableton Live’s Session View to launch clips? Then you’ll want a controller with tons of pads like APC Key 25.
Or do you play melodies and compose songs in the Arrangement View and only occasionally use the drum machine? Then pick a cheap keyboard like the Akai MPK Mini.
It’s crucial that you go through this exercise. The more you understand how you work and make music, the better purchase decisions you’ll make.
Also, factor in how your needs will change over time. Are you actively learning? Or has your learning stagnated and you’re happy to just play the way you’ve always played? If you expect to grow a lot in the next 12 months, pick a more powerful keyboard that won’t constrain you.
Features to look out for
Apart from the above, which impact the way you approach music production, there are a number of other features you need to consider when buying the best cheap MIDI keyboard, such as:
Pad controls
Pads are one of the most important features on any MIDI controller. Here are a few things you should look for in your controller’s pads:
Pad size: Large pads are easier to tap but take up valuable device real estate. Ideally, all pads should be as large as the ones on the Akai MPK Mini MK2, but if you go beyond 8, you’ll just sacrifice portability completely. Consider how you use the pads to figure out the right size for you. If you want to tap out drum patterns, you’ll want something that’s at least as large as the Novation Launchkey 25 pads. Smaller pads, like the ones on Akai APC 25, are great for launching clips but not so great for tapping out drum patterns.
Pad responsiveness: MPC-like pads are impossible to find in this price range. The best you can get is velocity sensitive pads. Consider this a bare minimum. Without this responsiveness, every hit will register equally loudly. This might be okay for launching clips but will make it impossible to tap out drum patterns.
Pad color: Backlit or color-coded pads are much easier to use since they give you a visual cue of each clip loaded in the pad. For instance, when you load a clip into Novation Launchkey, the pad lights up, showing you that it is “ready to go”. Colored pads can also help you figure out what kind of clip is loaded into each pad (drum, snare, hi hats, etc.).
Pad location: Most small MIDI keyboards place the pads at the top of the controller. This is generally a good location for the pads. I would advise against buying any keyboard that places the pads too far to the left or right; that would make it difficult to tap out the pad while you’re playing the keyboard.
Other control options
Knobs, sliders, buttons – all of these can greatly enhance your playing experience, giving you quick access to important controls. The end result is an experience that is more intuitive and intimate – crucial ingredients for creativity.
Here’s what you should look for in these control options:
Knob quality: Of all the control options apart from pads, I consider knobs to be the most versatile. They let you control a huge array of options in your DAW, from volume and panning to dry/wet controls. You want the knob to be “tight”. That is, there should be some resistance when you try to move them. Otherwise you’ll find that any sharp tap on the keyboard will change the knob’s position, ruining your sound.
Knobs vs encoders: Knobs usually have about 240 degrees of movement. Encoders offer a full 360 degree of movement. You’ll usually find encoders on high-end keyboards.
Knob location: While this is up to personal preference, I find that knobs are easier to use with the right hand. Most keyboard manufacturers agree, which is why you’ll find that keyboards typically have the knobs located to the right. Unless you’re left-handed, avoid keyboards where the knobs are placed to the left or the bottom of the keys.
Sliders: Sliders are great for EQing but don’t offer much utility beyond that. Few cheap MIDI keyboards offer sliders, so this isn’t something you have to worry much about. But if they do, pick sliders that offer resistance or tightness when you move them. You don’t want the level to go up/down easily.
Buttons: Customizable buttons are a common feature in MIDI keyboards in the mid-range and up, but you’ll rarely find them in cheap keyboards. Customizable buttons are mostly used to launch clips or get quick access to a function. They’re not a necessity by any means but it’s good to have them. Since you won’t use buttons frequently, you can mostly ignore their quality – as long as they work, of course.
Layout: Layout is often overlooked when evaluating all the control options. Always think of how your two hands will interact with the keyboard in a live setting when you consider the layout. You want to be able to play the keys with one hand while also getting full access to all the control options with the other hand. If any control options are awkwardly located (say, the bottom left of the keyboard), it can be difficult to access them. The Pad-Knobs-Sliders-Button (from left to right) usually works well in most keyboards.
Controller keys
The quality of the keys on the controller is obviously important. Here’s what you should consider:
Key type: MIDI controllers typically have synth-style keys. These keys have a lot of springiness, i.e. they immediately jump back into position once you press them. In contrast, semi-weighted keys, which are usually found on high-end controllers, jump back based on the location of the note. Lower note are “heavier” and jump back slower than higher octave notes. You won’t find any semi-weighted keys in the “cheap” category, however, so you’ll have to make do with synth-style keys.
Key size: Most keyboards offer “full-size” keyboards. This refers to the length of the keys, not their width. In contrast, “mini” keys refers to shorter keys – commonly found in portable controllers. I recommend getting full-sized keyboards unless portability is a big priority for you.
Key width: Keys can be either full piano-style or narrow/slim. Narrow keys are obviously harder to play and can lead to mistakes. However, they also let you stretch your fingers over a wider set of keys – great if you want to touch those hard-to-reach notes. Plus, narrow keys make for a smaller and thus, more portable controller.
Pitch/mod wheels: Traditionally, keyboards have thick rubbery wheels that are used to “bend” the note, i.e. the pitch/mod wheels. Ideally, your choice of keyboard should have these dedicated wheels if you intend to bend notes a lot. Some controllers, such as the Akai MPK Mini, offer thumbsticks, while some others replace the wheels with buttons. These are all poor replacements. Your first priority should be to get traditional pitch/mod wheels.
Other features
Besides the above, there are a few other things to consider when you select the best cheap MIDI keyboard:
Portability: Most cheap keyboards tend to be portable, but some emphasize portability exclusively (such as the Akai LPK25). These portability focused keyboards tend to have a small footprint and low weight. The Akai LPK25, for instance, weighs just 640 grams. If you plan to take your keyboard with you as you travel or if you plan to bring it to gigs and jamming sessions, focus on portability. But if you plan to produce only at your desk, go ahead and ignore portability completely.
Integrations: Your keyboard should integrate seamlessly with your DAW. Consider this a minimum requirement. Otherwise you’ll end up spending way too much time downloading configuration files and searching for drivers. Luckily, if you use one of the more popular modern DAWs – Ableton, Pro Tools, Logic Pro – integrations shouldn’t be a problem. Do keep in mind that some keyboards are designed to integrated with specific DAWs (such as Akai APC 25 with Ableton Live). In such cases, I would recommend choosing a controller that works specifically with your DAW.
Ports: Most modern MIDI controllers use USB for plug-and-play connectivity, so this isn’t really a concern any more. Ideally, your controller should also offer MIDI input in case you want to connect it to other devices or your audio interface. A few controllers, such as the Arturia KeyStep, also offer CV/gate ports to connect to analog equipment. Unless you have a specific requirement, you can safely ignore all these other ports.
That’s it for now – this should give you a fair idea of what to look for in a good MIDI keyboard. We’re working on a detailed buying guide for MIDI keyboards that will expand on all these options. Check this space soon to learn more.
With that, we come to a close in this extended guide to buying the best cheap MIDI keyboard. We’ve covered everything from the factors that should impact your purchase decision to a comprehensive list of the best affordable keyboards on the maret.
Just to recap, here is our list of the best cheap MIDI keyboards, sorted by category:
What’s the best 88 key MIDI keyboard to buy right now? We’ll look at this crucial category of full-sized, professional-grade MIDI keyboards. These keyboards are perfect for serious musicians, pianists, and anyone who wants the convenience of a full 7 octaves of range. Read on to find our top picks below.
Our Top Picks
Best overall: Yamaha DGX 660 ($$) “Supremely competent, comfortably priced, and packed full of features”
Best performance: Roland FP-90 ($$$) “The keybed is arguably the best in class and even beats high-tier Yamahas”
Best for beginners: Casio Privia PX160 ($) “The Privia PX160 has no business being as good as it is for so low a price”
Best first keyboard: Alesis Recital ($) “It won’t blow your socks, but it also won’t hurt your wallet. Perfect practice keyboard”
Best premium 88-key keyboard: Yamaha P-255 ($$$) “Stunningly rich sound with keys that feel almost acoustic-like”
A question from a reader prompted this article: what’s the best 88 key keyboard I can buy currently?
88-key keyboards are at the very top of keyboard totem pole. They’re big, usually expensive, and intimidating enough to keep casual buyers away. You don’t buy an 88-key keyboard as your first entry into the keyboard world; you buy it when you’re experienced enough to handle a full-size keyboard.
To that effect, I’ll share only a brief buying guide at the end of this article.
We use rigorous research, reviews, and real-world performance when recommending products. Our reviewers include producers, performers, and active musicians. You can read more about our review process here. Be advised that MIDINation might earn referral commissions on purchases made through this website. This does not affect your final purchase price.
Note: As an Amazon Associate, MIDINation earns commissions for qualifying purchases made through Amazon links on this page.
About your reviewer Ryan Harrell is the founder of MIDINation and an experienced producer/DJ. His first experience with electronic music production dates back to Cubase 3.0 in the summer of 1997, and he’s been a fan ever since. He prefers Ableton as his primary DAW these days, though he is still partial to Cubase and Pro Tools. He lives in San Diego and freelances as a producer and part-time DJ.
The 10 Best 88 Key Keyboards
Before I can share my list of the best 88 key keyboards, I want to clarify a few doubts you might have about keyboards, pianos, and synthesizers.
Keyboards, Pianos, MIDI Controllers, and Synthesizers
Keyboard is a broad term for any key-based musical instrument. If it has black and white keys, it can be called a “keyboard”. A keytar has a keyboard, as does a Steinway piano.
Piano is the instrument you all know and all. A digital piano is like a piano, except it is entirely electric (i.e. has no analog components). Digital pianos replicate the sound and feel of a piano through a computer-based sound engine. Read more about them in our guide to digital pianos.
MIDI controller or keyboard is an umbrella term for instruments used to control MIDI notes on a computer. These might be in the form of a series of buttons (a la Ableton Push). Or they might be in the form of a keyboard. Importantly, MIDI keyboards or controllers don’t produce any sound of their own.
A Synthesizer is an instrument that can create (i.e. synthesize) its own sounds via an onboard sound engine (either digital or analog). A synthesizer usually combines a keyboard with the sound synthesis mechanism, such as the Roland Juno. Synthesizers can also be without any keys, such as the MOOG Minitaur bass synth.
For the purpose of this roundup, I’ve considered every sort of keyboard. For more details on these different instruments, refer to the buying guide at the end of this article.
Let’s dive right into the question you wanted to see answered: what’s the best 88 key keyboard on the market right now?
Please note that if you’re looking for MIDI keyboards for specific DAW, you can find our best picks in these articles:
Yamaha makes some of the best pianos in the world. I’ve consistently ranked some of its top models such as the YDP-181 at the top of my list of the best digital pianos.
The Yamaha DGX-660 combines the best features of Yamaha’s digital piano offerings at a price that won’t burn a hole in your wallet. It is expensive, but for a serious musician, this is about the cost of entry to a truly top-tier digital piano that will serve you well for years.
The DGX-660 features graded hammer standard (GHS) action. This means that the weight of the keys is graded – as you move from the lower bass keys to the higher notes, the keys get lighter. This is meant to mimic the touch and feel of an acoustic piano.
Along with the Pure CF sound engine (the same sound engine used in the best-selling YDP-181), the DGX-660 does a compelling imitation of some of Yamaha’s top-of-the-line acoustic pianos (which start at thousands of dollars). The keys feel nice to touch and the matte black finish looks really nice as well.
You can also change the touch-sensitivity to suit your needs. Switch it to ‘fixed’, for instance, and the keys will become non-responsive to touch strength (i.e. they’ll play at the same velocity no matter how hard or light you press). Choose the ‘soft’ setting and you’ll get a light, feather-touch sensitive playing experience.
But the DGX-660 isn’t just a digital piano; it is also an arranger. You can use the built-in 6-track recorder to record and arrange your tracks. There are hundreds of sounds and effects built-in, such as reverb, drums, etc.
If there is one downside, it’s that the DGX-660 isn’t the lightest option around, nor the cheapest. If you’re looking for something more portable, I recommend the [recommendation].
The price, features, overall design and Yamaha’s proven performance makes this my best overall pick for the best 88 key keyboard on the market.
This sleek, sexy machine is the successor to the wildly popular Roland RD-800. The RD-800 has long been a standard for serious musicians – a proven workhorse with a long list of features.
Roland essentially took that exact same keyboard and added a bunch of new features to take it all the way up to 11 in Roland FP-90.
The keyboard features a PHA-50 Wood and Plastic hybrid structure with escapement, which is Roland’s approach to recreating the acoustic piano feel. The velocity mapping is superb; the playing experience is just like a real piano’s.
Like all its performance offerings, the FP-90 also uses Roland’s physical modeling engine to create sound. This sound engine creates a virtual model of an acoustic piano. The result is lots of options to create subtle variations. For instance, you can choose between 7 different lid positions. Each of these mimics the effect of raising or lowering the piano lid, creating subtle differences in tone and sound quality.
This is a keyboard meant for stage performers. So you don’t just get a standard 88-key keyboard; you also get programmable faders and buttons. A big new feature is the built-in Bluetooth which gives you wireless MIDI. This greatly enhances the keyboard’s capability. Use it as a replacement controller for Ableton or Logic without worry about plugging it in.
Rounding up the feature list is a powerful set of 30W speakers. You can easily drag this to a small gig and not even use any external speakers.
Oh, and did I mention that you get a whole range of Roland’s classic electric piano sounds to choose from? This ranges from the 1976 Suitcase Rhodes to the Model 200.
There are a ton of additional features; I’ll cover these in a review later. For now, if you’re looking for a performance pick, the Roland FP-90 should be at the top of your list.
There’s little doubt that Casio makes fantastic digital pianos, especially in the sub $500 range. The Casio P-150 was a bestseller for years. The Casio PX-160 is an upgrade on the P-150 that retains the features that made the original so popular, and adds a few bells and whistles.
For starters, you get the same tri-sensor scaled hammer action. This time, however, it is slightly refined (hence the ‘action II’) for better acoustic-like playback. This action essentially relies on three sensors built into the keyboard to detect velocity, force, and timing. The keyboard translates these signals into acoustic sounds.
The PX-160 uses Casio’s AiR (Acoustic and intelligent Resonator) sound engine. This is similar to Yamaha’s Pure CF sound engine in that it is based on sounds recorded from a 9-foot concert grand piano. Combined with the tri-sensor action, this delivers a superb playing experience.
A nice surprise is the built-in speaker system. At 8W, the speakers are louder than Yamaha DGX-660’s. The speakers are ported to the back which means that if you place it against a wall (as you would in most homes), the sound will resonate off the wall creating an even richer, louder sound experience.
The PX-160 is lightweight and narrow in design. At under 25lbs, it is light enough to carry anywhere. The slender design also means you can place it on nearly any surface.
The PX-160 doesn’t fare too well as an arranger – you get just 2-tracks on the MIDI recorder and it doesn’t have as many built-in effects or sounds. However, if you’re looking purely for an affordable and capable 88-key keyboard, you won’t be disappointed with the Casio Privia PX-160.
Pros
Tri-sensor action + AiR engine performs well
Powerful built-in speakers
Narrow design and low weight
Cons
Limited arrangement features
Tri-sensor action does not mimic weight of acoustic keys well
If you’re a beginner looking to get started with a full-size keyboard, don’t look further than the Alesis Recital 88-key keyboard.
This keyboard features semi-weighted keys. They don’t quite mimic the hammer action of a fully-weighted keys, but for beginners, it’s a nice compromise between synth keys and acoustic piano keys. The keys are velocity sensitive but feel slightly light overall (which can be an advantage for light-fingered beginners). The 128-note polyphony is a nice addition in this price range as well.
This piano is built for learning, so you get a ton of educational features (such as split and layer mode). The 20W built-in speakers are powerful enough that you don’t need any additional equipment. And the 5 voices (acoustic & electric pianos, organ, synth, and bass) give you a good foundation for different genres/playing styles.
Another plus is USB MIDI connectivity. You can plug this into your computer and use the keyboard as a MIDI controller for Ableton or Logic.
On the whole, the playing experience isn’t quite as good as some of Yamaha or Casio’s cheaper models, but for this price, the Alesis Recital is a great starting point.
The Yamaha P-255 is the successor to the popular but flawed P-155. Like its predecessor, the P-255 is inspired by one of the world’s greatest concert pianos, the Yamaha CFIIIS (which is also the source of the Pure CF sound engine). Yamaha’s engineers had a clear brief when making the P-255: replicate the CFIIIS as closely as possible.
And boy did they deliver!
The P-255 irons out all the kinks in the P-155. The keys are nimbler and the graded hammer action (GHS) is smoother. The polyphony has also been upgraded to 256 notes, which adds a subtle dynamic that was missing from the P-155.
The real stars, however, are a bunch of new features that go a long way towards replicating the acoustic piano feel. First up is string resonance. This feature duplicates the sound of that all non-struck keys make when you press down on a note forcibly. The effect is subtle but noticeable.
Another feature is sustain sampling. This mimics the sound produced by the soundboard and strings when you press the damper pedal.
Additional features include a 3-band EQ and a bank of effects and voices (including chorus, phaser, and tremolo). Make no mistake though – this is an out-and-out performance piano, not a general purpose keyboard. You’ll want this if you need the digital piano experience.
There are a few other features, such as the app controller for iOS devices. This app lets you edit and control all your piano’s features right from inside your smartphone. Nice to have and great for setting up presets.
Overall, the Yamaha P-255 is one of the best 88 key keyboards on the market. It does an impressive job of imitating one of Yamaha’s finest pianos ever. Even though it lacks modeling and arrangement features, it should be high on your list if pure playing experience is your priority.
Need a no-frills full-sized keyboard that does a fantastic imitation of an acoustic piano without the costs?
Then the Yamaha P45 is for you.
The P45 is the successor to the P35. It’s light, compact, and nearly Spartan in its design. At just about 25lbs, it is also one of the most portable pianos on this list.
The crowing feature of the P45 is the GHS action. This feature is only found in Yamaha’s higher-tier keyboards such as our highly recommended DGX-660. You get the same acoustic-like action (lighter on higher notes, heavier on bass notes) at a an affordable price tag.
What’s missing is the Pure CF sound engine. Instead, you get AWM stereo sampling. This is based on stereo samples recorded from Yamaha’s acoustic pianos. It works well, but lacks the dynamism and subtlety of the Pure CF engine.
Additionally, you get 4 touch sensitivity settings (hard, medium, soft, and fixed) to accommodate different playing styles. The key tops are plastic instead of the synthetic ebony & ivory found on Yamaha’s high-end digital pianos (such as the P-255). They look good but don’t do a great job of absorbing moisture from sweat.
As far as other features go, the P45 is as barebones as they come. You don’t get a massive sound library, nor do you get a ton of effects. This keyboard is targeted at people who want an affordable digital-piano experience in a portable package.
Overall, the P45 is a fantastic pick for an acoustic piano replacement in an affordable, lightweight package. It lacks arrangement and modeling features, but makes up for it with fantastic key action and acoustic piano-like performance – all at a great price tag.
The Korg KROME is a workstation, not just a regular old keyboard.
This means that unlike the other entries on this list, the KROME can function as a full-fledged audio production device.
Essentially, the KROME acts as a powerful hardware synth with highly capable 16-track sequencer built-in. Think of it as a copy of Ableton embedded right within your keyboard.
To start with, you get a bright and responsive 7-inch screen. Everything you need to control can be accessed here. You can change the instrument, add effects, and access the sequencer. The controls are intuitive and the screen is large enough even for the fat-fingered. Tap a parameter and you can adjust it with the large data dial to the right of the touchscreen. Hold on anything for a second and you get a pop-up with fine controls.
You get a full-blown synth with up to two stereo oscillators, four filters, two amps, and five LFOs on each voice. It’s not going to replace Serum, but for a hardware synth, it is both capable and powerful.
The built-in sounds are great as well, especially the acoustic piano sound (which uses Korg’s EDSx sound engine). There are good electric piano and clav samples, along with a drum kit.
The star of the show is the 16-track sequencer. The track editing is highly visual, which gives it a DAW-like workflow. You also get a piano roll editor for fine tuning recordings or adding/removing notes manually. You can pretty much create an entire track right from the workstation itself – no DAW necessary.
Overall, the KROME is a powerful workstation for experienced players looking for a hardware synth + sequencer combination. It’s ideal as a keyboard for live performances as well.
Do you need a controller for your DAW and couldn’t care less about onboard sounds and acoustic piano-like performance? Do you need plenty of programmable buttons, pads, knobs, and instant integration with Ableton and Massive?
If you answered ‘yes’, then the Nektar Impact LX88+ is for you.
As one of the few 88-key MIDI keyboards on the market, I just had to put the Impact LX88+ on this list. As I said in my earlier article on the best MIDI keyboards, the LX88+ ticks off all the right boxes as far as MIDI controllers go. You get semi-weighted keys that feel nice and tons of programmable buttons.
My favorite feature, however, is the existing integrations with most DAWs and synths. You can control your instrument right from the controller without fiddling with key mappings. Hit the ‘mixer’ button and Nektar will assign the first 8 sliders to the 8 channels of your DAWs mixer automatically.
The fact that it also has 88 keys – a rarity among MIDI controllers – makes it one of my topmost recommended models.
Do keep in mind that as a MIDI controller, the LX88+ doesn’t have any onboard sound or speakers. You will need to plug it into your DAW to hear anything.
Overall, the Nektar Impact LX88+ is a great pick for someone looking for a controller for his DAW. It has tons of buttons and pads, a great keyboard, and a full 7 octave range. And at this price, you can’t really get a better deal.
If there is one brand I trust besides Yamaha, Casio, and Roland, it’s Korg. Korg’s synths and workstations are legendary among performers. The Korg SP-280 is Korg’s attempt at making a digital piano, and it is a fabulous one.
First off, this keyboard features Korg’s natural weighted hammer action keys. This is similar to Yamaha’s GHS keys. The keys are heavier in the bass notes and become lighter as you move to higher treble notes. This does a great job of replicating the resistance of acoustic keys.
Rounding up the NH keyboard action is a dynamic sound engine that automatically chooses from 4 different piano sounds based on your playing style. Should you choose to go pianissimo or fortissimo, the SP-280 will choose the right soundbank to recreate the acoustic piano effect.
But replicating an acoustic piano isn’t the SP-280’s only forte. It also has a number of built-in electric piano and organ sounds, including a fantastic vibraphone and harpsichord. Korg’s electric piano sounds are particularly well done and harken back to some of the classic sounds of Korg’s ’80s models.
You get 3 built-in touch sensitivity settings (heavy, normal, light), and 120-note polyphone. You also get 3 effects (rever, brilliance, chorus). The only missing feature is a built-in arranger.
Rounding up the feature list is a set of powerful 22W speakers. These are loud enough that you can perform in a small venue without hooking the SP-280 to a PA system.
On the whole, the Korg SP-280 is a great alternative to the Casios and the Yamahas. It looks great, feels nice, and comes at a great price.
Pros
Natural weighted hammer action works great
Dynamic sound engine replicates acoustic piano perfectly
The Casio Privia PX-360 is the elder sibling of the bestselling PX-160. It boasts much of the same features but better build-quality, nicer keytops, and a standout touchscreen.
The keyboard uses a tri-sensor scaled hammer action with Casio’s AiR sound engine. This combination does a spectacular job of replicating the feel and sound of an acoustic piano. The action is graded, i.e. it goes from heavy to light as you move up the octaves. Synthetic ebony and ivory keys complete the acoustic piano experience (and serve a function purpose – the keytops are moisture resistant).
The standout feature, however, is the bright 5.3″ color touchscreen. This screen replaces all the buttons and kobs from the PX-360’s predecessor. You can control the entire keyboard from the screen without fiddling with messy physical controls. You can launch any of the 550 built-in sounds, open the 16-track recorder, and access the learning features (such as Duet mode) with a single tap of the touchscreen.
Despite all these features, the Privia PX-360 is surprisingly lightweight, weighing a measly 26lbs. It also has a narrow design which makes it easy to carry from gig to gig.
Overall, the PX-360 is an ideal upgrade to the PX-160. It boasts a better onboard recorder, a ginormous library of sounds, and one of the best touchscreens on any 88-key keyboard on the market.
I’m sure some of you reading this might be confused.
I’ll admit, so was I.
The word “keyboard” is incredibly broad. In my career as a producer, I’ve seen:
Pianists use “keyboard” for their pianos
Producers use it to refer to their MIDI controllers
Performers use it to refer to synths and digital pianos
Depending on who you are and what you do, “best 88 key keyboard” might mean different things to you. Which is why I tried to include every kind of keyboard I could find in my roundup.
Acoustic pianos are expensive and difficult to maintain. You can’t move them around much. And God forbid if they get out of tune – you’ll have to call in a tuner who’ll take half your salary for half a day’s work.
That’s why in the 60s, Harold Rhodes invented the electric Rhodes piano. Much like an electric guitar, this piano used electric pick-ups to translate vibrations into sound. You could send the sound signal to an amplifier and apply audio effects.
The Rhodes MK II piano from 1973 (Image source: Wikipedia)
The Rhodes piano enabled some fantastic innovation in sound. The strange, other-worldly effects in Pink Floyd’s music or the thick, driving bass in “Riders on the Storm” could be attributed to the electric piano.
In 1983, Yamaha introduced the YP-40, often credited as being the first digital piano. Instead of an electric pick-up, the YP-40 used a digital sound engine to create sound. A bunch of sounds were loaded on the YP-40’s sound engine. You could select a sound and press any key to hear it.
These early digital pianos were hardly acoustic piano replacements. Their tone was clunky and the keys never felt much like real pianos. What they did have going for them was their price. Since there were no moving parts, nor did they require expensive materials, you could make digital pianos for extremely cheap.
Over the years, digital sound producing capabilities have improved drastically. And with it, the quality of digital pianos on the market.
A modern digital piano has a sophisticated sound engine. Usually, this sound engine has a set of recorded sounds from high-end pianos (such as Yamaha’s Pure CF sound engine, which uses sounds from the Yamaha CFIIIS piano – priced at $54,000).
When you press a key, the sound engine springs into action, selecting the right sound based on the velocity and force of your touch.
Essentially, a digital piano is a pseudo-synthesizer that focuses on reproducing pre-loaded sounds.
The keys, too, have improved over time. Modern digital pianos mimic the hammer action of acoustic pianos. Yamaha’s Graded Hammer action, for instance, even makes the keys feel lighter as you move from low bass octaves to high treble octaves – just as on a real piano.
Most digital pianos can be plugged in via MIDI or USB cable into a computer. Thus, they can act as a MIDI keyboard, letting you enter notes into your DAW.
Choose Digital Pianos if
You want acoustic piano-like sound without the cost or maintenance
You’re ready to spend a minimum of $300 (ideally, $600)
You want to prioritize piano sounds
You want built-in speakers
You don’t need pads, dials, sliders, and buttons for MIDI control
A modern-day high-end digital piano can perform as well, and even better than a low-end to mid-range acoustic piano. You might want to choose the latter for acoustics or even sentimental reasons, but in terms of performance, a digital piano is as good an option as any other.
Synthesizers and Workstations
A synthesizer is any instrument that can synthesize sounds, i.e. create them from scratch. This can be a software synth, like Serum. Or a hardware synth, like the MOOG Minitaur.
A synthesizer does not have to have a keyboard. A keyboard is useful for playing the sounds you created, but creating the sounds doesn’t require it. In fact, hardware synths are often sold with just the synthesizing unit. You can plug in a keyboard separately.
An example of an old-school analog synth, minus a keyboard (source: Tumblr)
Of course, that’s not always the norm. Many of the best-selling synths in music history have built-in keyboards. The popular Nord Juno, for example, has a 49-key keyboard built into it.
Synthesizers can be analog, digital, or software. Analog synths, such as [example] create waveforms and give you the means of manipulating them. Digital synths are newer and create waveforms from a digital soundbank. And software synths take the same process to a software interface.
Synths are often colloquially called “keyboards”. You’ll often see the guy on the synth in a band referred to as the “keyboardist”.
While they were immensely popular earlier, hardware synths (either analog or digital) have become something of a niche buy recently. Modern software synths are so much more powerful than what even the best hardware synth can accomplish. You can usually get much better results by plugging a MIDI keyboard into your DAW and using a software synth like Serum.
Unless you need it for the performance aspect (a guy with a keyboard plugged into a laptop isn’t as nice to look at as a guy on just a keyboard), you don’t always need synthesizers anymore.
Choose synthesizers if:
You want to create sounds from scratch
You have a budget of $500 and up
A software synth isn’t enough for your needs
This brings me to another kind of keyboard: workstations.
Workstations occupy a niche spot in the keyboard lineup. They’re essentially “hardware DAWs”. They have built-in recorders and arrangers, usually accessible through a LCD screen. Often, they also have a synthesizer built-in.
The idea behind a workstation is to give you the means to create an entire track right from the keyboard. You can choose a piano sound and lay down the rhythm. Then switch to drum sounds and lay down the drums on another track. And you can synthesize a guitar sound for the main melody.
The Korg PA3x is a good example of a capable workstation. (Source)
Workstations are good if you like to “touch” your music. But in terms of capability, they’re far behind even a basic DAW. You’re usually limited to 16 or 32 tracks. You can’t add any plugins. And your effects are limited.
You’ll get far, far more utility out of using a full-fledged software DAW over a workstation.
Choose workstations if:
You want the “intuitiveness” of creating, recording, and arranging tracks from the same device
You don’t want to use a DAW
MIDI Keyboards
This brings me to the final piece of the keyboard puzzle – MIDI keyboards.
A MIDI keyboard is a keyboard that plugs into a computer and helps you control a DAW. Think of it as a physical interface for your DAW.
Instead of entering notes with your mouse (or God forbid, your computer keyboard), you can use the intuitive and familiar black-and-white keys of the MIDI keyboard to create your music.
MIDI keyboards don’t produce any sound of their own, i.e. they don’t have any built-in speakers. Unless they’re plugged into a DAW, you won’t hear a thing if you press a key.
In fact, it’s better to call them “MIDI controllers” than “MIDI keyboards”. The latter term is simply used to differentiate them from controllers that don’t have piano keys, such as the Ableton Push.
Ableton’s popular Push 2 MIDI controller (Image Source)
Because they’re meant to control a DAW (or a hardware synth), MIDI keyboards usually have poor quality keys. You’re unlikely to play them the same way as a conventional piano. Thus, you’ll rarely, if ever, find fully-weighted, piano-like keys on a MIDI keyboard.
To help you control your DAW better, most MIDI keyboards have built-in pads, sliders, and buttons. They’re usually pre-programmed to perform certain functions in the DAW or software synth. The sliders might be programmed to control the EQ, and the dials to control volume.
The lower key quality and the lack of synthesis capability means that MIDI keyboards are usually a) cheap, and b) limited to 49 or at most, 61-key arrangements. Though there are a few 88-key MIDI keyboards on the market, they are rare. You’re more likely to find 49-key, 32-key, and even 25-key options.
Prices have dropped drastically as the popularity of electronic music has increased. With everyone and their moms producing EDM, there is a glut of demand for MIDI keyboards. This has reduced prices to a point where you can buy a competent MIDI keyboard for under $100.
Overall, choose MIDI keyboards if:
You want to control your DAW, not synthesize music from the keyboard itself
Don’t care about key quality
Need close integrations with the DAW to make controlling it easier
Have a small budget
Do keep in mind that technically, you can use any keyboard – a digital piano, a synth, a workstation – to control a DAW, as long as you have a MIDI port. The only advantage MIDI keyboards have is better integrations and additional control options (pads, buttons, sliders, etc.).
3 Things to Consider Before Buying 88-Key Keyboards
If you’re in the market for the best 88 key keyboard, there are a few things you should ask yourself before making a purchase decision:
1. Do you really need 88 keys?
88-keys is the largest keyboard size you can buy. That’s the exact number of keys on a full-size modern piano, giving you a complete 7-octave range.
The idea of a full-size keyboard can be tempting, but for many people, it’s just overkill. Unless you’re playing piano pieces, you don’t really need 88 keys. In fact, for beginners, 88 keys can be downright intimidating.
Plus, a full-size keyboard is heavier and unwieldy. Not exactly perfect for lugging around to gigs.
If your goal is to produce music – either with a hardware synth, workstation, or DAW – a 49 or 61-key keyboard is a much better option. 49 keys gives you four octaves of playable range, and you can shift up/down octaves with the press of a button. The lower key count also makes them much more portable.
So before you plop down the cash for the best 88 key keyboard, ask yourself: what kind of music will I play with this keyboard? Does this music really require 88 keys?
2. What kind of music will you play?
What kind of keyboard you’ll buy will depend greatly on the kind of music you want to play. If you want to create ‘80s electronic pop, you’ll want a synthesizer with that traditional ‘80s sound. If you want to play Chopin and Bach, you’ll want a digital piano. If you want to produce songs with a DAW, pick a MIDI keyboard.
I’ve often seen beginners buy expensive keyboards only to later realize that they can’t fully utilize them.
Broadly speaking:
Digital pianos are for playing piano pieces that require an acoustic piano-like performance
Synthesizers are for creating your own sounds with a retro or ‘80s vibe and in a more intuitive physical form than a software synth
Workstations are for recording and arranging complete songs, without the assistance of a DAW
MIDI keyboards are for producing music using a DAW and software synth
3. What is my experience level?
The easiest way to ruin your music journey (and your finances) is to buy an instrument you’re not really ready for yet.
An expensive, high-end instrument is often more challenging to play.
A top-of-the-line Yamaha digital piano, for instance, has acoustic piano-like keys. This means that the keys are harder to press (i.e. require more finger strength). It also has features to mimic the complex acoustics of a real piano.
Advanced players might love these additional features. But for beginners, they can easily become too overwhelming. A new piano player will actually benefit from lighter keys and simpler acoustics.
This applies to key count as well. If you’ve never played the piano before, 88 keys will confuse you. A smaller 49-key keyboard will be much easier to control.
So before you decide what to buy, be honest with yourself about your experience level. If you’re a beginner, save your money and buy an entry-level keyboard. Reserve those $x,xxx keyboards for when you actually know what you’re doing.
Conclusion
You now know which are the best 88 key keyboards on the market right now. You also know the difference between different keyboard-types, and what features to look for when buying them.
Hopefully, this will help you make a better buying decision.
What’s the best mini MIDI keyboard for touring musicians? What kind of features you should look for when buying one? Should you choose the traditional wired keyboards, or should you spring for a wireless one? I’ll share answers to these questions and more in this detailed guide to the best mini MIDI controllers on the market.
Mini MIDI keyboards have come a long way. When the MIDI format was first introduced by Robert Moog at the 1982 NAMM show, the only “keyboard” was a heavy Roland synth, weighing in at several pounds.
Today, we have keyboards like the Akai LPK25 that weigh in at under 1 lbs.
Mini MIDI keyboards are arguably the most popular sub-category within the broader MIDI controller segment. This is mostly due to their non-intimidating size and low cost. Although their primary customers are supposed to be touring musicians and producers, tons of beginners also prefer them.
This effectively bifurcates the market. There are serious musicians who need a small keyboard to use on the go. And then there are beginners who just need something small, cheap, and non-intimidating for daily use.
In this review, we’ve tried to take both these markets into account. Our top choice should please everyone – serious musicians and amateurs alike. But at the same time, we’ve also covered gear that works better for amateurs as well as more professional equipment.
At a glance, these are my picks for the best mini MIDI keyboards:
Best overall: Akai MPK Mini Mk2
Best performance: Akai MPK225
Best budget: midiplus AKM320
We use rigorous research, reviews, and real-world performance when recommending products. Our reviewers include producers, performers, and active musicians. You can read more about our review process here. Be advised that MIDINation might earn referral commissions on purchases made through this website. This does not affect your final purchase price.
Note: As an Amazon Associate, MIDINation earns commissions for qualifying purchases made through Amazon links on this page.
About your reviewerRyan Harrell is the founder of MIDINation and an experienced producer/DJ. His first experience with electronic music production dates back to Cubase 3.0 in the summer of 1997, and he’s been a fan ever since. He prefers Ableton as his primary DAW these days, though he is still partial to Cubase and Pro Tools. He lives in San Diego and freelances as a producer and part-time DJ.
A Brief Guide to Buying MIDI Keyboards
To use the term “mini” keyboard is to essentially refer to keyboards that have between 25 and 37 keys, i.e. two to three octaves of range. By virtue of their limited key count, all such keyboards can be classified as “mini”.
That doesn’t mean that all mini keyboards are equally portable. Some keyboards might have a small size but use a heavier chassis which adds to their weight. The Behringer Deepmind, for instance, packs in a powerful synthesizer into the keyboard and weighs in at a whopping 15 lbs.
Not exactly something you can drop into your backpack and lug around!
So while I’m tempted to just direct you to our page for the best 25-key MIDI keyboards, I feel that there are a few things I should clarify about buying mini keyboards.
Who are mini MIDI keyboards for?
If you’re reading this, you likely fall into one of the two categories:
You’re a beginner looking for a cheap, small, and portable MIDI keyboard to help you produce music. You will primarily use it on your desktop with a laptop, but you also want to be able to carry it around to a friend’s place for a jamming session. Cost and ease of use are your primary concerns.
You’re a serious musician who already has one or multiple larger keyboards at home. However, you want something that you can carry around with you to gigs and jamming sessions. You already understand how to use MIDI keyboards well and hence, features, not price is your top concern. Since you want to lug it around to gigs, you also want
Because the market is divided this way, you’ll find that most mini MIDI keyboards fall into two camps:
Cheap and easy to use: These keyboards will typically have light synth-style keys, limited control options, and will cost under $100.
Feature-rich but expensive: These keyboards will feature better keys – even semi-weighted keys – and offer better quality pads, knobs, and control options. They’ll be heavier as well on account of the better construction quality. Most such keyboards cost over $200.
Which of these two categories you go for will depend on your needs, of course. In the next section, I’ll help you understand these needs better.
How to evaluate your needs?
Barring broken keys and non-functional pads, the number one reason why most buyers are unhappy with their MIDI keyboard purchase is because they bought something that didn’t fit their needs.
This is an easy mistake to make. You might overestimate your skills and buy something that’s far too powerful (and expensive) for you to ever use. Or you might underestimate your own growth trajectory and end up with something that’s too underpowered for anything serious.
To help you make sense of your needs, try answering these questions:
Will you use it on your desk or carry it around to gigs? In case of the former, you can sacrifice portability for functionality. In case of the latter, low weight and small size should be your top priority.
How much desk space do you have? An often overlooked factor is desk space. While mini MIDI keyboards are, as a rule, small, some are taller than they are wider. This requires more vertical desk space since you’ll want to keep a laptop/desktop behind the keyboard as well.
Do you need pads? I almost never recommend getting a MIDI keyboard without any pads – you never know when you might need them. But in case you already have a great pad controller (like the Ableton Push) and need something just for playing melodies, you can safely buy a keys-only controller (like the Akai LPK25).
Do you know how to play the piano? If you’re an experienced pianist, you’ll be disappointed with the loose, plasticky synth-action keys found on most low-end mini keyboards. Though 25-37 keys is hardly enough to play your best Chopin rendition, you’ll enjoy using better keyboards (especially with semi-weighted keys) a lot more.
How many control options do you want? If you’re a beginner, you don’t want tons of buttons, knobs, and sliders on your keyboard. It will just end up confusing you. If you’re a serious musician, however, you’ll want to prioritize customizable controls so you can play the way you’re used to playing.
How will you use the keyboard? Do you want to just play some chords and melodies? Then buy a keys-only controller. Do you want to tap out a few drum patterns? Then buy a keys + pad controller. Or do you want complete control over your DAW? Get a professional MIDI keyboard with extensive control options. Analyze your playing style and usage before you decide what to buy
Is it your primary or secondary keyboard? This might be a moot point for beginners, but if you’re a serious musician who already has a handful of keyboards, you’ll want to ask this question. Essentially, you want your new mini MIDI keyboard to fill the gaps left by your other controllers. Don’t get another portable keyboard with limited control options if you already have one Akai MPK Mini tucked away in your storeroom.
Are you learning new skills? Of course you are. But what you want to know is your “learning trajectory”. Essentially, you want to figure out how quickly you’re picking up new skills. You won’t buy a new keyboard every six months, so you want something that will still be powerful enough to serve you in 6 months, 12 months, or even 5 years.
What to look for in mini MIDI keyboards?
Now the all-important question: what should you look for in a mini MIDI keyboard?
The exact answer will, of course, depend on your specific requirements. But there are a few broad issues you should think about:
Portability: Portability is a function of three things: size, shape, and weight. While size and weight are obvious (the lower the better, of course), shape is often overlooked. If the controller is overly tall or overly long, it will be difficult to keep in a standard bag. This is why some of the best mini MIDI keyboards like the Akai MPK Mini have roughly the same shape as a laptop.
Durability: Durability is obviously important for MIDI instruments, but it is arguably even more important for mini keyboards. Why? Because you’re likely going to lug it around with you on tours and jamming sessions. A few dings here and there and you might find that the keys don’t work anymore or the pads don’t pop back after being pressed.
Integrations: While technically you can make any MIDI keyboard work with any DAW or synth (the MIDI protocol is universal after all), you’ll have a far easier time if your controller integrates with your DAW out of the box. Look for keyboards that are designed specifically for your DAW. If you happen to use one of the popular DAWs – Ableton, Logic, FL Studio – this will be easy to find.
Number of keys: Mini keyboards, by definition, are mostly limited to 25 to 37 keys. A few offer 32 keys as well. From experience, I find 37 keys to be a weird in-between two and four octaves of range. They also add to the size. Unless you absolutely need three octaves of range, I recommend going for 25 keys.
Connectivity: Thankfully, nearly every modern MIDI keyboard offers USB connectivity. This means you no longer have to carry around your USB audio interface and a MIDI cable. However, a few modern keyboards also offer wireless connectivity via Bluetooth.
Built-in sounds and speakers: Any keyboard that allows you to create your own sounds isn’t just a MIDI keyboard anymore; it’s a synthesizer and that’s a whole new product category. But a few MIDI keyboards, most notably the Akai MPK Mini Play, have a handful of built-in sounds and a small speaker. This isn’t meant to replace a full-fledged synthesizer. Rather, it’s meant to give you the ability to jam out some melodies without connecting to your computer. It’s a nice feature to have, but I don’t consider it a must-have.
Mobile/tablet connectivity: Not a lot of serious musicians use their iPads or phones to produce music. However, if you’re a beginner with a free copy of Garageband or just want to have some fun, it can be fun to connect your keyboard to your tablet or phone and jam out some tunes. For this, you’ll need either a dongle to connect the USB cable to your mobile device. Or you’ll want the keyboard to support wireless connectivity via Bluetooth. If you intend to use your keyboard this way, consider this a must-have feature.
Should you buy wireless MIDI keyboards?
This brings us to a question that’s caused a lot of agony and heated debates among musicians in the last couple of years: wireless keyboards.
Wireless MIDI keyboards bypass the USB cable and connect to your computer via Bluetooth.
When they were first launched, wireless keyboards were mostly a gimmick. The Bluetooth protocol didn’t offer enough bandwidth to transmit MIDI signals with low enough latency. The end result was often hilarious as you would tap a note and only hear it back after a second (which, in latency terms, is a lifetime).
But as the Bluetooth protocol and batteries have improved, so has the potential of wireless keyboards. Modern wireless keyboards offer competent latency. Obviously, it’s not going to be as low as wired controllers paired to a powerful computer (the MIDI standard is designed for latency as low as 1ms), but it’s enough to be playable.
So the question is: should you buy a wireless MIDI keyboard?
Our stance on this is consistent: Only if you absolutely have to.
Wireless MIDI keyboards pose three big issues that stop me from recommending them wholeheartedly:
Latency: Although it is improving, especially with Bluetooth 4.0, wireless just doesn’t have the bandwidth of traditional wired USB cables. Your latency is always going to be lower unless they develop a groundbreaking new wireless technology.
Price: Wireless keyboards tend to be priced nearly twice of their wired counterparts. While it’s nice to be untethered, is the lack of wires really worth the much fatter price tag?
Batteries: With wireless keyboards, you have to worry about yet another problem: batteries. You can plug your USB-powered MIDI keyboard and start playing right away. But with a wireless keyboard, you have to worry about keeping the unit fully charged. And who has time to take care of yet another thing to charge every day?
Our most recommended mini wireless MIDI keyboard – the CME Xkey Air 25 – has a battery life of just 10 hours (around 7-8 hours in the real world). That’s barely three jamming sessions. Is being wire-free really worth the hassle of getting your keyboard charged every couple of days?
Of course, there are advantages: you don’t have to worry about cables. And connecting to mobile devices becomes much easier. But the pros outweigh the cons.
Our recommendation: Buy wireless MIDI keyboards only if you have the extra cash. And make sure that the keyboard allows for regular wired operation via USB when the batteries run out.
With that out of the way, let’s look at the best mini MIDI keyboards you can buy right now.
The keys are a little narrow, the pads not as responsive as they could be, and the build quality is a little suspect.
But despite all these flaws, Akai MPK Mini MK2 still ranks as our best mini MIDI keyboard and tops most bestseller charts.
The reason is simple: This Akai does nearly everything well enough. The keyboard is good enough to satisfy most people. There are enough control options for most musicians. And the size, price, and build quality is agreeable enough for anyone.
Which is to say, the individual parts might not be the best, but the overall package works really well together.
In terms of portability, the MPK Mini is perfectly sized. It is roughly the same size as a 13″ laptop and under 2″ thick, which makes carrying it around extremely easy. The weight is also under 1.6 lbs – less than a Macbook. You can throw your laptop and this keyboard into the same bag and not even notice the difference.
Besides the size, the other best feature is the number of control options you get. 8 pads, 8 knobs, and dedicated DAW controls make it easy to create complete tracks right from the controller without looking at your screen. Integrations are smooth as well, especially with Ableton and Logic (I didn’t get a chance to test it with FL Studio).
If there are any pet peeves, it’s the weird thumbstick that replaces traditional pitch/mod wheels. I understand that this was a space-saving compromise but it lacks the intuitiveness of conventional wheels.
Apart from these minor niggles, the Akai MPK Mini remains our top-most recommended mini MIDI keyboard. I recommend getting it in either black or the special edition red.
Recommended for: Anyone who needs an affordable, feature-rich and portable keyboard that can take some abuse. If you can’t decide on anything else from this list, go for the Akai Mini MPK. There’s a reason it’s often the default choice for most musicians – beginners and experts. It just works.
LCD information screen with 4-way directional keys
DAW controls
Everything the Akai MPK Mini does, the MPK225 does better. For instance:
You get semi-weighted keys instead of cheaper synth-action keys
You get MPC-style pads instead of the rubbery APC-style pads on the MPK Mini
The pads are RGB-illuminated
You get 4 assignable banks for pads, 3 for the knobs, greatly expanding your control options
The LCD screen packs in way more information and includes navigational keys
This is truly a “grown up” mini keyboard with all-premium components. Even the software is better, especially the accompanying MPC Essentials tool that gives you full MPC-like controls over the keyboard.
Where the MPK225 does falter is in its weight and size. At nearly 20″, the MPK225 can’t just be thrown into a backpack and carried anywhere (not that you’d want to treat a mid-$xxx device poorly). The 6.61 lbs weight is also similar to old school Alienware laptops. It’s not so large and heavy to make portability a challenge, but will certainly require some effort to carry around.
Apart from the portability concerns, there is little to complain about in the MPK225. Everything feels premium, from the aluminum chassis to the rubbery pitch/mod wheels. If you have the budget for it, this is a keyboard you’ll love to own.
Recommended for: With its size, weight and premium-components, the MPK225 is clearly meant for a certain kind of user: professionals. This isn’t a keyboard you want if you want to make casual music in the park or a friend’s place. Rather, it’s a heavy duty keyboard that’s perfect for live gigs and touring sessions.
Pros
Backlit MPC-style pads are a delight to use
Semi-weighted keys feel much better than synth-style keys
Solid build quality; will last you years, even decades
Cons
Expensive
Large size (20″ wide) and weight makes portability a challenge
If you want a keyboard that offers the bare minimum at the bare minimum price, you’ll want the midiplus AKM320.
Designed as a no-frills keyboard controller, the AKM320 offers nothing apart from a set of 32 keys. You don’t get any pads, knobs, buttons or sliders.
Instead, you get just 32 keys along with two pitch/mod wheels, and dedicated octave up/down and transpose up/down buttons.
Given the lack of control options, the AKM320 is extremely easy to use. Just plug it in via the included USB cable and your DAW will (most likely) recognize it instantly. There is nothing to configure or change; just tap the keys and start playing immediately.
The key quality is as you’d expect in a keyboard at this price range: shoddy. The plasticky white keys feel loose and jump up inconsistently. It’s not a good playing experience. However, it does get the job done: give you a physical interface to control your music.
More importantly, the midiplus AKM320 does all this at a price tag that’s ridiculously low. Unless you buy something straight off Alibaba, you won’t find a cheaper MIDI keyboard in the market.
The dimensions and weight fit the portability requirements as well. At under 1.6 lbs, you can carry this keyboard around anywhere. And while it is longer than most laptops at 18″ length, the narrow width – just 4.9″ – and low height (1.2″) make it easy to carry.
Recommended for: Beginners on a small budget who just need something to play melodies and chords, or serious musicians who need a secondary abuse-friendly keyboard. The tiny price tag means that you don’t have to think much about buying it.
As I said earlier, I’m not the biggest fan of wireless keyboards. There are still some unresolved latency and battery life issues. Considering the premium you pay for them in terms of price, these issues have to be addressed before I can recommend them wholeheartedly.
Having said that, if there is any wireless keyboard I can recommend, it’s the CME Xkey Air 25.
CME isn’t a big name in the MIDI keyboard category, but this manufacturer does make some of the best wireless MIDI keyboards on the market right now. The Xkey Air 25 is their smallest and most affordable keyboard.
There’s a lot to like about this unit:
You get 7-9 hours of battery life during actual use – good enough for 2-3 jamming sessions.
The latency is ~30ms on my system. Slower than a wired keyboard but good enough that you won’t notice it much.
Slim profile keys take up little desk space and look good
Low weight – the entire unit weighs under 1.5 lbs
Aftertouch keys are responsive and feel good to play
The low weight, small size, and wireless connectivity make this one of the most portable keyboards you can buy.
Of course, there are plenty of problems with this keyboard as well. There are no control options for starters – no pads, knobs, or buttons. You can only use it to play chords and melodies, nothing else. The price tag is also exorbitant, especially when compared to equivalent wired keyboards.
But with that said, there is certainly some joy in being untethered. A USB cable might not take up much space, but the freedom of being able to take the keyboard anywhere (well, within Bluetooth range) can make you think that the price tag is worth it.
Plus, Bluetooth connectivity makes it much easier to use the Xkey Air with a mobile device. If you like making music on your iPad with Garageband, you’ll love this keyboard.
Recommended for: People who make music on their mobile devices, or absolutely need wireless connectivity and have the budget for it. The rest of you will be served better by a traditional wired keyboard.
Pros
Low enough latency to not be noticeable on a good system
Decent battery life
Slim profile and good quality keys with aftertouch
Cons
Pricey; you can get much better wired keyboards for the same price
Latency can be a problem on mid to low-end systems
When it comes to portability, you can’t go wrong with the bestseller in the category: the Akai LPK25.
The LPK25 doesn’t boast a lot in terms of features. Even its keyboard isn’t perfect.
But it does have a tiny size and incredibly low weight, plus a price tag that’s hard to resist.
Let’s back up a second though. The LPK25 has 25 velocity-sensitive keys. They won’t give a Yamaha piano a run for their money but they’re useful enough for their primary function: entering MIDI notes and playing chords.
As a caveat, the velocity sensitivity can be inconsistent at times. You might find that pressing the note doesn’t always yield the response you expected. This makes using the LPK25 in life performances an issue.
Moving on, you don’t get much in the way of controls save dedicated arpeggio and sustain buttons. There are no pads, knobs, or programmable buttons. Crucially, you don’t get dedicated pitch/mod wheels.
While I would have preferred some control options, I know that it would have also affected the portability. Which, after all, is this keyboard’s primary selling point.
With a length under 14″, 3.8″ width and just 1.1″ height, this keyboard is among the tiniest you can buy. It’s barely larger than my 13″ Macbook and fits easily into any backpack.
Add in the ridiculously low-weight – just 650 grams – and you can see why it ranks as my top pick for portability.
Integration is quite seamless as well, mostly because there are no control options to worry about. Plug it into your USB port and you can start using it immediately with most DAWs, no installation necessary.
For what it claims to do – effortless portability – the LPK25 definitely ranks as one of the best options on the market.
Recommended for: Beginners on a budget or serious musicians looking for an ultra-portable keyboard at throwaway prices. This keyboard can take a beating and still carry on. Buy it if you want to prioritize portability and price over everything else.
Pros
Easy to use plug-and-play performance with most DAWs
Affordable and highly portable
Very low weight – under 650 grams
Cons
Inconsistent key performance
No features; slightly overpriced for what it offers
Roland makes some of the best pianos and synthesizers in the world. So it should come as no surprise to see the Roland brand name as our best keyboard pick as well.
The A-300-Pro-R is the smaller sibling of the popular A-500 (49-key keyboard). It packs in 32 keys, i.e. 2.5 octaves of range. Portability isn’t this keyboard’s strong suit; the unit weighs in at nearly 9 lbs and is 27″ long on its longest side. You won’t be able to drop it into your backpack and carry it to a gig.
The star of the show is the keyboard. Although the keys have synth-action (as opposed to the semi-weighted keys on the MPK225), they have Aftertouch. For the uninitiated, Aftertouch is responsible for the soft dulling of sound after you lift your fingers off the key. This creates a far more natural sound, plus improves the action greatly to give you an authentic piano feel.
This video should help you understand it better:
As great as the keyboard is, there are plenty of control options as well. You get:
8 velocity-sensitive dynamic pads
9 knobs
8 + 1 sliders
8 programmable buttons
Plus, you get complete DAW controls right on the keyboard itself. Combined with the built-in LCD screen and navigational joystick, it means that you can divorce your laptop screen and make music entirely from the keyboard.
There are some caveats, of course. The pads are small and don’t have the responsiveness of Akai’s MPC-style pads. The horizontally mounted pitch wheel is a bit more cumbersome than the traditional vertical pitch/mod wheels. The heavy weight and large size also make it one of the largest “mini” keyboards on the market.
Further, Roland’s integrations remain iffy at best, especially with the more popular modern DAWs like Ableton and FL Studio. And the price makes it difficult to buy for all but the most serious of musicians.
That said, as far as keyboard quality goes, the Roland A-300-Pro is one of the best mini MIDI keyboards you can buy right now.
Recommended for: Serious musicians looking for a premium keyboard that mimics the piano playing experience. If you don’t know how to play the piano, this keyboard will simply be overkill for you.
Pros
Superb keyboard, especially with Aftertouch enabled
To call the Roli Seaboard Block a “keyboard” would be to severely undersell it; it’s far more than that – a powerful, innovative wireless music production center that will transform how you make music.
At the heart of the Roli Seaboard experience is Roli’s “5D Touch” technology. Instead of the conventional black and white piano keys, the Seaboard uses an innovative squishy, rubbery skin. It’s difficult to describe it in words; you’ll get a much better idea if you see it in action:
This 5D, squishy touch enables so many music making possibilities:
Bending notes becomes far easier. You don’t have to wiggle around the pitch/mod wheels; just drag your finger from one note to the next
You can get authentic sounding vibrato simply by wiggling your finger on a note
Slide effects are far more natural – press a note, then drag your finger to the bottom and slide it to another note
The entire experience is particularly delightful for playing guitar, strings and wind instruments. If you’ve ever struggled to get authentic guitar sounds with your keyboard, you’ll love what the Seaboard brings to the table.
The squishy nature of this “keyboard” also makes it easy to use as drum pad.
Besides the innovative 5D touch, the Seaboard Block is also wireless and has a tiny size – it’s just 11″ long at its widest. You can connect it to your phone and get access to 100+ sounds over Bluetooth. This puts a complete music production center at your fingertips without worrying about DAWs and synths and integrations.
It’s hard to evaluate the Roli Seaboard Block. It is just so different than everything else on this list that you can’t really compare it to anything else.
What I can tell you is that the Seaboard Block – and Roli’s other instruments – are some of the most groundbreaking products on the market. Quietly and slowly, they’re changing the way we make music.
Recommended for: Anyone looking for an innovative, powerful, and highly intuitive playing experience. The Seaboard is particularly good for playing guitar and string sounds. The companion app and wireless connectivity also makes it one of the most portable keyboards on this list. If you have the money, don’t even think twice – buy it!
Pros
Tiny size – just 11″ x 5.5″ x 1″
Wireless connectivity and companion app turn it into a wireless production system
With that, we come to a close in this extended guide to buying the best mini MIDI keyboard. We covered everything from the features you should look for in the keyboard of your choice to the process for evaluating your own needs.
Just to recap, here is our list of the best mini MIDI keyboards, sorted by category:


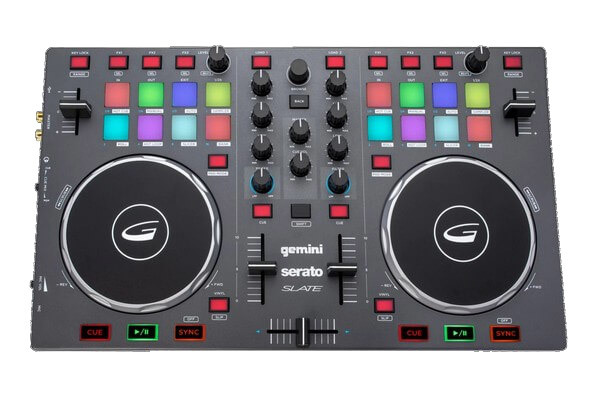


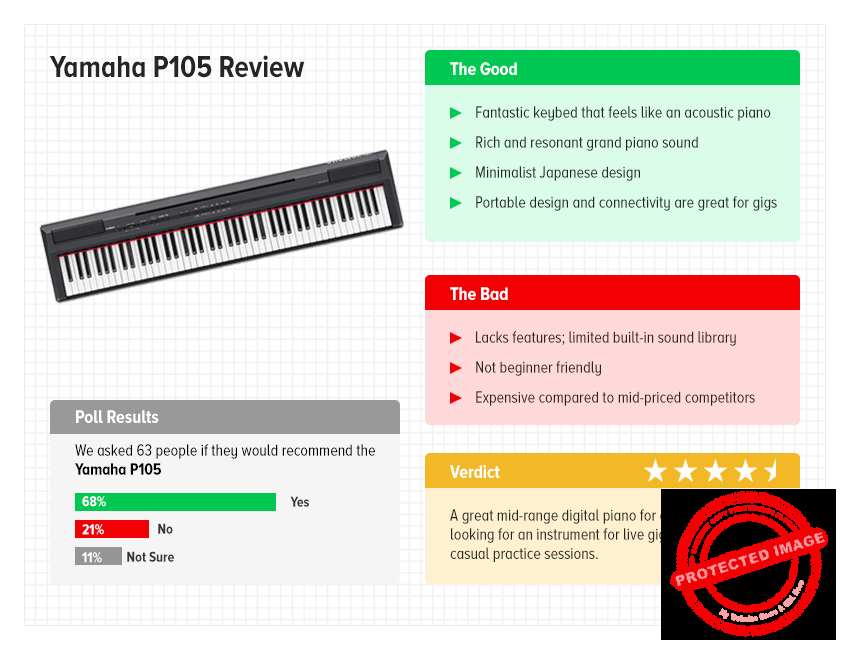


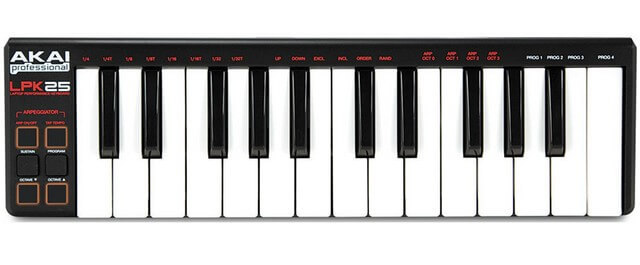


