Midi Nation is supported by our great readers. We might get a commission if you buy gear through a link on this page [at no additional cost to you].
Few things are as essential for any music producer as a pair of quality monitors. The problem? Good monitors cost an arm and at least a leg. Which is why we put together this guide to the best studio monitors under $200 you can buy right now.
Studio monitors…for under $200?
This isn’t just fantasy. Prices for studio monitors have come down sharply in the last few years, so much so that you can buy a pair (yes, a pair) of studio monitors for not just under $200, but even under $100.
And these aren’t just bookshelf speakers masquerading as studio monitors either. Plenty of the top models boast nearly flat frequency response and enough ‘comfort’ to be your studio workhorse for years.
But buying studio monitors is always tricky. Like a good pair of shoes, so much of the buying experience is subjective. Some monitors will just “click” for you (and your room).
I’ll help you out by sharing a detailed buying guide for studio monitors. You’ll learn what to look for, what kind of tracks to use for testing, and even how to treat your room.
Before we can get to that, here’s a quick overview of my picks for the best studio monitors under $200 right now:
Keep in mind that for under $200, I’m only looking at pairs of studio monitors, not single speakers. You can get a lot of quality single monitors for $200, but for pairs, your options are more limited.
In the sections to follow, I’ll share my insights on buying studio monitors. Unless you are an experienced musician, I urge you to read it thoroughly. It will help you understand how and why I picked my top options.
At a glance, these are the best studio monitors under $200 right now:
- Best overall: PreSonus Eris 4.5
- Best for beginners: PreSonus Eris 3.5
- Best for DJs: Pioneer DJ DM-40
- Best for mixed-use: Mackie CR3
To quickly jump to the right section, use the navigation below:

About your reviewer
Ryan Harrell is the founder of MIDINation and an experienced producer/DJ. His first experience with electronic music production dates back to Cubase 3.0 in the summer of 1997, and he’s been a fan ever since. He prefers Ableton as his primary DAW these days, though he is still partial to Cubase and Pro Tools. He lives in San Diego and freelances as a producer and part-time DJ.
Contents
The 7 Best Studio Monitors Under $200
What are the best studio monitors you can buy for less than $200?
This is no objective answer to this question, of course. Music is inherently subjective. What sounds good to one ear will be grating to another.
Environmental factors also make a huge difference in monitor performance. A cheap monitor in an acoustically treated room will deliver better results than an expensive one in an echo-filled room.
Which is to say: there is no “best” studio monitor. There are “good” and “better” monitors. The “best” one is simply a “better” monitor that sounds good in your studio.
For “good” and “better” studio monitors under $200, check out my roundup below:
Best Overall

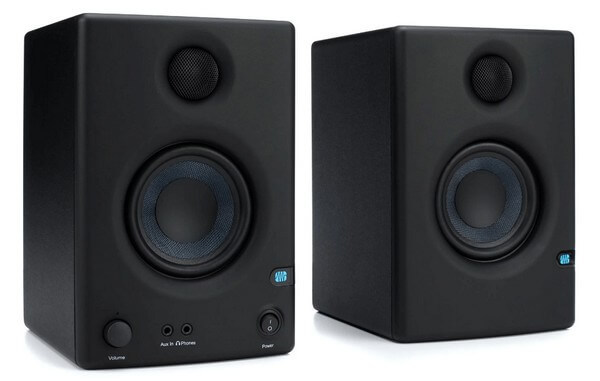
PreSonus Eris E4.5
4″-5″ is usually the ideal monitor size (more on this below) for most bedroom producers. The PreSonus Eris 4.5″ sits snugly in between. And just like its size, its price and performance are right in the middle: good enough in every aspect. While it doesn’t have the punch and clarity of a $500 Yamaha monitor, it is clear and loud enough for most musicians. More importantly, it is priced perfectly, which is why I’ve ranked it as the best studio monitors under $200.
The PreSonus Eris 4.5 were the first “grown-up” studio monitors I ever bought. I might be a bit biased, but the extensive time I’ve spent with these speakers has convinced me that these are among the best studio monitors under $200 right now, especially for value customers.
In terms of design, these aren’t anything to write about. The gray speaker cone set against the black enclosure don’t exactly scream “look at me”. The only hint of color is the blue PreSonus logo. If looks are a criteria (I don’t think they should be), pick Audioengine A2+ (see below).
The left speaker is the master, the right one is slave. You get an aux and headphone port up front. The back is nearly the same as its younger sibling, the Eris 3.5 but for one big difference: you get acoustic space controls. That is, you can cut off lower frequencies by -4 to 0db to fit your setup. If you’re working in a smaller space (true for most beginners), this can help reduce unnecessary bass echoes.
The audio profile is mostly the same as Eris 3.5 but louder and fuller. The 4.5″ drivers do a good job of filling up a decent-sized room. The bass is thicker than the 3.5 monitors, and the highs are clearer. The mid performance is adequate, if not spectacular. Overall frequency response is flat save a small dip in low-mids.
Recommended for: For the price, PreSonus Eris 4.5 are some of the best studio monitors money can buy. They are affordable, accurate, and work well with nearly every genre of music. Additional features such as acoustic space control and manual tuning make it ideal for any beginner buying his first pair of “serious” monitors.
Pros
- Feature packed: acoustic tuning, acoustic space settings
- Great overall performance; accurate
- Value for money
Cons
- Eris 5″ is priced only slightly higher but boasts better performance
Alternative: Alesis M1 Active MK3

Don’t like the PreSonus Eris 4.5 for some reason? Need something with 5″ drivers? Then look no further than the Alesis M1 Active MK3.
Alesis is a strong brand name in monitors, particularly for their combination of quality and affordability. The MK3 lives up to that reputation. There are few 5″ monitors in this price range, let alone one from a brand like Alesis.
In terms of sound, the Alesis MK3 tilts slightly to the higher side. Frequencies up from low-mid to mid-highs are clear and bright. You might detect some shrillness on extremely high notes, especially on tracks with sharp snares.
The low-end is tight, but the bass does sound fuller and rounder than it should. You can chalk this one up to Alesis tinkering with the stereo imaging to replicate a ported monitor (which this one is not). You will want to undercut the low-end slightly to make up for this effect.
Another plus point is the design. These look much better than the PreSonus, especially when the Alesis logo in the front glows blue.
A big negative is the lack of ports. You get just one XLR port. No TRS, no RCA. I know XLR is better than RCA and TRS for quality purposes, but plenty of people don’t have an audio interface that can accommodate it – or at least accommodate a spare one.
Another negative is the lack of acoustic tuning/spacing features like the Eris 4.5. Alesis says it has a “precision-designed waveguide” built-in to help with stereo imaging, but that’s not a replacement for manual tuning controls.
Nevertheless, for its price, the Alesis MK3 remains one of the better deals on the market right now.
Recommended for: Pick the Alesis M1 Active MK3 if you want 5″ speakers under $200. The audio performance is rock solid, but the lack of ports and tuning features make it a second choice to PreSonus Eris 4.5
Pros
- Impressive performance in mids and trebles
- Value for money; few 5″ monitors in this range
- Good design and build quality
Cons
- Limited ports
- No acoustic spacing and tuning features
Best for Beginners: PreSonus Eris E3.5-3.5″
It’s incredible how much ‘juice’ PreSonus was able to extract from what amounts to an absurdly affordable pair of monitors. Sure, they’re tiny and don’t have the power to fill even a small room. But when you look at the price : performance ratio, this is clearly one of the best offerings on the market.
For starters, these are true studio monitors. They aren’t “bookshelf speakers” offering “studio-like” performance. Rather, they use the same internals as PreSonus’ more popular 4.5″ and 5″ offerings. The only difference is that these are smaller at 3.5″.
This means that you can actually use the PreSonus Eris 3.5″ to produce music – something that can’t be said for a lot of sub $100 offerings.
Each of the two monitors are rated at 25W. The monitors are uni-amped which does lead to some signal muddiness. They use 3.5″ kevlar drivers, though as a beginner, the driver material should be immaterial to you. The monitors are powered and you get two TRS and RCA ports. There is no XLR port unfortunately.
Sound quality isn’t loud but it is fairly accurate – at least enough for beginners starting to make music. The frequency response is flat, especially in the mids and highs. The low end suffers some muddiness owing to the driver size.
Another “first-ever” feature in this range is acoustic tuning. You can manually increase/decrease the highs and lows by +/-6Db to match your room’s acoustic conditions.
If you’re in a large room, I encourage you to upgrade to a larger monitor. But for most small rooms under 60-70sqft, these monitors would make a great first buy.
Recommended for: The Eris 3.5″ is an affordable, entry-level monitor that works well enough to give amateur musicians a taste of music production. Get these if you’re new to music production and want something that “just works” without burning a hole in your pocket.
Pros
- Beginner-friendly price with studio-level performance
- Acoustic tuning
- Flat frequency response, esp. in mid, high ranges
Cons
- Muddy lows
- Under-powered for larger rooms
Alternative: Edifier R1280DB

At 4", the drivers are only slightly larger than the Eris 3.5". The wattage is slightly lower at 21W for each speaker. The frequency response is wider than the Eris 3.5", going all the way down to 55Hz. The speakers also look great compared to other offerings on the market.
You don't get a TRS input. Rather, you get coaxial, optical, and RCA ports. There is no XLR input either.
The lack of XLR and TRS ports should be your first indicator that these are designed to be used for casual listening, not music production. This impacts the sound quality as well. Though the performance is fairly flat, it has a tendency to shimmer at higher frequencies.
Bass response is disappointingly flat, especially in the sub-bass bass. The bookshelf design also creates a low echo in the bass range.
On the plus side, you get Bluetooth connectivity. I can't imagine any serious musician relying on wireless to produce music, but if you're in the target market - serious listener, casual musician - Bluetooth + remote is a great feature.
Recommended for: On the whole, I would recommend it to people who only plan to make music casually. For any sort of accuracy and studio-like peformance, look elsewhere.
Pros
- Comes with Bluetooth and wireless remote control
- Great design
- Reasonably accurate performance
Cons
- Poor bass performance; some echoes in sub range
- Limited ports
Best for DJs: Pioneer DJ DM-40

Pioneer's position as, well, a pioneer in the DJ controllers market means that it has a captive audience of first-time producers. It makes perfect sense for it to offer an affordable entry-level monitor set to complement its DJ equipment.
What you get is a compact (but not tiny) set of monitors that surprise with their heft and clarity. The speakers are made of wood - a rarity in the plastic-filled low end of the market.
Unlike most of the other speakers on this list, Pioneer DJ DM-40 are front ported. This allows the air to move around and create a thicker bass. Refer to the section above to learn more about ported vs unported speakers.
For a pair, you get a master and a slave speaker. The master speaker (on the left) has all the ports and controls. The right speaker acts as the slave. The ports are limited; you get RCA and aux, but there is no 1/4" TRS or XLR. The power input is located on the master speaker as well.
The performance is decidedly bass-heavy. The front ports create a fuller sound that often drowns out low-mid frequencies. This isn't ideal for mixing music with a lot of nuance, but if you're primarily producing bass-heavy tracks, or working as a DJ, you'll enjoy the bass-heavy nature.
Recommended for: Overall, I would recommend the Pioneer DJ DM-40 for DJs and producers focused on bass-heavy music. For anyone looking for more nuance and clarity in the mid and high ranges, there are better options on the market.
Pros
- Strong bass-heavy performance
- Good build-quality
Cons
- Strong, bass-heavy performance
- Limited ports
Best for Mixed-Use: Mackie CR Series CR3

"Mixed use" means speakers that you can use both for monitoring and for casual listening.
Essentially, this means that these speakers have all the features you'd expect from traditional monitors - TRS + RCA ports, "flat" frequency response in theory, etc. But in practice, they are a little top-heavy with an unbalanced output that sounds great, but isn't ideal for mixing.
Mackie's CR3 fits this description perfectly. The company calls these "multimedia monitors", not "studio monitors", hinting at their mixed-use heritage. These speakers are tiny and light-weight with 3" drivers. Total power is 50 watts distributed across both speakers.
The right speaker is powered and the left one is passive. Volume controls and aux/headphone ports are on the right.
The tiny driver size means that these speakers struggle to perform in large rooms. I recommend going for Mackie's 4" and 5" monitors in the same range for rooms > 60sqft.
The small size also impacts bass performance. Low and low-mid bass performance suffers especially, while the top end of the treble is muted. The mids perform admirably, however, even though it is hardly balanced. These speakers DO sound good, especially on most pop tracks.
Recommended for: Bottomline, the Mackie CR3 is a good choice if you plan to mostly use them for listening to music, and only casually for mixing. I wouldn’t recommend these as your primary mixing device, but they work great for gaming, watching movies, etc.
Pros
- Affordable
- Decent mids and low-high performance
Cons
- Poor bass and unbalanced treble
- Too small for most rooms
Alternative: Klipsch R-15M

The Klipsch R15m is one of the best all-around speakers you can buy in this price range. It is loud, clear, and almost neutral in performance. The Klipsch brand is widely respected and these speakers even look good in any room.
I would place them near the top of my list if it wasn't for one reason:
They're not studio monitors.
Klipsch R15m are "reference" bookshelf speakers. That is, they are meant to be used as conventional bookshelf speakers, but they have a neutral response and thus, yield a "reference" grade output.
In practice, this means the sound you get from them is accurate and clear and without any built-in equalization. This works wonderfully well for movies, gaming, and listening to music.
But they're not studio monitors, and that impacts their performance in studio settings. "Studio-like" still means that some equalization artefacts creep in. You would love to use them for casual listening, but mixing requires as flat a frequency response as possible.
Having said that, there are some things that stand out about the Klipsch R15m:
- These are LOUD. In comparison to my Polk satellite speakers, the Klipsh R15m sounds significantly louder at the same volume.
- Better trebles: Unlike Klipsch Icon KB-15 speakers, the trebles in the R15m don't have that characteristic Klipsch brightness. This makes them more suitable for mixed use.
- Mids performance is admirable. The frequency response is nearly flat in the upper bass to high mids range (100-4khz range).
On the downside, they don't perform quite as well in the bass range. There is a slight dip in sub-bass frequencies and jump in mid-bass.
On the whole, the Klipsch R15m is a great speaker by itself. It's just not the perfect replacement for a full-fledged studio monitor.
Recommended for: Buy the Klipsch R15m if you want speakers for conventional use that can be sometimes used for mixing. If your usage pattern is 80% casual use, 20% production, they’ll do more than fine. As it is, you can’t get a Klipsch-quality speakers for this price.
Pros
- Strong mid performance, clear sound
- Great value; work great as multimedia speakers
Cons
- Not studio monitors; some equalization artefacts
- Poor bass performance
A Beginner’s Guide to Buying Studio Monitors
If you're looking at the best studio monitors under $200, it is fair to assume that this is your first pair of monitors.
In that case, it is also fair to assume that you are (relatively) new to music production.
Keeping this in mind, you have to first understand the role studio monitors play in music. It's not unusual for people to read this guide and realize that they don't need monitors in the first place - at least not initially.
Here's what we'll cover in this brief guide:
- Studio monitor brands, prices and workflows
- Frequency ranges, accuracy, and other technical specifications
- Monitor types, sizes, and configurations
- Studio setups and acoustic treatment
Understand Studio Monitors and Their Role in Music Production
Here's a picture of Kygo in his recording studio from his Instagram (@kygomusic):

Did you notice the two sets of speakers next to his computer monitor?
Those are Kygo's studio monitors.
Kygo uses two sets of studio monitors for a reason. He wants to test how something will sound on different speakers. If it sounds good on multiple monitors, chances are, it will sound good on everything from your $10 earphones to a $10,000 Bang and Olfusen system.
This is precisely the role studio monitors play in music production. They aren't meant to sound good. Rather, they're meant to perform two functions:
- Give you an accurate idea of what something sounds like
- Make it possible to listen to a sound on-repeat comfortably
Music production is so much about repetition. You will listen to the same loop on repeat for hours to fine tune it. You'll browse through hundreds of kick samples to find the right one for a track. You'll spend hours in Serum tweaking a synth to sound exactly like it's in your head.
A studio monitor that isn't comfortable and accurate will make all this difficult. If the bass is too muddy, it will be a pain to sit through the 120th loop of the bass track. If the highs are too sharp, you'll abandon tweaking your trebles after a while.
If you're testing out a pair of monitors, play tracks you know intimately. See what new sounds and frequencies you can hear. Compare how the same song performs on different monitors.
As a friend once said, "studio monitors are like a pair of shoes. If they're not comfortable, they're useless".
Keep this in mind when you look for the best studio monitors under $200.
Monitors, Mixing, and Workflows
Every producer has his own workflow. It all depends on your preferences, equipment, and even current living situation.
In my case, I live with my wife. Although I have a separate studio, I don't want to force my wife (and neighbors) to listen to 2 hour loops of the same bass line.
So in my workflow, I use my Audio Technica ATH-M50x headphones to listen to samples and arrange the track. Once I've finalized a sample, I turn on my studio monitors to make sure that it sounds okay. I find that listening to samples through headphones brings me "closer" to the sound.
But when the time comes to mix the track, I turn to my studio monitors.
Mixing requires a sense of space. If you mix with your studio headphones, you'll be too close to the sound. You won't get any idea of what the final mix will sound like when it is spread apart.
Studio monitors fill this important role. They give you a much needed sense of space. You get an idea of what the track sounds like when it fills the room. You'll often find that a mix that sounds good on headphones will be muddy and inaccurate on studio monitors.
Further, headphones separate the left and right channels completely. You don't get a clear idea of what sits in the center of the mix - when two sounds merge together. For this, you need studio monitors.
Also read: Our guide on buying the best DJ mixer to complete your studio.
Since space is such an important question in using studio monitors, it begs the question:
Should You Use Studio Monitors in an Untreated Room?
An "untreated" room is essentially a room without any acoustic dampening or soundproofing.
Some experts say that you should never use studio monitors in an untreated room. Their argument is that the lack of treatment makes the sound frequencies bounce off the walls, giving you an even less accurate idea of the final sound. They say that you're better off just using your headphones in this case.
I tend to disagree. While acoustic treatment is great to have (and you should get it as soon as you can afford to), studio monitors still give you a better sense of space than just using the headphones.
In my experience, any mix that I've made in an untreated room with studio monitors sounds 10x better than anything I've made using just headphones.
So don't let the lack of acoustic treatment discourage you. Studio monitors are worth the investment.
How should you place your studio monitors?
Placing your studio monitors is more complicated than you think. You can't just plop them on your desk, at least not if you care about accuracy.
There are two crucial tips you should know when deciding your studio monitor placement:
1. Place monitors at ear level
Place your monitors at a slight angle such that they form an equilateral triangle with your head.

Your monitors should also be at ear level. Lower or higher and you risk missing some frequencies.
Ideally, you should place your monitors on stands. This will prevent sound from bouncing off the desk and creating a slight echo.
2. Keep monitors away from walls
Keep a distance of at least a foot between walls and the back of the monitors. Closer than this and low frequencies will bounce off the wall, creating a slight echo.

You can try adding some sound absorption behind the monitors to reduce echo, but you risk losing some bass frequencies as well.
Whatever you do, never place monitors at corners. This will create all sorts of echoes. If possible, add a bass dampener in the corner instead.
What should be your monitor size?
One of the first things you'll notice when searching for monitors is the size that's usually mentioned next to the name:

This is actually the size of the cone, and it affects the sound production a great deal.
How large the monitor's cone is will affect how well it fits the room. Monitors need to fit the room they're going to be used in. A larger cone isn't necessarily better. In fact, if the monitor is too large, it will create unnecessary resonances.
Studio monitors are typically available in sizes ranging from 3.5" to 8". The most common sizes are 5" to 6" which are a good fit for a standard 8' x 10' room (also, did you know that square rooms are bad for acoustics?).
At the lowest end of the spectrum, you'll see 3.5" monitors. I don't recommend them since they're too small to accurately render lower frequencies. Unless you're producing in your wardrobe, look for at least a 4.5" monitor.
Here's my take on monitor sizes:
- 3-3.5": Only buy them for very small rooms under 30sq ft.
- 4-4.5": These work for most smaller roomers (typically under 40-50 sq ft)
- 5"-6": Pick this size for any standard room.
- 7"-8": Choose this size for larger rooms (>80 sq ft)
The larger the monitor size, the higher the price. For best results, stick to the 4.5-6" range.
How much wattage should you get?
Understanding wattage is tricky business. There is a perception that "bigger wattage = better" but that isn't necessarily true.
What a speaker's watts rating essentially equates to is "headroom". When you have more watts, you have more "space" to accommodate transient frequencies.
Think of it this way: a track covers a range of frequencies and sounds. Some instruments will play at a consistent frequency throughout (such a rhythm guitar). Others will have a sharp impact (i.e. a transient) at regular intervals - such as a kick drum (low frequencies) or snare drum (high frequencies).
To render these sudden, sharp frequencies, a speaker requires substantially more power. If the rest of the track runs at 10 watts, a kick drum might require 100 watts.
Speakers that don't have sufficient wattage can't render these transients effectively. The sharp peaks run out headroom and are clipped, or merged with the rest of the frequencies. This can cause you to miss frequencies or lead to a muddy mix.
Higher wattage also means that you have more room for precise control. Low watt monitors might give you a +10db increase in volume for 1 point increase in gain. But higher watt monitors might increase volume by just +2db. This helps you fine-tune the mix.
On the downside, too much power when paired with the wrong hardware can sound spacey. Your amplifier needs to have the same power rating as your speakers. Else you're just wasting money on extra power that you can't utilize.
To sum it up: Higher wattage is better, but only when the rest of your equipment can handle it. Else, a lower watt monitor is fine - and cheaper.
Should you get active or passive monitors?
Studio monitors can be broadly divided into two categories: active and passive.
Active studio monitors
Active studio monitors have built in power and amplifier (though you should still plug in your own amp/audio interface). They are also called “powered” speakers.
Most monitors of the best studio monitors under $200 are active. Since they have built-in power, you can simply plug them in and start playing. You don’t have to worry about matching the speakers to the right amp.

I recommend most beginners to get active studio monitors. It will save you money and requires less technical know-how to use.
Passive studio monitors
Passive studio monitors require external power. The studios, by themselves, can’t produce any sound unless plugged into an amplifier.
For a passive monitor to work, it has to be paired to an amplifier with a compatible power rating. This requires some technical knowledge. This is why you’ll rarely find passive monitors in the budget range. Plus, you have to shell out extra for the amp, increasing costs.

I recommend most beginners to stay away from passive studio monitors.
Should you buy ported or closed studio monitors?
Another frequent question that crops up when buying the best studio monitors under $200 is: ported vs closed studio monitors.
- Ported monitors have a small vent or "port" cut into the speaker cabinet. This allows sound to escape the cabinet, creating a resonance that allows the speakers to "breathe". The resonance frequency depends on the size and shape of the port, and it is usually rated lower than the bass range of the speakers. This can create a stronger, thicker bass sound.
- Unported or sealed monitors are, as you expect, completely sealed. There is no hole or duct to allow air to enter/escape the speaker cabinet. This removes unnecessary resonances and produces a thinner, but more accurate sound.
Ported studio monitors are rare and not really recommended, unless you plan on doing some extremely bass-heavy work (usually when producing for movies). Although they technically perform better in the lower frequencies, most home studios are simply not designed to handle this bass sound. You end up creating unnecessary resonances that lead to inaccuracy.
Plus, ported monitors are more expensive.
For 99.9% of beginners, I would recommend buying unported or sealed monitors.
Should you buy a subwoofer?

My answer to 99% of people who ask this question is the same: nope.
Subwoofers are meant to augment low frequencies, typically in the 20-200Hz range. A subwoofer can thicken bass sounds and give you a greater sense of bass "presence".
You need subwoofers if you're producing music for a medium that can actually render these bass frequencies clearly. Mostly, this is in the case of movies. Home theater systems and movie halls have the equipment necessary to produce low bass frequencies, so it might be worthwhile to invest in a subwoofer.
But most of you reading this aren't producing tracks for movies. Your audience is going to listen to your tracks through cheap earphones and Bluetooth speakers. No matter how well you mix your track in the subwoofer range, they aren't going to hear much of it.
Besides being practically unnecessary, there is also the fact that most home studios are just not designed to use subwoofers effectively. Bass frequencies need "space" to flow and develop. A tiny bedroom studio with inadequate acoustic treatment is just going to let the bass frequencies bounce around, creating undesirable resonances.
So here's my take: don't spend money on a subwoofer unless you're producing for a movie. Instead, take that extra cash and buy the best studio monitors under $200 that you can afford.
What other features should you look for?
As far as musical equipment goes, studio monitors are remarkably "feature shy". You won't see manufacturers boast about their new, incredible "3d space scanning" technology or other marketing mumbo-jumbo that plagues the industry.
It helps that the market is mostly dominated by a handful of major brands (Yamaha, KRK, Alesis, etc.), and that they all tend to compete on precision and build quality. Features, if any, are mostly wasted since any educated buyer will pick studio monitors for their accuracy, not their marketing.
With that said, you might see some features advertised on manufacturers' websites. Here's how to evaluate them when considering the best studio monitors under $200:
Acoustic space controls: Some studio monitors will have toggle buttons to cut off frequencies below a certain threshold by a certain amount.
For example, the PreSonus Eris 5 monitors let you choose a cutoff frequency, and the amount of the cutoff (-4db, -2db, 0db):

You'll use this feature if your studio space isn't large enough to accommodate the monitors. As I said earlier, bass frequencies need room to develop. If the space is too small, you will find that bass frequencies sound too loud on the monitors, but feel thin or absent on normal speakers.
You can control this by cutting off low-end frequencies by a fixed amount.
This is a good feature to have, though it isn't necessary.
Acoustic tuning: Plenty of studio monitors will have basic acoustic tuning features to reduce/increase the high and low-end.

Think of it as rudimentary equalization. You can use them in case your room has poor acoustics and the high/low end is too weak or strong. If the mix sounds too tinny, you can reduce the highs, for instance. If the low end is too thick, you can reduce its volume.
Ideally, you'll want to keep acoustic tuning controls in the neutral position. The more you need to tinker with these controls, the less accurate the sound.
Digital signal processing (DSP): DSP is a relatively recent feature that is meant to compensate for poor room acoustics. This feature digitally processes the signal to create a flatter frequency response, keeping in the room's acoustics in mind.
That's at least the way it is supposed to work on paper. But personal experience shows that DSP is mostly just marketing hype. You want to avoid it for two reasons:
- DSP can require slightly additional processing power, which can reduce latency.
- Every room's acoustics are unique and it is next to impossible to create a "perfect" equalization for it out of the box
If your room's acoustics are so bad that you need DSP, I recommend forking up some extra cash for basic acoustic treatment. You'll be surprised what a couple of foam panels and bass traps can do to improve a room's sound.
A brief note about studio monitor connections
Before we leave, I wanted to make sure you understand all the ports you'll usually find on the back of any studio monitors.
Below, you'll see the back of the PreSonus Eris 5 studio monitors. The Eris 5, like most studio monitors, has 3 input pots. Two of these are unbalanced - RCA and TRS. One is balanced - an XLR port.

Balanced connections have three wires - two signal wires and a ground wire. The signal wires have the opposite polarity which is reversed by the receiving unit (in this case, the monitors). This reduces noise, especially in long cable runs. XLR connections - used in microphones - are an example.
Unbalanced connections have only two wires - a ground wire and a signal wire. This increases the noise but it isn't a big factor since cable runs for unbalanced connections are usually short. RCA and TRS cables (used to connect electric guitars) are examples of unbalanced connections.
The best studio monitors under $200 that you buy should have a minimum of these three input ports - RCA, TRS, and XLR.
To sum it up
If you're read through this mini guide, you can conclude a few things:
- Active monitors are better than passive ones, at least for beginners
- Choose sealed monitors over ported ones
- Get as many watts as you can afford - provided your room can handle it and you don't sacrifice on the accuracy
- Avoid any complex features such as DSP. Stick to basic ones like acoustic tuning
- 95% of you don't need subwoofers
Lastly, never mix on consumer speakers. They're simply not designed to be flat and will give you wildly inaccurate results.
Over to You
That wraps up this detailed guide to buying the best studio monitors under $200.
For more recommendations and advice, don't hesitate to reach out to me here.
Also read:
- Need help picking a pair of studio headphones to accompany your monitors? Here's our guide to studio headphones
- You can't plug in your studio monitors directly to your computer; you also need a good audio interface. Here's our buying guide
References:
- August 2, 2018: Article first published with 6 reviewed studio monitors
- October 7, 2018: Additional studio monitor added targeted towards DJs
- November 3, 2019: Minor changes to guide structure